DIY: Protect your Girl Scout cookies with a Raspberry Pi

Robotics
Could anything be worse than someone pilfering your favorite box of Girl Scout cookies? My friends at Initial State, an IoT software company, know the answer: Yeah, probably, but it's still pretty darn annoying.
That's why Initial State's engineers jumped at the chance to bring our cookie-loving readers a unique Raspberry Pi 2-based build tutorial designed to protect your cookies. What follows are instructions to build your own layered security system around your cookie stash using a Raspberry Pi, a couple of sensors, and a cloud service. You will receive an SMS alert the instant anyone comes near or--God forbid--touches your cookies.
Frivolous? Perhaps. Awesome? You bet. Thanks to Initial State for authoring such a great tutorial for ZDNet, and to Dexter Industries for connecting us. This build uses Dexter's GrovePi board. If you're interested, you can buy the GrovePi starter kit, which includes Initial State, software here. And stay tuned for more IoT and robotics tutorials in the weeks ahead.
Without further ado, let's keep those cookies in the cupboard ...
Project level: Beginner
Approximate time to complete: 20-30 minutes
Importance of completion: Is there even a question here?
In this step-by-step tutorial, you will:
- learn how to use a GrovePi (http://www.dexterindustries.com/grovepi/) to quickly connect sensors that can be read by a simple Python script on a Raspberry Pi (http://www.raspberrypi.org)
- learn how to send sensor data in real-time to Initial State (https://www.initialstate.com), an Internet of Things data analytics and visualization platform.
- learn how to configure instant SMS and email notifications on sensor readings.
Part I: Equipment
- Raspberry Pi 2 + SD Card + Power Supply + WiFi Dongle (http://www.amazon.com/CanaKit-Raspberry-Complete-Starter-9-Items/dp/B008XVAVAW/)
- You can save quite a bit of money on this setup by going with a Pi Zero instead of a Raspberry Pi 2.
- GrovePi+ (http://www.dexterindustries.com/shop/grovepi-board/)
- The Grove PIR Motion Sensor (http://www.dexterindustries.com/shop/grove-pir-motion-sensor/)
- The Grove Ultrasonic Range Finder Sensor (http://www.dexterindustries.com/shop/ultrasonic-sensor/)
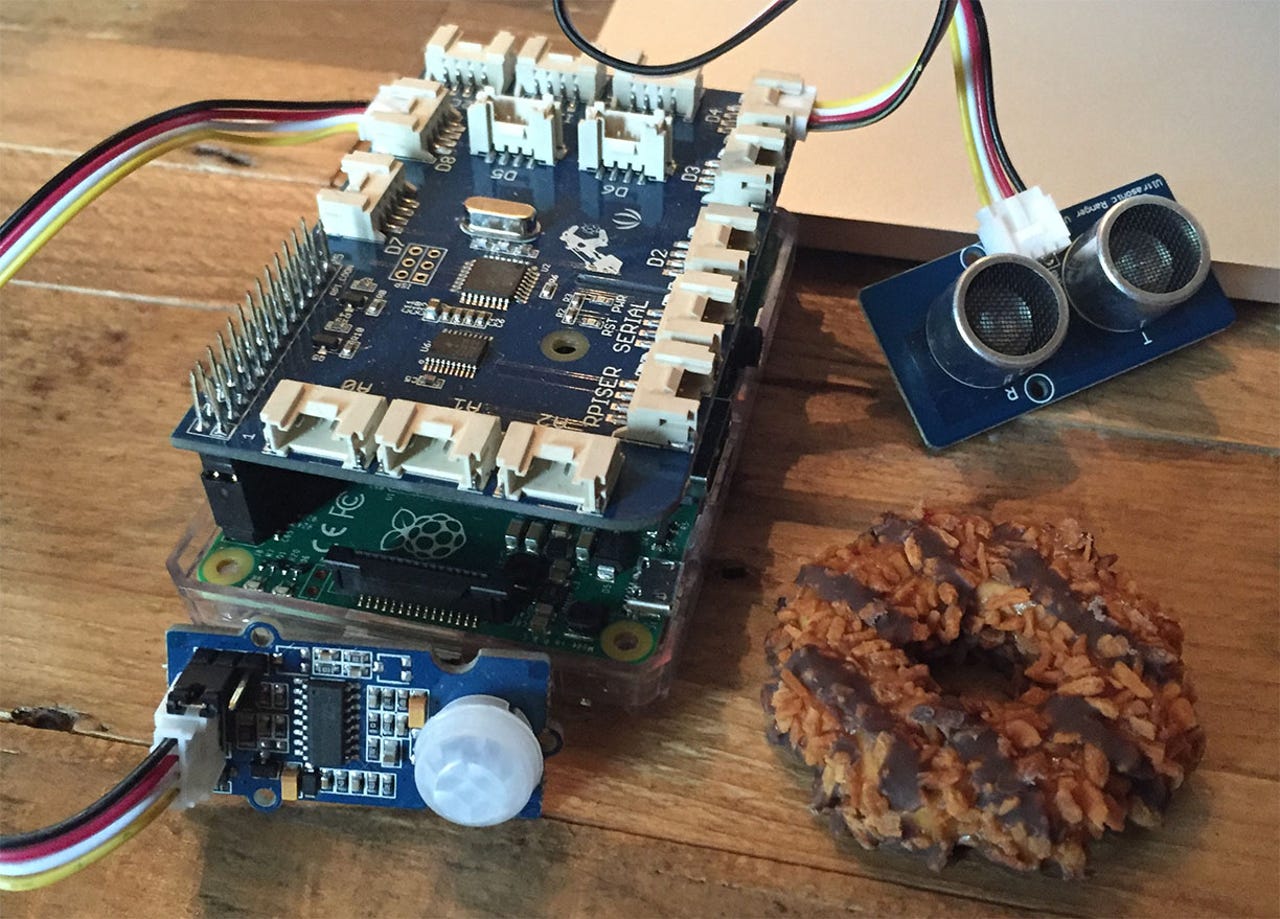
We will use a GrovePi+ with a Raspberry Pi 2 as this gives us a super simple way to connect sensors without any breadboard wiring. Let's get started.
GrovePi Setup
To get started, first connect the GrovePi+ to your unpowered Raspberry Pi by sliding the Pi pin headers into the GrovePi pin socket.
Next, we need to install the GrovePi software onto our Pi to make reading Grove sensors super easy. We will follow the instructions listed at http://www.dexterindustries.com/GrovePi/get-started-with-the-grovepi/setting-software/ and add one step at the end.
The TL;DR version is as follows:
$ cd /home/pi/Desktop
$ sudo git clone https://github.com/DexterInd/GrovePi
$ cd /home/pi/Desktop/GrovePi/Script
$ sudo chmod +x install.sh
$ sudo ./install.sh
$ sudo pip install grovepi
The step, "$ sudo ./install.sh", will take several minutes. Be patient.
The last step, "$ sudo pip install grovepi", allows us to import the grovepi Python library from any directory on our Pi. If you skip this step, you will have to create all of your GrovePi projects within the /home/pi/Desktop/GrovePi/Software/Python directory (which is icky).
Part II: Initial State
We want to stream all of our data to a cloud service and have that service turn our data into programmable notifications and even a nice dashboard that we can access from our laptop or mobile device. Our data needs a destination. We will use Initial State as that destination.
Step 1: Register for Initial State Account
Go to https://www.initialstate.com/app#/register/ and create a new account.
Step 2: Install the ISStreamer
Install the Initial State Python module onto your Raspberry Pi:
$ cd /home/pi/
$ \curl -sSL https://get.initialstate.com/python -o - | sudo bash
Security Note: The above command has some important anatomy that the user should be aware of. 1) There is a preceding \ before curl. This is important to ensure no alias of curl gets run if one was created. This helps mitigate risk of the command doing more than intended. 2) The command is a piped command, so when running, you are piping the output of a script that is being retrieved from https://get.initialstate.com/python into the command sudo bash. This is done to simplify installation, however, it should be noted that https is important here for helping ensure no man-in-the-middle manipulation of the install script, especially since the script is being run with elevated privileges. This is a common way to simplify install and setup, but if you are a little more wary there are some slightly less convenient alternatives: you can break the command out into two steps and investigate the bash script being downloaded from the curl command yourself to insure it's fidelity OR you can follow the pip instructions, you just wont get an automatically generated example script.
After Step 2 you will see something similar to the following output to the screen:
pi@raspberrypi ~ $ \curl -sSL https://get.initialstate.com/python -o - | sudo bash
Password:
Beginning ISStreamer Python Easy Installation!
This may take a couple minutes to install, grab some coffee :)
But don't forget to come back, I'll have questions later!
Found easy_install: setuptools 1.1.6
Found pip: pip 1.5.6 from /Library/Python/2.7/site-packages/pip-1.5.6- py2.7.egg (python 2.7)
pip major version: 1
pip minor version: 5
ISStreamer found, updating...
Requirement already up-to-date: ISStreamer in /Library/Python/2.7/site-packages
Cleaning up...
Do you want automagically get an example script? [y/N]
(the output may be different and take longer if you have never installed the Initial State Python streaming module before)
When prompted to automatically get an example script, type y. This will create a test script that we can run to ensure that we can stream data to Initial State from our Pi. You will be prompted:
Where do you want to save the example? [default: ./is_example.py]:
You can either type a custom local path or hit enter to accept the default.
You will be prompted for your username and password that you just created when you registered your Initial State account. Enter both and the installation will complete.
Step 4: Access Keys
Let's take a look at the example script that was created.
$ nano is_example.py
On line 15, you will see a line that starts with streamer = Streamer(bucket_ .... This lines creates a new data bucket named "Python Stream Example" and is associated with your account. This association happens because of the access_key="..." parameter on that same line. That long series of letters and numbers is your Initial State account access key. If you go to your Initial State account in your web browser, click on your username in the top right, then go to "my account", you will find that same access key at the bottom of the page under "Streaming Access Keys".
Every time you create a data stream, that access key will direct that data stream to your account (so don't share your key with anyone).
Step 5: Run the Example
$ python is_example.py
Step 6: Profit
You will want to step through the Waves tutorial to familiarize yourself with how to use this data visualization tool. Next, view the data in Tiles to see this same data in dashboard form.
You are now ready to start streaming real data from your Raspberry Pi and more.
Part III: Motion Detection
Let's create the first layer of security - instantly being notified when someone is in the same room as our cookie stash. To accomplish this, we will use a PIR motion sensor to detect motion in the general vicinity and send this data to Initial State. Whenever the motion sensor trips to active, we will configure Initial State to send us a SMS text message.
Hardware setup
This part is about as easy as it gets. Plug the PIR motion into digital pin 8 (D8) of the GrovePi+ board and power on your Pi.
Software Setup
1) Power on your Pi and navigate to the directory of choice. When I created this tutorial, I created a grovepi directory
$ cd ~/
$ mkdir grovepi
$ cd grovepi
2) Copy the GrovePi PIR Motion Python script at https://github.com/InitialState/precious-protector/blob/master/grovepi_pir.py to a new file.
$ nano grovepi_pir.py
copy/paste the code contents of https://github.com/InitialState/precious-protecto... into nano
3) Modify the user settings at the top of this file accordingly
# --------- User Settings ---------
# Connect the PIR motion sensor to one of the digital pins (i.e. 2, 3, 4, 7, or 8) PIR_SENSOR_PIN = 8
ROOM_NAME = "Office"
# Initial State settings
BUCKET_NAME = ROOM_NAME + " Log"
BUCKET_KEY = "pir022016"
ACCESS_KEY = "PLACE YOUR INITIAL STATE ACCESS KEY HERE"
# Set the time between sensor reads
SECONDS_BETWEEN_READS = .2
# ---------------------------------
Specifically, you will need to place your Initial State access key (found in your Initial State account settings) in the ACCESS_KEY variable assignment. If you do not do this, your data will not be streamed into your Initial State account, making you very sad and frustrated.
Note: You should copy/paste your Initial State ACCESS_KEY if at all possible to avoid any mistakes. Your ACCESS_KEY is case sensitive.
4) Save and exit
CTRL+X
Y
5) Run this script
$ sudo python grovepi_pir.py
Note: If you get an error such as "ImportError:cannot import name grovepi", you may need to run your GrovePi scripts from within the GrovePi python directory. Try the following:
$ cd /home/pi/Desktop/GrovePi/Software/Python
$ cp ~/grovepi/grovepi_pir.py .
$ sudo python grovepi_pir.py
6) Go to your Initial State account and look for a new bucket called "Office Log" (or whatever your named your ROOM_NAME; you may have to refresh the browser page to see the new bucket). Click on this bucket then click on the Tiles icon.
As someone comes within range of the motion sensor, the Office Motion tile will toggle between "inactive" and "active". You can also see this happen on the command prompt where you kicked off your script. To learn more about the many things you can do with Tiles, check out http://support.initialstate.com/knowledgebase/topics/102613-tiles.
Click on the Waves icon.
Waves gives you another view of the historical data of your PIR sensor. You can collect statistics and even transform data in Waves. To learn more about the different things you can do with Waves, check out http://support.initialstate.com/knowledgebase/topics/74567-waves.
Configure Motion Alerts
Now that data is flowing into our Initial State account, let's create a SMS text alert whenever our motion sensor detects motion.
*Trigger notifications are currently in Alpha. Email contact@initialstate.com for an invitation to be a part of the Trigger development experience.
We are going to follow the Trigger notification setup process outlined at http://support.initialstate.com/knowledgebase/articles/834354-triggers-adding-a-trigger.
- Make sure your pir motion data bucket is loaded
- Click on the bucket's settings in the data shelf (under its name)
- Click on the Triggers tab
- Select the data stream to trigger on (you can use the drop-down list to select from existing streams once a data bucket has loaded or you can type in the stream name/key manually; *note Safari does not support HTML5 dropdown lists). In my example screenshot above, I selected Office Motion.
- Select the conditional operator, in this case '='.
- Select the Trigger value that will trigger an action (manually type in the desired value). In this case, type in "active" as shown above.
- Click the '+' button to add the Trigger condition
- Select the action (current actions available are notify by SMS or email)
- Click the '+' button to add the action
- Input any verification code if adding a new phone number or email to complete setup
Your trigger is now live and will fire when the condition is met. Click done to return to the main screen.
Activate your motion sensor by getting near it. You should get a text message within seconds.
Part IV: Proximity Detection
Let's create the second layer of security - instantly being notified when someone gets really close or touches our cookie stash. To accomplish this, we will use an ultrasonic range finder sensor to detect the distance of the nearest object and send this data to Initial State. Whenever the someone gets too close to our cookies, we will configure Initial State to send us a SMS text message.
Hardware Setup
Just like the PIR motion sensor setup, this part is super easy. Plug the ultrasonic range finder sensor into digital pin 4 (D4) of the GrovePi+ board and power on your Pi.
Software Setup
1) Power on your Pi and navigate to the directory of choice. Again, I will use the grovepi directory I created earlier.
$ cd ~/
$ cd grovepi
2) Copy the GrovePi Ultrasonic Range Finder Python script athttps://github.com/InitialState/precious-protector/blob/master/grovepi_usr.py to a new file.
$ nano grovepi_usr.py
copy/paste the code contents of https://github.com/InitialState/precious-protecto... into nano
3) Modify the user settings at the top of this file accordingly
# --------- User Settings ---------
# Connect the ultrasonic ranger sensor to one of the digital pins (i.e. 2, 3, 4, 7, or 8)
USR_SENSOR_PIN = 4
OBJECT_NAME = "Cookies"
OBJECT_EMOJI_TOKEN = ":cookie:"
# Initial State settings
BUCKET_NAME = OBJECT_NAME + " Log"
BUCKET_KEY = "pir022016"
ACCESS_KEY = "PLACE YOUR INITIAL STATE ACCESS KEY HERE"
# Set the time between sensor reads
SECONDS_BETWEEN_READS = .2
# ---------------------------------
Specifically, you will need to place your Initial State access key (found in your Initial State account settings) in the ACCESS_KEY variable assignment. If you do not do this, your data will not be streamed into your Initial State account, making you very sad and frustrated.
Notice that we will stream to the same BUCKET_KEY as before. This will allow us to stream both the PIR sensor data and the ultrasonic sensor data into the same bucket even if we are running this script on a completely separate device.
Note: You should copy/paste your Initial State ACCESS_KEY if at all possible to avoid any mistakes. Your ACCESS_KEY is case sensitive.
4) Save and exit
CTRL+X
Y
5) Run this script
$ sudo python grovepi_usr.py
Note: If you get an error such as "ImportError:cannot import name grovepi", you may need to run your GrovePi scripts from within the GrovePi python directory. Try the following:
$ cd /home/pi/Desktop/GrovePi/Software/Python
$ cp ~/grovepi/grovepi_usr.py .
$ sudo python grovepi_usr.py
6) Go to your Initial State account and look for a bucket called "Office Log" (or whatever your named your ROOM_NAME; you may have to refresh the browser page to see the new bucket). Click on this bucket then click on the Tiles icon.
As someone comes closer to the ultrasonic sensor, the Proximity to Cookies(cm) tile will update with the distance. You can also see this happen on the command prompt where you kicked off your script. Every time someone gets close enough to our cookies, the Cookies Compromised stream gets another value. This is best seen in Waves:
Now you have an audit log of every time anyone gets near your cookies. This could come in handy in case of accusation.
Configure Proximity Alerts
Now that proximity data is flowing into our Initial State account, let's create a SMS text alert whenever our someone gets too close.
*Trigger notifications are currently in Alpha. Email contact@initialstate.com for an invitation to be a part of the Trigger development experience.
We are going to follow the Trigger notification setup process outlined athttp://support.initialstate.com/knowledgebase/articles/834354-triggers-adding-a-trigger.
- Make sure your ultrasonic range data bucket is loaded
- Click on the bucket's settings in the data shelf (under its name)
- Click on the Triggers tab
- Select the data stream to trigger on (you can use the drop-down list to select from existing streams once a data bucket has loaded or you can type in the stream name/key manually; *note Safari does not support HTML5 dropdown lists). In my example screenshot above, I selected Proximity to Cookies(cm).
- Select the conditional operator, in this case '<'.
- Select the Trigger value that will trigger an action (manually type in the desired value). In this case, type in "30" as shown above.
- Click the '+' button to add the Trigger condition
- Select the action (current actions available are notify by SMS or email)
- Click the '+' button to add the action
- Input any verification code if adding a new phone number or email to complete setup
Your trigger is now live and will fire when the condition is met. Click done to return to the main screen.
Get close to your ultrasonic range finder sensor. You should get a text message within seconds.
Part V: Put it all together
The last step is to combine both the pir motion and ultrasonic range finder sensor into one script running on one Pi. You can use the Python code at https://github.com/InitialState/precious-protector/blob/master/grovepi_pir_usr.py (make sure you modify the User Settings at the top).
You can apply what you learned in this tutorial to create other awesome sensor data streams and notification triggers.