Getting down to details

Location, location, location
First, perform a site survey of your home or office. Walk around the area you want to network to find the best location for your AP. Here are some general tips for choosing a good location:
- The maximum distance you plan to travel from the AP should remain within the AP's specified range.
- To cut down on interference, avoid areas with thick walls.
- To keep the cabling as short as possible, you should place the AP close to your broadband connection.
- Make sure you place the AP next to an outlet for electrical power.
- Keep the AP reasonably well hidden and away from traffic, for both aesthetics and its own safety. Bookshelves, entertainment centres and the tops of appliances, such as a refrigerator, can provide a flat, out-of-the-way location. As an alternative, many manufacturers include or sell mounting kits for attaching the AP to a wall. If you have removable acoustic tiles, you can even place the AP within the ceiling.
- Place the AP up high to reduce obstacles or down low to help hide the power and connection cables.
With the AP's location settled, you can begin building your wireless LAN. Start by installing a wireless adapter in each notebook or desktop computer you want to network. Because the software and hardware can vary by vendor, we strongly recommend that you read the instructions carefully before you begin. Once each adapter is installed, open the user interface and enter the SSID or the name of your network. Depending on the manufacturer, you may have to use Windows' wireless networking software to configure the client. For Windows XP users, click Start/Settings/Network Connections/Wireless Network Connection. From there, click the Advanced button, and enter the particulars of your network. It's a good idea to record those settings, as you'll want them to be the same for all devices on the network.
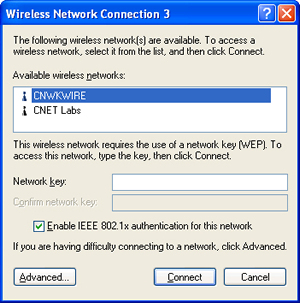
Windows XP's Wireless Network Connection dialogue.
To make installation easier, let DHCP automatically assign IP addresses to your networked computers and leave WEP security turned off. Unfortunately, some manufacturers make you use an explicit IP address before you can access the AP; check the documentation for help.
Try, try again
With the client taken care of, it's now time to configure the AP. Connect your cable or DSL modem to the AP using a Cat-5 cable. If your AP shipped without a cable, you can get one at your local electronics or computer store. Most devices include an integrated configuration tool that you access over a standard Web browser. Enter the AP's network details to match the client's, and then reboot the AP.
Now take a minute to make sure the network works. The easiest way is to point your Web browser to a reliable page and see if it connects. If you get a warning that the page is unavailable, try again. Still having trouble? Here's a quick troubleshooting checklist:
- Make sure all the network settings between the client and access point match, including SSID, DHCP and encryption.
- Check the sequence of status lights on the AP and refer to the system's documentation for possible errors.
- Make sure you properly installed the AP's antennae and secured all cable connections.
- Check the signal strength on the client end to make sure the AP is within range.
- Clear your Web browser's cache and restart the AP or router.
- Look for possible interference with other devices, such as security radios or Bluetooth connections.
- As a last resort, reboot the AP to return it to its default settings, and then start again.