Hands-On: Raspberry Pi 7-inch Touch Display and case

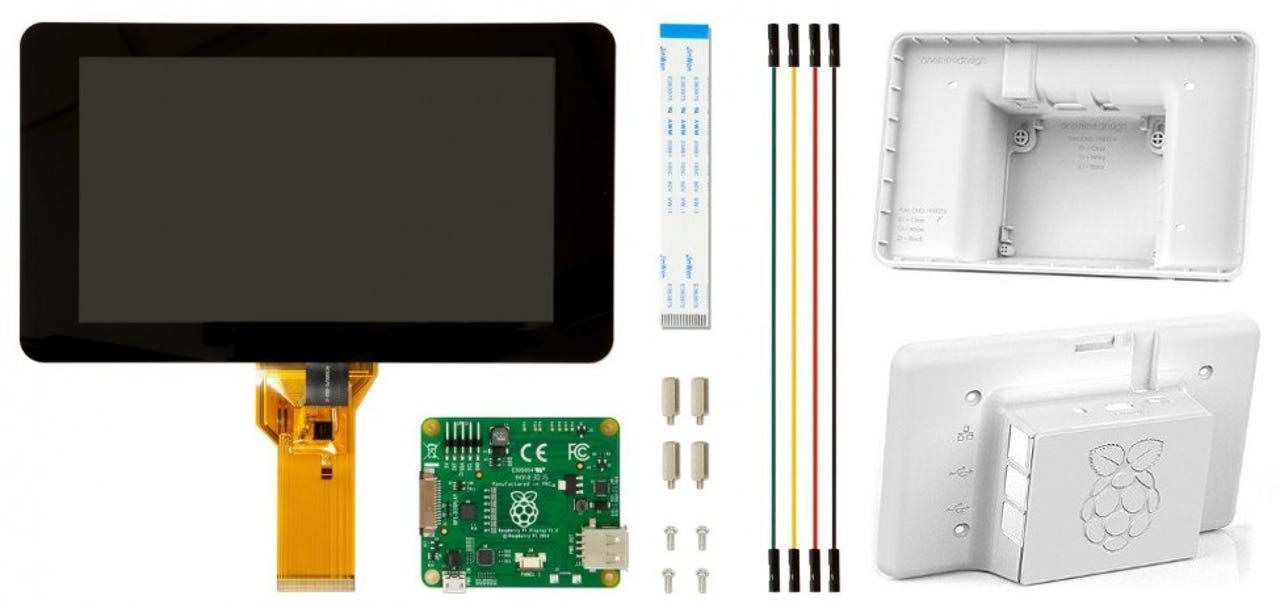
The Raspberry Pi 7-inch Touch Screen Display and Case kit.
While writing about Kali Linux on the Raspberry Pi recently, I started thinking about portability with the Raspberry Pi. Until now, I have used a standard HDMI desktop monitor (24", 1920x1080), which doesn't exactly lend itself to portability. So I started looking for a small, portable display and a convenient case.
The first thing I realized was that there are a lot of different displays available for the Raspberry Pi. I mean really a lot -- so many that it can be pretty intimidating just trying to figure out what the differences, advantages, and disadvantages are.
The second thing I realized was that there are even more display cases available. It seems like there are multiple cases available for every different display, and then a lot of those cases are available in multiple colors... yikes!
I finally decided to set my display/case search criteria as follows:
- The display has to be large enough and have sufficient resolution to be able to reasonably use the Pi with only that display.
- The display, case and Pi should all assemble into one easily carried unit.
- Powering both the Pi and display should be reasonable and convenient.
- When all else is equal (or close), I prefer to use original Raspberry Pi Foundation hardware, because I want to support them first.
After looking around, reading quite a few descriptions and reviews, I decided on the official Raspberry Pi 7" Touchscreen Display, and a Raspberry Pi and LCD Touchscreen Case.
The display size is good enough, although the 800x480 resolution is at the low end of what I want. The case encloses everything very nicely, and even has a slot at the top where a Pi Camera Module can be inserted. The power requirements of the screen are very reasonable, so one 2.5A power supply can handle a Pi and the display together.
The display connects to the Raspberry Pi DSI (Display Serial Interface) rather than the more common HDMI. The reasons for doing this are explained in the original post on the Raspberry Pi Blog.
This display works best with Raspberry Pi Models A+/B+/2/3. Although it will also work with the original Models A and B, the mounting holes do not line up correctly for those models, so you would have to mount them some other way. The Pi Zero doesn't have a DSI connection, and as far as I know there isn't any way to work around that.
Detailed instructions for assembling the display, and some very nice pictures of it, can be found in the Original Pi Display Manual. I have just a couple of comments/updates/clarifications to add to that.
First, the Display Manual shows and describes the unit as it was originally shipped, with all of the pieces separate. For some time now it has actually been shipping with the interface board already mounted on the back of the display, and the display ribbon cables connected to that board. So the actual assembly today probably starts with Step 4 in the original manual.
Second, the package includes four GPIO jumper wires, but the function of two of those has been incorporated in the DSI interface on the Pi Models A+/B+/2/3, so it is only necessary to use two of the GPIO jumpers, to connect power from the Pi to the display adapter. Assuming, that is, that you choose to power the display that way. More about this below...
Third, the manual mentions that you have to have the latest operating software to support this display. Well, yeah, but if you have installed or updated Raspbian within the last year or so, it's going to work. Perhaps a simpler way to say this is that if you are running Raspbian PIXEL, you'll be ok - and if you're not, you really need to update anyway so do that first, and then come back and finish connecting the display.
Now, about connecting power to the Raspberry Pi and the Pi Display. There are at least three different ways to power the two of them:
- Power only the Raspberry Pi, and connect the 5v GPIO pins to the power input pins on the display adapter. This is probably the simplest and most common method.
- Power only the display, and use a Type-A USB to micro-USB cable to connect the power output of the display adapter to the power input of the Raspberry Pi. There is even a special Short microUSB Power Cable available to make this easier and neater. Note that this is not possible if you are using the Pi Display case that I have chosen, as described below.
- Use a separate power supply for each of them - they each have a micro-USB power connector. There is a variation on this method, using a Dual micro USB Power cable (Y-splitter) to connect one power supply to both boards. This method is possible using the Pi Display case, because it has cut-outs for both power connections.
The important thing here is, if you choose either the second or third method, don't connect the GPIO pins as described in the display manual -- we don't want multiple power paths running around.
Another consideration about power supplies. If you are powering the Pi and display from one supply, you have to make sure that the power supply can handle the load. I started doing this testing with a Raspberry Pi 2 and a 2A power supply. I got a low voltage warning (a yellow lightning bolt at the upper right side of the screen) pretty frequently, so I switched to a 2.5A power supply and didn't have any more problems.
Once you have connected the DSI ribbon cable and whatever power method you decided to use, it's ready to go! You can connect power and you should see the boot messages scrolling down the display. Hooray! Well, maybe Hooray, but maybe not, because you might actually see the boot messages upside down and scrolling up the display instead of down...
In this case you will have to address the issue of "Which way is up?". Getting the obvious part out of the way first, you can't use this display in "portrait" (vertical) orientation. The software and drivers only support "landscape" (horizontal) orientation.
The less obvious part is that even horizontally, the optimal viewing angle is not equal in both directions. It goes up to 70 degrees from one side, but only 60 degrees from the other. Raspbian boots by default such that the 70 degree viewing angle is upward, which makes perfect sense.
But if you have the bare-bones assembly just sitting on your desk or work bench, the natural way to place it is with the power cable coming out of the top, so the assembly can sit solidly on the flat edge of the display. Unfortunately, when you boot Raspbian it will then be upside down. Not only that but the case that I will be using, and almost every other case I have seen for this display, also has the power cable coming out of the top, so they would also be upside down.
Fortunately there is an easy fix for this - just add 'lcd_rotate=2' to the end of /boot/config.txt. (For those devious minds out there, no you can't get portrait orientation by setting this to either 1 or 3. Sorry.) If you then just reboot, without a power off/on, you will still see the boot messages upside down but the Raspbian desktop will be correct. That's kind of fun. The next time you power cycle, the boot messages will be flipped as well.
With the display working and properly oriented, you should get this:
Raspberry Pi 7" Touch Screen Display with Raspbian PIXEL
So go ahead, touch the screen... It works! Touching is the equivalent of a mouse click, so you can touch the PIXEL top panel to get the desktop menu or launch one of the applications. There is no on-screen keyboard yet so you still need to have a USB keyboard connected, but I will address that a little later.
First, though, here are a few tips about using this display. The resolution is 800x480, and that is not a lot of real estate. Raspbian PIXEL does a very good job of adjusting as you can see in the screen shot above. It also has a few optional setting which I think make it even better.
Right-click anywhere on the desktop background and choose Desktop Preferences, then select the Menu Bar tab. You can then set the size of the menu bar (top panel) to Small, Medium or Large (the default is Large). I find Medium to be comfortable, but those with better eyes might be able to work with Small. This is not a huge savings, but at 800x480 resolution every few pixels you can save helps.
If you want to save even more space, you can get ride of the top panel entirely. It is always displayed by default, but you can change that pretty easily. Right-click on the panel, choose Panel Settings, then select the Advanced tab. Under "Automatic hiding" you can choose "Minimize panel when not in use".
With these two changes made, you will have essentially the entire screen available for application windows.
Ok, now what about an on-screen (virtual) keyboard? Well, there are some, and I will look at one in just a second. But honestly, this is a small display with limited resolution. How much screen space can you give up for a keyboard, and still have enough for an application window? Also, within the on-screen keyboard window, how large are the keys going to be, and how easy (or difficult) is it going to be to touch a specific key? Well, let's at least find out.
The most often recommended virtual keyboard is the matchbox-keyboard. To install it just 'sudo apt-get install matchbox-keyboard'. You can then start it from the Accessories menu, or by name via the Run... command.
The resulting on-screen keyboard is shown here. If anyone can honestly say that they can work with that, and be happy, then you're doing better than I am. I find the keys much too small and the amount of screen space it occupies too large. But then again, dinosaurs are not known for either mental or physical dexterity, so if you are happy with it, that's great.
With the display working, I am ready to put the entire assembly into a case. The case that I chose is very simple and very compact. It will hold the display and a Raspberry Pi Model B+, 2 or 3. The original models A and B will not work. Even if you were clever enough to figure out a way to get one mounted, the port openings in the case are all wrong.
Raspberry Pi 7" Touch Screen Case
The cut-outs in the case align perfectly with the Raspberry Pi B+/2/3 ports, and they have embossed identification symbols. There are cut-outs for the power connection on both the Pi and the display adapter, so you still have the option of powering them separately (or with a USB Y-cable) if you want.
There is a slot on top to hold the Pi Camera Module, and a small gap between the rear cover and the case, so you can run the camera ribbon cable (and other cables and wires) out of the case.
The rear cover (with the Raspberry Pi Logo) can be removed to get access to any of the connectors on the Raspberry Pi. Also with the rear cover off, there are holes for wall-mounting the case. If you should choose wall-mounting, keep in mind that if you invert it from what is shown here, so the power cable is coming out of the bottom, you won't need the lcd_rotate configuration command mentioned above, and you will gain 10 degrees of viewing angle from above.
When the Raspberry Pi and the Pi Display have been assembled as described above, putting the case on the assembly is very easy. Just set it in place, make sure that the ribbon cables and GPIO jumpers are out of the way, and insert the four screws into the display stand-off posts.
The one thing you can not access when the Raspberry Pi is in this case is the microUSB card. So make sure that the card is in place before you put it all together.
It is also possible to have an HDMI display connected at the same time as the DSI display. There is a brief discussion of this under Dual display usage in the original Pi Blog post about the DSI display.
It is important to note that the two displays are completely separate. Unfortunately it is not possible to configure the two displays as a single "extended desktop".
When both displays are connected the SDI display is used by default, and applications or utilities have to be specifically made to direct output to the HDMI display. omxplayer is a good example of such an application. If you want the HDMI to be the default, add display_default_lcd=0 to the boot configuration file.
The display from the front view.
Finally, I think it would be useful to see a couple of pictures which give a good perspective of the size of this unit. It really is very small, and I can easily imagine carrying it in a backpack or briefcase.
The camera module shown here would obviously not be left attached, and I might want to have some sort of protective cover or bag to keep the screen from getting scratched. For the time being the bubble-wrap bag that the display came in will do for that.
The case from the rear view.
The rear view shows how the Raspberry Pi ports are all easily accessible, and the camera module ribbon cable runs through the gap between the case and the back cover.
In this case I have been using a Pi 2, so I have a Pi WiFi dongle plugged in; just imagine what it could be like with a Pi 3! Not only would it not need the USB WiFi dongle, but you could use a Bluetooth keyboard and mouse, so you wouldn't need a dongle or cables for those either. You would be carrying nothing but this basic unit and a power supply. Zowie!
To summarize, the first thing I would say is my goodness this has been fun! The Pi Touch Screen Display has actually been easier to connect and get working than I expected it to be. That is in part due to the fact that the interface board is already mounted and connected on the display, so half of the instructions that I had read in the manual were already done. It is also in part due to the fact that everything just fits together really well, and worked straight out of the box. Even the minor hiccups that I did run into, such as the display being upside down initially, were fun to see and easy to fix.
The more important thing to take away from this, though, is that for certain situations and applications, the Touch Screen Display can be an excellent addition to the Raspberry Pi. The much lower resolution of the display turns out not to be as inconvenient as I thought it would, and the small size and light weight make it very convenient to take along in a backpack or brief case.