How to fully de-gunk a PC of Crapware

This information is also available as a PDF download.
One of the most hated things on the Personal Computer is Crapware. It slows your PC down to a crawl, often causes instability and crashes, eats up valuable screen real-estate, and may even border on Malware. I started on this topic a few months ago with a partial solution but it wasn't the total solution that really scrubbed the computer clean. This time I'm going to show you thoroughly scrub a PC of Crapware but first I'm going to give a few definitions.
Definition of Crapware: Crapware is software that you don't want on your computer. Not everyone will agree on what is and what isn't Crapware because a piece of software that one person wants might be something that another person doesn't. Some software will fall in the grey area where people need - or they think they need - certain features of the software but it causes them grief by causing system slowdown or instability. Although we can technically define Malware, Spyware, or Adware as Crapware because it's software that people definitely don't want, those three typically get put in to the category of Malware.
Examples of Crapware: Crapware might come in the form of a bloated driver CD that installs additional junk on top of the required driver. It might be software that came with a router, printer, or broadband service that the typical user unwittingly installs or it's the stuff that came pre-installed on the PC you purchased. Often times you try to install something to play a simple video and it installs a massive music library manager or you install a piece of software and you get an extra toolbar added to your web browser even though you had never asked for it.
At the end of the day it's companies trying to fight each other for every inch of your screen real-estate, monetize every search and every click, and capture every glance you make which turns your computer in to a messy battleground. What every user wants to know is how do you get rid of their crap and take back your PC. The following techniques aren't guaranteed to get rid of every piece of Crapware on your Windows (2000, XP, or Vista) computer but it is one of the most thorough method available that a modestly computer literate person should be able to follow. The two free tools you will need to download are:
<Next page - Autoruns, the ultimate startup cleaner>
Autoruns, the ultimate startup cleaner
[Second UPDATE 6/22/2007 - It appears that some people may be having problems even with legitimate software. After checking with master programmer and Technical Fellow Mark Russinovich of Microsoft (formerly SysInternals), it appears that some people might be running device drivers that haven't gone through WHQL (Windows Hardware Quality Laboratories) which meant that Autoruns will not hide it from the user. If those unsigned drivers get disabled by the user, Windows may get a BSOD (Blue Screen Of Death) or have certain devices like keyboards fail on startup. Ideally users should never trust unsigned drivers but it's an unfortunate reality that we have to deal with sometimes. So in the event that you disable everything unsigned (unauthorized) by Microsoft and you have the misfortune of not being able to boot Windows, you will need to go in to Windows using the F8 during startup with either the "Last Known Good" or safe mode. Last known good should put your computer back the way it's suppose to be but if that fails, you'll need to go in with safe mode and re-enable everything in the "Drivers" tab of Autoruns. If you want to play it safe, you can leave everything in the "Drivers" tab enabled but ideally you shouldn't need anything checked that isn't authorized and signed by Microsoft. Russinovich also did a webcast last year where he uses a combination of Autoruns and Process Explorer for "Advanced Malware cleaning" and I highly recommend it.][UPDATE 2:00PM - A few people are complaining that Autoruns broke some device drivers such as the Keyboard or caused BSOD (Blue Screen Of Death). This should never happen with a healthy PC but in the event you find yourself locked out of Windows due to one of these problems, tap the F8 key as soon as Windows starts booting up and use the "Last Known Good" boot option. That will undo the registry changes made by Autoruns and put your computer in the state it was previously in. If you are uncomfortable with this recovery procedure or you're not sure how to execute it, stop reading at this point and do not attempt this procedure because you won't be able to repair your computer if anything bad happens.
Now any properly designed device driver should never rely on anything that Autoruns can disable and they should never stop functioning (especially the Keyboard) just because Autoruns disabled the extra startups. If you find some devices need some of the startup settings, Autoruns will allow you to enable individual components. If your computer crashes because you stripped out all of the unofficial non-signed Microsoft startup entries, that could be an indicator of a deeper problem with your computer and could be a sign of malicious tampering. If a piece of Malware modifies a legitimate file to piggy back on it, that will invalidate the Microsoft digital signature and Autoruns will treat it as an unofficial un-signed entry. Then by disabling that tampered entry, Windows may crash on startup. If you find that using Autoruns to disable all non-signed Microsoft entries causes your computer to crash, it might be a good time to do a wipe and reload of Windows since there is possibility of Malicious tampering.]
Autoruns is a startup cleaner utility that is similar to the MSCONFIG utility but it is far more comprehensive and accurate. MSCONFIG only shows you startup and services and it doesn't check digital signatures which means anything can hide from it. With Autoruns, nothing can hide and there's no need to use MSCONFIG at all.
After you have downloaded Autoruns from the official Microsoft website, you'll need to unzip it. You do not need to install anything, just extract the content anywhere on your computer. Windows XP and Vista have built-in ZIP support you can just right-click on the file and hit extract. Windows 2000 users will need to download a FREE utility like IZArc which also comes in handy for Windows XP or Vista because it supports a wide range of compressed files. Once extract the files to a folder, simply double click on the file named autoruns.exe. Vista users will have to elevate UAC privileges when running this application.
Once opened, you'll see the following application and you'll need to enable "Verify Code Signatures" and "Hide Signed Microsoft Entries". DO NOT SKIP THIS STEP!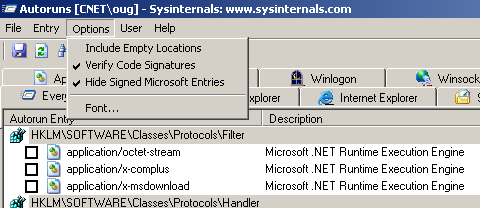
After checking these two items, hit the F5 key to refresh the scan.
The beauty of Autoruns is that it can verify the authenticity of everything being loaded in to Windows through rigorous cryptographic signatures so that it can't be fooled by registry entries masquerading as something legitimate and it will recognize files that have been tampered with. By hiding all of the verified Microsoft entries, we can single out every piece of software that was added to our computer that isn't officially from Microsoft. Autoruns is effectively our spotlight that highlights all the potential Crapware on your computer and it makes it easy for us to disable anything we don't want.
Take the following screenshot for example.This is a list of stuff that popped up which wasn't signed as Microsoft code. Some of it may have been legitimate Microsoft code but I don't need any of this stuff to make Windows run. Even the Adobe stuff is unnecessary and my Acrobat reader works fine without all this extra stuff. We can safely uncheck all of these entries and everything will work just fine. In the unlikely event that any of this stuff was actually needed for a critical application, we can always come back and re-enable certain parts bit by bit. These changes are non-destructive and there are no risky registry changes that need to be made.
[Update 6/22/2007 - In case anyone misunderstands what I mean by "non-destructive" changes, that means you can UNDO the changes by re-checking the items you disabled. Destructive changes to a computer are those that can't be undone. That does not mean making changes with Autoruns will never cause any issues; it just means you can undo the changes if you boot up Windows in Safe mode. To be safe, you can leave everything in the "Drivers" tab enabled just in case if you have drivers that weren't WHQL (Windows Hardware Qualification Labs) that were not hidden. Once again I'll remind the reader that if you do not understand what I'm talking about here, DO NOT use Autoruns. You need to know how to troubleshoot a computer in case anything goes wrong and your computer doesn't boot up.]
Whenever I'm troubleshooting a computer, I'll disable everything in that list and chances are a lot of strange issues will disappear. I generally like to keep everything unchecked. You might want to leave the antivirus stuff checked but I generally consider that one of the worst forms of Crapware though it may be a necessary evil for most people especially prior to Windows Vista.
<Next page - Cleaning out the gunk with CCleaner>
Cleaning out the gunk with CCleaner
Once you clean out the startup with Autoruns, you'll need CCleaner to flush out all the junk files and bad registry entries on the computer. You'll need to download CCleaner from this website and install it. Ironically, there is some Crapware bundled with CCleaner in the form of a major search engine toolbar which comes bundled with it though you can choose not to install it which I recommend you not. That helps finance this free utility but at least you can uncheck it and avoid installing it. Once installed, you'll launch the CCleaner application as shown here.The "Advanced" section on the bottom isn't checked by default but I usually do. Note that flushing the "Menu Order Cache" will mean that all your bookmarks and shortcuts will be alphabetically arranged instead of chronologically. Click on "Run Cleaner" and it will flush all the junk files on your computer. This can easily clear a gigabyte on some computers and I've seen some systems where I've cleared out 2 gigabytes.
Next we have the "Issues" section shown below:This is a two step process to clean out the Windows Registry. You first click on "Scan for Issues" and wait for the results. Then you click on "Fix selected issues" and it will flush out all those bad entries. Note that it gives you an opportunity to save the changes in an REG file which you can double click on to undo the deletions from the registry.
Next we have the optional tools section:I use this section for uninstalling applications that I don't use. I wouldn't use the startup button because Autoruns does a much better job with that and Autoruns makes non-destructive changes you can easily undo. The Uninstall feature is handy to have though you can use Windows Control Panel to uninstall applications as well. However, CCleaner's uninstaller does a much nicer job because it can see many more items on a more granular level that you can uninstall.
Once you've performed all the Autoruns and CCleaner tasks, it's time to reboot your computer. Once the rebooted, your computer will feel as fresh and fast as the day you first installed Windows. It might even feel better than the day you purchased the PC which was already preloaded with a ton of Crapware. It isn't uncommon to see computers that use to take 3 minutes to boot all of a sudden drop to 40 seconds boot time. Many of those strange pauses when you use your computer will disappear. If your computer still takes a long time to boot, remains unstable, and often has pauses, chances are there is a faulty device driver or antivirus program causing the problems.