How to implement SSL or TLS secure communications

This information is also available as a TechRepublic download.
SSL (Secure Socket Layer) and its successor TLS (Transport Layer Security) are two technologies that enable secure communications on a massive global scale. To facilitate SSL or TLS encryption between any two computers, an X.509 Digital Certificate is required on at least one end of the connection. The Digital Certificate is usually installed at the Server end because it makes it simple for any end user to make a secure SSL or TLS connection to the server without a Digital Certificate on the client end. A trusted third party called a CA (Certificate Authority) like VeriSign, Entrust, GeoTrust, or GoDaddy asserts the authenticity of the Digital Certificate with a Digital Signature so that the client knows that the Server isn't fake. This trust comes from the fact that these Certificate Authorities have their Root Certificates with Public Keys pre-installed in every nearly every Operating System and Application on the market.
Therefore to enable SSL or TLS secure communications on a Server with the general public, Server administrators need to acquire a Digital Certificate from any trusted third party CA and this is usually done through an offline web-based request. Since I've gotten requests from Administrators who read my blog entry "A secure Wireless LAN hotspot for anonymous users" how to go about doing this, I've created the following procedure for buying a Digital Certificate. This procedure works on VPN Concentrators, Web Servers, RADIUS Servers, or anything that uses standard X.509 Digital Certificates.
The Certificate generated using this Windows-based procedure will work for any device or Operating System that uses standard X.509 Digital Certificates. No additional tools are needed if you're running this procedure on Windows Vista computer. On any other version of Windows Client or Server OS, you will need to make sure that the Windows Server 2003 Admin Pack is installed so that the needed command line tools are available to you. You can download a copy here from Microsoft but it is also available on any Windows Server 2003 installation CD. There is an alternative procedure for doing this if Microsoft IIS is installed but this procedure will focus on the command line technique.
The first step is to prepare a text file that contains the desired parameters with the following format. You will need to put in your own server name with your DNS qualifier at the end of it. The "CN" field is the Common Name field and it is the key identifier for our Digital Certificate. If we were going to set up a secure server called secure.zdnet.com for example, the CN field will need to be secure.zdnet.com. If we were setting a secure RADIUS server for Wireless LAN authentication, we can call it something like RADIUS.zdnet.com. We can create a file called CSRParameters.txt and put in the following text.
[NewRequest] Subject="CN=MyServerName.MyDomainName.com,C=GB" KeyLength=2048 MachineKeySet=TRUE Silent=TRUE Exportable = TRUE
Assuming you're running Windows Vista or you've installed the Windows Server 2003 Admin Pack on Windows Server 2003 or Windows XP, you will need to start a command prompt. Windows Vista requires the following special procedure to start a command prompt in Administrator mode.
Start a Vista command prompt as Administrator:
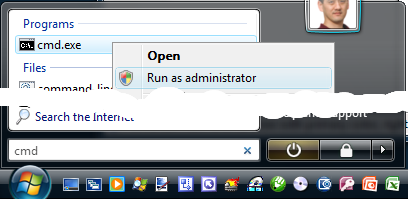
Hit the "Start" button on the keyboard (CTRL-ESC) and type "cmd". You'll find cmd.exe returned on the top of the start menu where you will then right click on cmd.exe. Click "Run as administrator" and Windows Vista UAC will ask you for permission to escalate permissions. Click "Continue" and you'll get a command prompt that's running under the context of Administrator. If you're running older versions of Windows, you just log in as any Administrator and hit the "Start" and "Run" command and launch cmd.exe.
Once you're at the command prompt, type the following command to generate a CSR (Certificate Signing Request):
certreq -new CSRParameters.txt CSROutput.txt
Note that this is assuming CSRParameters.txt is in the directory that you're running the command in. If it isn't in the same directory, you'll either need to move it there or type out the entire path of the file for the input parameters. After a few seconds, the output file called CSROutput.txt will be generated and you'll be able to open it up like any text file.
<Next page - Buying a Digital Certificate>
Buying a Digital Certificate
Next you'll need to go to any of the Certificate Authorities I mentioned above and purchase a Digital Certificate using this CSR you just created.Note: GoDaddy certificates at $20/year happens to be about ten times cheaper than VeriSign and there isn't really a shred of difference in the certificate you buy other than the branding aspect of it which no one will ever see unless they dig deep in to the certificate. If you are under the impression that buying a $200 VeriSign certificate is more secure, understand that any breach of security at the cheaper CA shops mean that all of us are compromised equally since the GoDaddy Root Certificate carries as much weight in our factory installed CTL (Certificate Trust List) as the VeriSign Root Certificate. So ultimately it doesn't matter where you buy your Digital Certificate from a security standpoint.
I'm bringing this issue of branding up because I've had people tell me that they refuse to buy the cheap SSL certificate. But the same people will end up running self-signed Digital Certificates and have their users ignore the invalid Certificate warning when they log in to their corporate web application or they won't even bother running SSL at all. As absurd as these examples are, they're quite common in the world of IT and it's terrible a shame. Buy the expensive certificate if you're worried that other people might look down on you for buying the $20 certificate, but please don't use self-signed certificates or run clear text! Now that you know how cheap it is to do it the right way and you have this tutorial, do the right thing!
So once you've decided where you want to buy your certificate, go to their website and have a Credit Card ready. For example if you go the cheapest route, take the first option of one or two years at less than $20 per year and hit the "ADD" button. Skip all the extra offers section and hit "Continue" and you'll see the shopping cart. Accept the terms and click "Checkout". You'll probably need to use a credit card to pay for the Certificates and once you finish paying, you will be prompted to paste in the CSR text from the file called CSROutput.txt which looks something like the following.
The Certificate Authority will have to verify that you're authorized to buy a certificate for the domain name that you're requesting and they do this by sending an email verification to the administrator of the domain listed under whois. You'll usually get a choice of which administrator email account to send the verification to so make sure you pick one that you have access to or someone within your company has access to. Once the email verification has been completed, you will either see the Digitally Signed Certificate on the web page or you'll get it emailed to you. Don't worry if that email isn't encrypted because a Digital Certificate has no Private Key in it because the Public and Private Keys were generated on the computer that created the CSR. The CA signing process only signs a CSR which contains Public Key information.
Once you've gone through the process of buying a Digitally Certificate, it will look something like the following:
You can take that entire chunk of text and paste it in to a text file called MyCertificate.txt. Once it's pasted, you'll want to rename it to MyCertificate.cer or anything ending with the ".cer" extension. This way you can immediately open it in Windows and it will look like the following.
<Next page - Installing the Digital Certificate>
Installing the Digital Certificate
Once you've created the Digital Certificate by cutting/pasting it in to a text file and you've renamed it with a .cer extension, you'll need to install that Digital Certificate on the machine you generated the CSR on before you can ultimately export it. To begin, you'll need to open an MMC console by clicking Start | Run. Then type "mmc" and OK. You'll need to do a UAC escalation and you will see the following console appear. From there, you'll click "ADD/Remove Snap-in...". Note that these are screen shots from Vista. The procedure with Windows XP and 2003 will be slightly different but in principle it will be the same. This article shows you what the old procedure looked like on Windows XP and 2003.<Next page - Export the Digital Certificate>
Export the Digital Certificate
The final procedure is to export the Digital Certificate. The newly exported Digital Certificate will contain both the Public Key and the Private Key which means it can be installed on any number of Servers that will host your secure application. So long as the Server is being used for the same purpose or hosting the same website, you can use an identical Digital Certificate on as many Servers as you like. You will need to carefully protect this file containing the Public and Private Key keeping it secret since anyone who possesses the Private Key can decrypt. To export the Certificate along with the Private Key, right click on the Certificate you purchased shown in the screen shot below and choose "All Tasks" and "Export".Now that we have the exported Digital Certificate containing the Private Key, we can transfer that to any number of Servers that will be using the Common Name we selected for our Digital Certificate.