Update 11/29/2007 - See updated AIO computer imagesThis is the new all-in-one Intel dual-core 2.0 GHz E2180 19" LCD PC computer I built for the family.
This is the new all-in-one Intel dual-core 2.0 GHz E2180 19" LCD PC computer I built for the family. The shocker is that I did it for less than $363 in parts (not including keyboard and mouse). The 19" LCD (1440x900 resolution) was on sale for $140 and the dual-core Intel CPU/Motherboard/graphics was on sale at Fry's for an eye-popping $88 and I just couldn't resist the temptation to build a nice all-in-one for the kitchen/dining area. I got a 300 GB hard drive for $50 and 1 GB of RAM for $30 (with an additional $20 rebate) and I used a $50 energy efficient "80 plus" 220 watt 1U power supply. For the chassis I used some scrap wood I had left over and spent 4 hours on a Sunday afternoon building this computer. [See image gallery.]
I haven't made the top lid or bottom lid for this computer yet but this picture shows the full thickness of the computer bolted on to the back of the 19" LCD display. The entire computer excluding the 19" display consumes 40 watts in idle and 65 watts peak (WPrime with 2 threads). The 19" LCD consumes 22 watts when it's operating at full resolution regardless of the image being displayed. If the system is overclocked to 2.66 GHz, then the peak wattage goes up to 100 watts which is still well within safety margins. Note that this particular motherboard that came free with the CPU isn't a stable overclocker so I don't recommend overclocking on this system with this motherboard. For testing purposes, I loaded Windows Vista Ultimate 64 bit edition and it booted up in less than 35 seconds (10 seconds due to BIOS post).
.
With the top and bottom are sealed off (with some holes for venting heat), I wanted to make sure the CPU fan had a fresh supply of cool air so I cut out a hole in the back. I didn't have one of those circular cutters handy so I had to freehand the hole with a jigsaw so I still need to sand it in to something smoother. I also didn't want to make the chassis an extra inch thicker to accommodate the retail box fan that came with the CPU. To minimize cable clutter, I used 1 foot long power cords plugged in to a power strip. That strip also comes in handy for plugging in lots of other things.
.
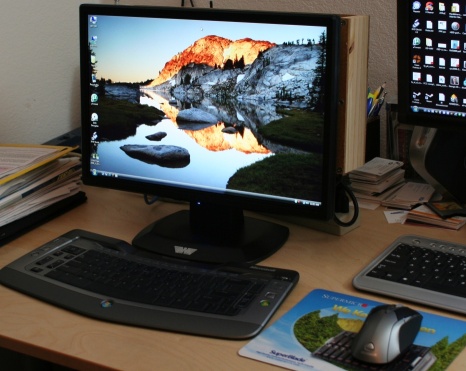
Unlike the VESA stand PC I built a few months ago, this computer uses the monitor's factory stand which allows me the full range in tilt motion. Here in the photo you see that it's tilted all the way back and it's in no danger or tipping over.
.
.
.
For the photo gallery, I used the Microsoft Wireless Entertainment Desktop keyboard and mouse. Not shown is a tiny USB Bluetooth dongle in the back that connects the keyboard and mouse.
.
.
.
This photo shows the inside of the system with the back, top, bottom covers off. The hard drive is bolted on to the side but I will need to put some rubber washers on to minimize hard drive noise. Wood has a nasty habit of amplifying sound which is great for musical instruments but not so good for computers so I'll need to spray the inner walls with insulation foam to minimize noise. I'll probably look in to plastic materials in the future.
.
This is the back of the computer with the components exposed. As you can see, the box is not much bigger than the Micro ATX motherboard. The hard drive had to overlap the motherboard a little so that the entire box can be narrower than the 17" wide 19" diagonal LCD display. The LCD has a DVI input but the motherboard only had VGA out so a VGA cable was used. Wired Ethernet was used but I have enough room to plug in a PCI wireless LAN adapter using a 90 degrees PCI adapter. [Update 11:55PM - I'm probably going to go for a cheap 802.11g USB adapter since that saves me the trouble of using a PCI angle adapter. The fact that I can mount it on top means it will probably get better radio reception.]
This is the full profile view of my new all-in-one computer. Note that I made a mistake of not turning the bad side of the wood in so you can see some flaws in the wood. It's not too late for me to unscrew it and turn it around though.
So the bottom line is that while it isn't pretty from the side or the back, you won't ever notice it from the front and it doesn't take any more space than the LCD display would occupy by itself. The price tag is $1000 cheaper than commercial all-in-one computers from Apple, Gateway, and now Dell. Sure you can get a laptop but laptops don't have 19" displays and they can't safely clock to 2.66 GHz like this one. Having a full size keyboard and a real mouse makes this computer as powerful as a desktop yet it's portable.
[Update 11:59PM] - Instructions for making your own box
If you want to make your own box, you just need to cut 6 pieces of board. The dimensions for front and back plate are 17" by 8.75". Side plates are 8.75" by 2.5". Top and bottom are 17" by 3" (thickness of front and back added 0.5"). The top 2 VESA holes are 2.75" from the top (not including thickness of top plate). The four VESA mounting holes are centered on the box and measure 100mm apart.
The box needs to be mounted to the LCD before the motherboard is installed. To figure out where to mount the motherboard, place the motherboard and power supply on the wood and mark where the mounting holes will be with a pencil.
My colleague Justin James suggested that I go to the auto supply store and buy some rubber underbody coating (spray or roll on) for spraying on the internal walls to dampen the noise. That should also pad the contact between the hard drive and the side wall so that the hard drive noise isn't amplified by the wooden box.
[Update 11/27/2007] - A number of people in the talkback want to know about the RF interference characteristics and whether I will paint the box black or not. On the RF interference issue, all motherboards and electronic components are already FCC certified to be within limits of how much RF noise can be leaked and I haven't had any RF interference issues running my over-the-air HDTV tuner in my home or radio close by to this computer. As for painting the box black, yes that is what I intend to do so that it will blend in with the LCD.