The quad-core project - Building the PC walkthrough
Last weekend we built two new quad-core PCs over at the PC Doc HQ. I promised that you'd be first to see the results of our hard work - well, here you go.
Last weekend we built two new quad-core PCs over at the PC Doc HQ. I promised that you'd be first to see the results of our hard work (buildig these PCs is easy, the hard part is the photography ... hot lights, having to keep your arms out of the shot, reducing reflections ... ) - well, here you go.
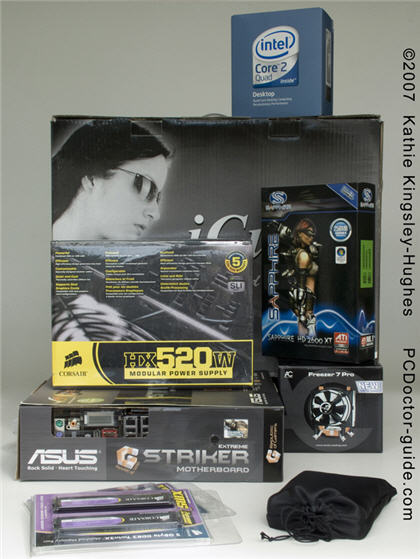
Intel Core 2 Quad Q6600
Four cores, each running at 2.4GHz, 8MB of L2 cache, blistering speed ... what more is there to say?! Sure, I could have spent more money and got a faster processor, but it wouldn't have been all that cost effective.
The only downside to the Q6600 is the same downside that applies to every other processor - the stock cooler is noisy and not all that effective if you plan on overclocking. But this is not a problem since I plan on replacing it.
ASUS Striker Extreme motherboard
I wanted a motherboard that would give me a lot of scope for tweaking with settings (for experimental purposes more than anything) and my interest was instantly drawn to the ASUS Striker Extreme. But once I started reading reviews of this board, I came across a lot of people having a lot of problems with this board. Crashes, lockups, DOAs, BIOS problems and dozens of other random issues. Hmmm. These reviews put me off the board.
However, after looking at other quad-core boards, I came back to the Striker Extreme and decided to give it a go. Either it would work or it wouldn't, and if it gave me too much grief, I'd send it back to the store in a heartbeat.
As you'll see later, the board performed flawlessly and I'm thrilled with the purchase. In fact, not only does it look amazing (the heatsinks are a very beautiful piece of engineering) but it comes equipped with some really nice features such as an electro-luminescent panel on the IO plate on the rear and on-board on/off, reset and CMOS reset buttons.
SAPPHIRE Radeon HD 2600XT 256MB 128-bit GDDR4
We wanted a decent graphics card but didn't want to spend crazy money on it. Since there was no way we were going with NVIDIA given how poor the current drivers are, it didn't take us long to pick the HD 2600XT. It's relatively cheap, powerful, DirectX 10 compatible, HD compatible.
Again, we could have spent more money to get more power, but the return on investment is hard to justify unless you really need that power. The HD 2600XTs should do just fine for us (for now!).
2 x CORSAIR XMS2 2GB (2 x 1GB) 240-Pin DDR2 SDRAM PC2 6400
My guess is that a lot of the problems people are having with the ASUS Striker Extreme motherboard comes down to combining it with shoddy parts, in particular poor quality RAM and PSUs. To avoid such problems we went for good quality memory.
Western Digital Raptor X 150GB 10,000 RPM
This drive really was an impulse buy since I could have saved some money by going with a different drive, but I've always wanted a Raptor X. At almost $190 for 150GB it's far from cheap, but from a performance perspective it's well worth it. I could improve performance even more by adding another Raptor X to each system and setting up a RAID 0 array, but I don't think I need to do that - yet!
The Raptor X is amazing. It's noisier than a normal drive but the performance (combined with the hypnotic effect of watching the heads move) more than makes up for the noise - and the cost!
Corsair HX520 PSU
I had several requirements for a PSU - +500W output, modular cabling system, support for ATX12V v2.2 and EPS12V 2.91, +80% efficiency, industrial grade capacitors, and a quiet fan. The Corsair fits the bill on all points. In fact, looking at the PSU I'm convinced that Corsair has underrated a 600W PSU down to 520W. This PSU represents $130 well spent.
ARCTIC COOLING Freezer 7 Pro 92mm CPU cooler
I wanted to get one of the biggest, meanest looking coolers that I could fit on the board, and the Arctic Cooler Freezer 7 Pro fits the bill perfectly. In fact, it's so big that it barely fits on the motherboard because of the copper heatsinks for cooling the chipset - if the cooler hadn't fitted we'd have either had to cut the heatsink or fitted the stock coolers while waiting for a replacement.
Fortunately, it fitted – just – and it's a beautiful piece of Swiss engineering that's capable of moving 200W of heat away from the CPU.
iCute S901 case
Not much more to say about this case than it was cheap, well made and looks pretty good. I’ve built a lot of PCs in iCute cases over the years.
OK, we have all the parts, now lets start building!
I'm not going to bore readers here with all the minutiae of the build - I'm pretty sure that most ZDNet readers are familiar with how a PC goes together. What I will do is give you an overview and highlight some interesting aspects of the build.
Because all the reviews I'd read had led me to expect problem with the motherboard I decided to test build the PC out of the case prior to building (I don't usually do this because as a rule things work just fine). This meant getting the motherboard ready, fitting the CPU, heatsink, RAM, graphics card, hard drive and hooking it up to a PSU which took just a couple of minutes.
One item of note when setting up the motherboard was what a close call the CPU heatsink was - it fitted, but only just. The clearance between the CPU heatsink and the copper heatsinks on the board was about about .04 inch (1 mm). Had the heatsink been fractionally bigger we would have had to fit the stock cooler (or give the Arctic Cooler some unscheduled surgery).
Because the Striker Extreme comes with an on/off switch built directly onto the board, it's easy to jumpstart the board into life. Amazingly, as soon as the power switch was pressed the board sparked into life and the system started working. All our fears of BIOS issues, cryptic error messages, DOA boards and all the other issues evaporated at this point. With any worries that the motherboard might be a dead stick out of the way, it was time to put the parts into the case.
One of the things I really love about the Striker Extreme is the attention to detail. For example, the Q-Connector that makes connecting and disconnecting the front panel cabling easy because they're combined into a single module. While I don't expect to have to remove the motherboard from the system any time soon, I still think that this is a really sweet feature.
The board has some other sweet features, in particular I like the electro-luminescent panel on the IO plate which makes hooking up peripherals a lot easier, the onboard LEDs that light up the interior of the PC, the on-board on/off, reset and CMOS reset buttons and the LCD poster panel on the back which replaces POST error messages and makes troubleshooting problems quicker and easier.
I'm also thrilled with the Corsair PSU. The modular design helps to keep the inside of the case tidier which in turn improves airflow, helping to keep the components cool. The PSU is also really quiet during operation, helping to keep the noise level to a minimum.
When assembling the PC I made a mistake and installed all 4GB of RAM, forgetting that there's a bug in Windows Vista that can prevent the operating system being installed where there's more than 3GB of RAM installed. When I tried installing Vista I got the following error message on a BSOD:
Removing 2GB of RAM allowed the installation to continue.
Closing Thoughts
With the build completed and Windows going onto the system, it quickly became clear that this system packed a real punch. Windows install was done in under 20 minutes and once finished the system was blazingly fast, and after installing the latest ATI drivers the system scored a very robust Windows Experience Index score of 5.3 (the top score possible is 5.9). The processor, graphics and hard disk all got a top score. Pretty impressive.
Building this PC was a lot of fun, and to end up with such a powerful PC for the price certainly made it a worthwhile experience and the quality of the parts made it an easy and satisfying build process. Each part was chosen to provide the maximum power and pereformance for the price, and the final Windows Experience Index score, combined with the benchmark results we got (which I'll post later) confirm this.
Many thanks to Kathie for sharing her photos of the build process. If you feel like building your own PC and you'd like to learn how she will be running an online course based around this PC specification in the next few weeks over on the PC Doctor website.