DIY Photoshop Torture Test

If you've ever wondered how your Apple iron stacks up to the Photoshop benchmarks I posted, I am making available the Photoshop action and test files that I used in the test. Feel free to download them and run them on your own machine. After you run the Photoshop action, please post your results in the TalkBack below!
Click through for the downloadable files...
Download the Photoshop Torture Action and Test files (2.27 MB, .zip)
In the download you'll find two test images and a Photoshop action set that will torture your new MBP or any computer for that matter (it even runs on Windows).
INSTRUCTIONS
Put the Photoshop action "PS CS Test Actions.atn" in:
Applications > Photoshop CS > Presets > Photoshop Actions
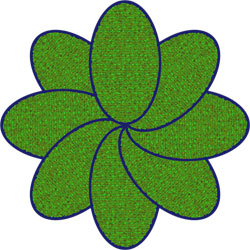
TEST 1 creates a Kaleidoscope from and existing image. The action creates a Kaleidoscope image by copying layers and rotating them. Will wrote this action because it has scaling, rotation, blurring etc.
1) Open the Action palette (Window > Action)
2) Open the Action palette's flyout menu (the triangle in the upper right corner of palette)
3) Select "PS CS Test Actions" which will put the actions in your actions palettes.
4) Open the image "Kaleidoscope Test" and go to the Paths palette. Click on the "Work Path" action to make the path active.
5) In the Action palette click on the action "Make Kaleidoscope"
3) Click the small "play" button in the bottom of the palette, and START your stopwatch.
4) STOP when the completed image (pictured) appears on screen.
RESULTS
Will's TiBook 1GHz (1GB RAM, 100GB HDD) completed the action in 01:08 (one minute, eight seconds) in Photoshop CS2.
My MacBook Pro 2GHz (2GB RAM, 120GB HDD) completed the action in 01:30 (one minute,30 seconds) in Photoshop CS2.
TEST 2 takes a 10MB image and scales it losslessly to about 550MB. It does so in 110 percent steps with sharpening in between. It creates a 550MB file and it tortures the processor, RAM and HDD. Will's TiBook 1GHz completed the action 06:45 (minutes:seconds).
1) Open the image called "Resize Test" and run the action called Resize CS
2) The final file is actually scaled 540 percent plus with little or no loss of quality
3) There is a "Purge" steps in between each scaling step otherwise you would be using well into the 4TB of RAM and scratch space.
4) You will have to click on a "continue" button twice, so pay attention.
5) STOP time when the final dialog displays a stop button.
RESULTS
Will's TiBook 1GHz (1GB RAM, 100GB HDD) completed the action in 06:45 (six minutes, 45 seconds) in Photoshop CS2.
My MacBook Pro 2GHz (2GB RAM, 120GB HDD) completed the action in 04:40 (four minutes, 40 seconds) in Photoshop CS2.
Note: Both PowerBook and the MacBook Pro were running with the "Better Performance" option selected in the Energy Saver control panel. I will be running the new benchmark files on a PowerBook G4 1.5GHz (aluminum) over the weekend and will update the story with the results.
Download the test files and post your results in the TalkBack section below.
(Thanks to Will Hammond for the test files!)