Business
MacBook migration strategies
It's no secret the I took delivery of my new MacBook Pro notebook this week, but like many of you doing the same I was faced with some tough decisions: how to migrate my data to the new iron.

One tip: I highly recommend that you name the target hard drive the same name as the source as this saved me tons of problems with file paths on the new Mac. Once you've used it for about a week, you can change the target HDD name to whatever you wish.
Typically when I migrate to a new PowerBook, I update the OS on the old machine (the source) and simply drop its hard drive into the new machine (the target). In the MacBook Pro era however, all bets are off. The MBP uses a new Serial ATA (SATA) hard drive replacing the slower Ultra ATA drives from the previous generation PowerBook, so a hard drive swap is out.
Some people recommend copying your source User folder to a FireWire drive then simply copying it over to the target. While this can be done, I don't recommend it. There's a much better solution that's now included with all new Macs (since OS 10.3.4) called the Apple Migration Assistant.
The Migration Assistant pops up when you boot up a new Mac for first time as part of the setup/registration process asking the simple question "Do you already own a Mac?" If you answer yes, the helpful assistant walks you through the process of rebooting the source Mac in Target Disk Mode (hold down "T" at boot) then connecting the two with a FireWire cable. Then you have some decisions to make.
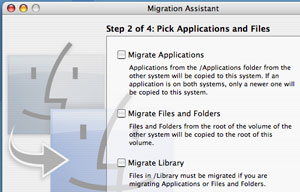
The Migration Assistant give you several options as to what to migrate (Users, Applications, Network and Machine Settings, Files and/or Volumes) and I recommend that you choose wisely young jedi. While it's easy to simply grab everything in one fell swoop I took a different tact.
First a disclosure: I am a software pack-rat. I've got applications on my PowerBook that I've launched just once. I've got many applications that I've long forgot about. In fact, scrolling through my Applications folder was like a trip down memory lane. I also have some legacy Norton crap on my drive I've been dying to expunge because it warns me that "this version is not compatible with your OS" every time I install an OS update - long after removing (or so I though) Norton itself.
Combined with the desire to install only Universal Binary applications on my new MacBook I decided not to migrate applications, files/folders (from the root) or the library, all of which are choices on one of the Migration Assistant screens. I'd rather install my software individually, as needed, with a heavy bias against non-Intel-native applications that need to run in Rosetta. I even went so far as relegating non-native applications to a folder called Applications-Rosetta.
Granted, it's a lot more work to install applications from CD but it's also incredibly liberating. I've got a lot more free space on my drive as a result and everything just snaps. It also gives me a reason to nag software developers that haven't released Universal versions of their applications.
Before using the Migration Assistant it's important to verify the health of your source Mac first. Run the Apple Disk Utility's repair disk function while booted from a Tiger CD (running it off the hard drive can give erroneous errors.) If you get errors trying to sync certain song to a new iPod then you may want to clean them up first. The Migration Assistant bombed twice, both half way through my iTunes Music Library so I simply moved it to the root, ran Migration Assistant then manually copied it over.
I'm also an iTunes ratings junkie and didn't want to lose a few years of fanatically rating songs cleaning ID3 tags in the music migration. The easiest way to keep this stuff is to simply launch iTunes, click through the agreement, then quit. Toss the newly created iTunes Library and the iTunes Music folder (you can keep "iTunes Music Library.xml"), replace them with the equivalents from your backup, relaunch iTunes and your playlists, ratings and ID3 tags remain intact.
For more migration strategies I highly recommend François Joseph de Kermadec's excellent article "Tiger's Powerful Migration Assistant" on O'Reilly's MacDevCenter.