The unofficial guide to installing iTunes 10 without bloatware

One of the most popular posts I wrote in 2008 was a set of step-by-step instructions to help you do what Apple doesn't want you to do with iTunes for Windows (see Slimming down the bloated iTunes installer). Now that iTunes 10 has been released, it's apparent that nothing has changed in Cupertino. Apple still gives its customers a monolithic iTunes setup program with absolutely no options to pick and choose based on your specific needs.
Why is that important? When you run the iTunes setup program, it unpacks six Windows Installer packages and a master setup program, which then installs nearly 300MB of program and support files, a kernel-mode CD/DVD-burning driver, multiple system services, and a bunch of browser plugins. It configures two "helper" programs to start automatically every time you start your PC, giving you no easy way to disable them. It installs a network service that many iTunes users don't need and that has been associated with security and reliability issues.
And you wonder why I dislike iTunes with a passion that burns like the fire of a thousand suns?
That's where this post comes in. It contains detailed, up-to-date instructions for cracking open that gigantic iTunes installer and installing just the pieces you want and need. I've also updated my advice for individual scenarios so that you can make intelligent choices instead of simply settling for Apple's defaults.
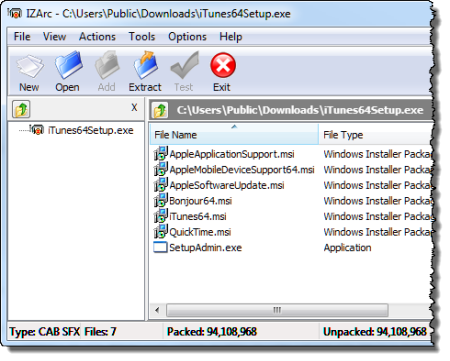
To get started, you need a copy of the iTunes Windows installer, which comes in x86 and x64 versions and is available via this download page. You also need a third-party file extraction utility. WinZip and WinRAR work fine. (I previously recommended the free and versatile IZArc utility but it is now, unfortunately, a nest of crapware and I can no longer recommend it.) Use the file utility to extract files from iTunesSetup.exe (or, on x64 Windows machines, iTunes64Setup.exe). This screen shows the contents of the 64-bit iTunes 10 installer.
Extract those files to a local or network folder and you can run them individually, using command-line switches to control their behavior.
When you run the master iTunes setup program, it extracts the following files to a temporary folder and then begins installing all of them in sequence. In Windows 7 and Windows Vista, it interrupts you for two UAC prompts.
Here's an unvarnished description of each installer:
- QuickTime is Apple's multimedia framework, a collection of codecs, plugins, DLLs, and several players designed to help you play back digital media files in most popular formats. The big selling point is support for the QuickTime movie (.mov) format, via the standalone player or an embedded ActiveX control. QuickTime is required if you want to use iTunes. If you don't have an iPod or other Apple-branded device and all you want is the ability to play QuickTime files, go to Apple’s QuickTime download page and choose the QuickTime-only option (don’t select the QuickTime with iTunes option, which includes the full, bloated iTunes installer). If you’d prefer an even lighter option, try the unofficial QuickTime Alternative, which runs on Windows XP, Windows Vista, and Windows 7.
- iTunes (iTunes64 on x64 systems) is Apple's all-purpose media player/device sync application. It is the only officially supported way to sync music, videos, and other content with Apple-branded devices, although third-party alternatives are available. iTunes also provides access to the iTunes store. If you own an iPhone or a 3G iPad, you must use iTunes to activate your device. For an iPhone, iPad, or iPod Touch, you must use iTunes to update its firmware and sync its content with your PC.
- Apple Application Support was added in iTunes 9 as a framework for managing applications on the iPhone, iPod Touch, and iPad. It is a required component for both iTunes and QuickTime. If you remove it, or if you install iTunes without also installing this package, you'll see the following error message.
- Bonjour (Bonjour64 on x64 systems) is Apple's implementation of the open-source Zeroconf, a multicast DNS responder used to discover services on a local area network. It is installed by default with the iTunes download. I strongly recommend not installing Bonjour unless you need it. Bonjour has required patches for security issues in the past and has been known to cause a complete loss of network connectivity on Windows networks. (Yes, I've seen Bonjour disable local and Internet connections on Windows networks. It was not a fun troubleshooting exercise.) And a search of the Apple support forums finds dozens of recent complaints from Windows users struggling with iTunes 10 and Bonjour. Adding unauthorized peer-to-peer services on a corporate network is a distinct no-no, as a number of customers have told Apple on their support forums. (The response? Crickets.) If you want to share iTunes libraries over a network or use Apple TV, you need Bonjour. If you have a printer attached to an AirPort device, you should use Bonjour. It's also required with AirPlay speakers and some remote control apps. However, if you simply want to play media files and sync your iTunes library with your iPod, you do not need Bonjour. iTunes will throw up an error message if Bonjour is missing. You can safely ignore that message, which will not reappear.
- Apple Mobile Device Support (AppleMobileDeviceSupport64 on x64 systems) is the synchronization framework for the iPhone, iPod Touch, and iPad family of "mobile devices." This package is not necessary if you use another member of the iPod family, including the Classic, Mini, Nano, or Shuffle, which sync just fine using just the basic iTunes app.
- Apple Software Update is a utility that checks for new versions of Apple software installed on your PC. It also pushes new Windows-compatible Apple software programs. Understanding how this utility works is crucial; it can and will install software you have explicitly rejected if you don't monitor its actions carefully. Just today, for example, I updated iTunes on a Windows 7 system and Apple Software Update selected Safari and Mobile Me for installation, even though I had specifically hidden them previously. This is a behavior that Apple has been guilty of for years. It doesn't happen on every system, but for some reason it's an issue on this one.
The seventh file in the list is SetupAdmin.exe, the monolithic installer. You don't need it, obviously. Oh, and thankfully, the MobileMe component, which was previously included with a full iTunes install, is now a separate option.
So how do you decide which programs to install, and how do you avoid inadvertently getting more than you wanted?
Performing a selective iTunes install involves three steps:
1. Extract the installer files you need to a local folder.
2. Run the installers with the proper command-line switches.
3. Prevent Apple Software Update from undoing your careful work later.
The exact steps vary, depending on what device you're using.
If you want to use iTunes with an iPod Classic, Mini, Nano, or Shuffle…
Extract three files from the iTunesSetup installer and save them in a local folder. Open a command prompt window, navigate to that folder, and run the following commands:
- AppleApplicationSupport.msi /passive
- Quicktime.msi /passive
- iTunes.msi /passive (on a 64-bit Windows system, use iTunes64.msi /passive)
If you shudder at command lines, press the Windows logo key + R to open the Run box. Clear its contents, and then drag the extracted file into it. That will add the full filename, with path, to the Run box. Add a space and then type /passive after the closing quotation mark. Click OK to execute the command. Repeat for the other packages.
The /passive switch performs all installations in unattended mode. After you complete the installation, you can rip and burn CDs, play music from your collection, buy music tracks and TV shows from the iTunes store, and synchronize music and other media files with any Apple device except an iPod Touch, iPhone, or iPad. I tested this scenario with an older iPod Nano and it worked just fine. If your experience differs, please let me know in the Talkback section.
If you want to combine multiple iTunes libraries on a local network and/or connect to an Apple TV device…
Install the AppleApplicationSupport, QuickTime, and iTunes packages as described in the previous scenario, and also extract and install Bonjour.msi using the /passive switch. Note that Bonjour must be installed on any computer whose library you want to share. It's not necessary if you have two iPhones, each with different accounts and connected to different PCs. In that scenario, Bonjour provides no benefit.
If you want to activate and manage an iPhone or iPad or synchronize with an iPod Touch...
In addition to installing the iTunes and QuickTime packages, you’ll need to extract and run AppleMobileDeviceSupport.msi (on x64 installations, be sure to use AppleMobileDeviceSupport64.msi.)
And finally, decide whether you want to install Apple Software Update. Given the history of serious security flaws in QuickTime and iTunes, it’s crucial to remain up to date with patches for all Apple programs you choose to install. The trouble with Apple Software Update is that any attempt to “update” iTunes will install the other, unwanted packages as well. iTunes actually has its own update detector that doesn't require Apple Software Update. You can check for a new version any time by clicking Help, Check for Updates. Regardless of how you check, when you see that a new update is available, be sure to download the iTunes installer manually and then extract and update only those components you want.
If you inadvertently install a component you don't need, it's relatively easy to undo the damage. All of the above components are available from the Programs option in the Windows Control Panel, where you can uninstall them individually. If you plan to uninstall Bonjour or Apple Mobile Support, be sure to stop the associated services first; if you don't, you'll need to restart to complete the uninstallation.
And finally, there are those two startup files, which slow down your boot time and add nothing to your iTunes experience. One is called iTunesHelper.exe; the other is QTTask.exe. You'll find only a few lines of sparse documentation at apple.com. In my experience, neither is necessary for using any of the features in iTunes or QuickTime. Unfortunately, Apple does not offer a supported way to disable these start-up programs, so you'll have to do it manually by using the System Configuration utility in Windows (Msconfig.exe), by editing the registry manually, or by using an external utility like AutoRuns from Sysinternals.
Update: As a commenter points out, you can prevent QTTask.exe from starting automatically by opening Control Panel's QuickTime option, clicking the Advanced tab, and clearing the Install QuickTime Icon In System Tray option.