Vista Hands On #12: Manage partitions after setup

Earlier this week I explained how to create separate system and data volumes when setting up Windows Vista from scratch. Today, I'll explain how to accomplish the same goal on a system where Windows Vista is already set up. In previous Windows versions, this task required either third-party software or a full backup, followed by a format and restore. In Vista, the capability to shrink and extend partitions is built into the Disk Management console.
For this scenario, I’m going to assume you’re working with a new system that arrived with Windows Vista preinstalled on a single disk with a single partition – in this example, a 160GB SATA drive. The goal is to take that 160GB and shrink the system partition to 60GB, leaving the remainder for storage of data files. Here’s how to do it:
1. Open Disk Management Console. You can do this directly, by typing diskmgmt.msc at a command prompt or in the Run box. I prefer to right-click Computer in the Start menu, choose Manage from the shortcut menu, and then click Disk Management in the tree pane of the Computer Management console. This lists all available drives.
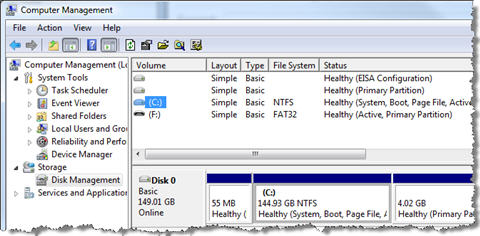
2. In either pane (the top list view or the bottom graphical view), right-click the volume you want to change. In this example, that’s drive C:, the lone volume on the single physical disk.
3. Choose Shrink Volume from the shortcut menu. After a bit of calculating, the Disk Management console displays this dialog box:
4. Adjust the amounts to suit your preferences and then click Shrink. The process is virtually instantaneous. The display now shows an Unallocated Space block to the right of the C: volume.
5. Right-click the Unallocated Space block and choose New Simple Volume from the shortcut menu. Follow the wizard’s prompts to use all available space, assign a drive letter, and format the volume. You can save some time by choosing the Perform a quick format option in this last step.
You’re done. You can now move your user data files to the new volume and then create an image backup of the slimmed-down system partition.
A few caveats:
This strategy works best if you do it as soon as possible after setup. As the text at the bottom of the Shrink dialog box points out, the accumulation of volume snapshots and page files can severely cut into your ability to shrink the system volume.
You might find your options limited severely if you have already defined multiple volumes (such as on a dual-boot system). Vista’s volume management tools work best with a single partition and a chunk of unallocated space. For more advanced tasks, you’ll still need third-party software.
Do you see one or more oddball partitions with no drive letter attached? Don’t delete those unless you’re certain you don’t need them. In the example shown here, there’s a utility partition and a recovery partition, both used by Dell computers for system maintenance tasks. Removing them will render those recovery tools useless.