Vista Hands On #2: A no-fuss, nondestructive clean install

Thanks to the radically revised Setup program in Windows Vista, Windows users can safely discard one of the basic tenets that have governed installation decisions since the beginning of the Windows era.
That's right - you can now safely point Windows Setup to a partition on which Windows is already installed, as long as you have at least 15 GB of free disk space and you don't plan to use the copy of Windows on that partition anymore. When you choose to do a clean install in this configuration, Windows Vista Setup moves the old Windows, Program Files, and Documents and Settings folders to a folder named Windows.old. Your new installation creates a brand-new set of top-level folders on the current system drive: Windows (for system files), Program Files (for application files), and Users (for data associated with each user account on the system).
Why would you want to do this? Let's say you currently have a system that has a single disk with a single partition and plenty of free disk space. You want to start fresh with a clean install, and you're willing to reinstall your programs and re-create your settings. But you have lots of valuable data and you don't want to lose any of it. Performing a non-destructive clean install gives you the fresh start you're looking for, and your data files are safely ensconced in the Windows.old folder. You can no longer start up your old Windows installation, but you can copy any of the saved files from that folder to your new user profile whenever you're ready.
Why is this option acceptable now? In previous Windows versions, the operation of the Setup program invariably involved some commingling of files in the old and new Windows installations. Those unwanted system files and leftovers from previously installed programs defeated the purpose of doing a clean install. But the image-based Windows Vista setup makes a clean break, allowing you to quarantine the old files and do a truly clean installation of your new operating system.
Here are the step-by-step instructions:
1. Log on to your previous edition of Windows (the one you intend to replace), insert the Windows Vista DVD, and allow the Setup program to run.
2. From the Install Windows screen, click Install Now and follow the prompts to get the latest updates and enter your product key.
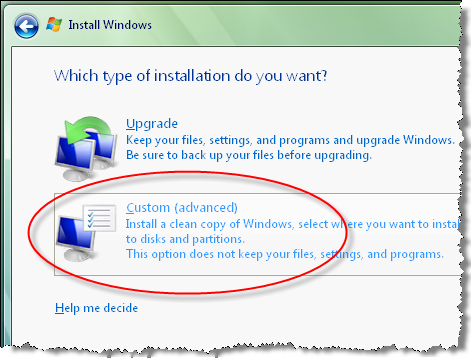
3. When prompted to choose an install type, select the Custom (Advanced) option, as shown here:
4. In the list of available disk partitions, choose the one containing your current Windows installation. For most people, this will be drive C.
5. Click OK when you see the warning dialog box shown here:
Finish setup. Because you're not doing an upgrade, the rest of the installation should proceed very quickly. When you start Windows Vista for the first time, you'll see that all your data and program files from the previous installation are in the Windows.old folder. If you have any old data files to retrieve, you'll find them in the Windows.old Documents and Settings folder, under your old user account name.
You needn't rush to get rid of those old files. Unless you're severely cramped for disk space, your best option is to hold on to the old files for a week or a month or however long it takes to assure yourself that you don't need anything stored there. When you're ready to get rid of those old files, don't try to delete them from Windows Explorer. Instead, choose the faster, safer way to eliminate them: Run the Disk Cleanup tool (just type Clean in the Search box on the Start menu to find it). Select the Previous Windows Installation(s) option as shown here, and then click OK.
When the Disk Cleanup tool finishes (typically in only a minute or two), you'll be left with a copy of Windows that is virtually indistinguishable from a clean install performed on a freshly formatted hard disk.