Back to Basics #1 - Cloning a hard disk

Given the kinds of comments that I'm getting (mostly through email) I've come to the conclusion that having a few "back to basics" posts on here might be worthwhile to a lot of readers. Sure, if you're a hardcore geek then this stuff is likely to be second nature to you, but for those on the path to becoming a hardcore geek, a little helping hand might be appreciated!
Note: Hardcore geeks reading this are welcome to chip in with their own thoughts and ideas.
For this, the first back to basics post I've decided to cover the way that I clone hard disks here at the PC Doc HQ.
Cloning a hard disk
Adding a new hard drive to a PC is one of the simplest upgrades that users can carry out on their PCs. However, the step that most people get caught up on is not the fitting the hard drive step, but the cloning of the existing drive onto new drive.
Cloning a hard drive is made simple if you have the right tools. Here in the lab we use Acronisproducts, specifically True Image 11 Home and True Image Echo Workstation. Here I'll show you the steps involved in cloning a disk using True Image Echo Workstation, which is the beefed-up small/medium/enterprise version of True Image Home.
Note: Home users are better off checking out Acronis True Image 11 Home. Details on how to clone a hard drive using this version can be found here.
Note: Why am I choosing Acronis products here? Simple - having used countless other products, and ultimately been disappointed by them, a few years ago I moved to Acronis True Image and several hundred disk clones/images later I've not had a single problem. There are other products out there that do the same thing, but for me I know and trust Acronis products. Not only does Acronis let you clone drive, it is without a doubt the best data management tool available.
OK, so you have your new drive (let's assume that it's a SATA drive) and you've fitted it into the system and booted up (I'll assume that you're using Vista here, but the steps are pretty much the same for XP). A quick trip to Disk Management (click Start and type computer management into the Start Search box and click on Computer Management, then click on Disk Management under Storage) will show you that both drives are being seen:
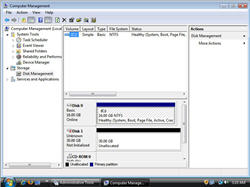
Full image gallery here.
Here I have one 16GB disk and a larger 30GB one. I want to copy everything off the small driver onto the big one.
Note: Eagle-eyed readers will have spotted that these screenshots are taken on a VMware Workstation virtual machine - for the purposes of documenting the process this makes it easier, and other than I don't have to handle any physical drives, the process is the same as it would be for a physical system.
To save time I have Echo Workstation already installed on this machine, so I just need to fire it up. Once up, click on Manage Hard Disks.
Next click on Clone Disk.
This brings up the Disk Clone Wizard, a tool that makes disk cloning a snap! Click Next.
Keep the clone mode set to Automatic. Click Next.
Click Next again.
Click Proceed to start the process.
Click Reboot.
The system now reboots and after the BIOS POST screen and the Windows startup logo, you'll see the following. Don't panic! This is normal!
When you get to this, you're done. Click any key to shut down the system.
OK, at this point if you're swapping hard drives and are ready to boot up off the new one, disconnect the power to your system, open up your PC and swap the data cables over for the two drives (the small, flat ribbon), close up the PC, reconnect the power and boot up. When the system has loaded up you should see both drives show up in Computer Management.
If you no longer want the data on the original drive then you can right-click on the old drive as shown in Computer Management and choose Format ..., and work through the wizard. Remember that formatting is a one-way process, so take care!
Thoughts?