How-to: Getting started with .VHD files in Windows 7

![]()
Some of you seem confused about how Windows 7 goes about supporting .VHD files as used by Virtual PC, Windows Server 2008 R2 and Hyper-V. Here's a quick how-to work with .VHD files in Windows 7.
OK, let's begin with a Windows 7 beta 1 install. Fire up a Command Prompt and type the following:
diskpart
Note: Press ENTER after each line to execute the commands.
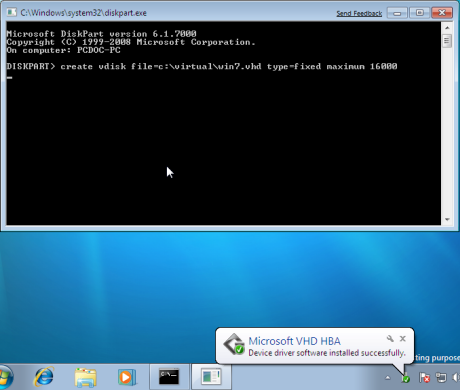
You're now ready to create a blank .VHD file. The following command creates a 16GB VHD file in a folder called virtual (you can put the .VHD anywhere, but create any folder in advance):
create vdisk file=c:\virtual\win7.vhd type=fixed maximum=16000
It'll take a few minutes for the .VHD file to be created - took about 10 minutes on my test system. Diskpart will tell you once it's done.
OK, now to install Windows 7 beta 1 into the .VHD. Pop the Windows 7 beta DVD into the DVD drive and reboot the system and boot up off the disc. Once the Windows 7 installer is up and running, choose your language and once you're on the Install now screen, press SHIFT+F10 to bring up a Command Prompt.
Into the Command Prompt window, and first check to find out what drive letter has been assigned to your system partition (for me it was d:\). Make a note of the drive letter.
Next -->
Next type the following (substitute "d" for the drive letter of your Windows 7 partition if different):
diskpart select vdisk file=d:\virtual\win7.vhd attach vdisk
Close the Command Prompt and then click Install now. Choose a custom install when given the chance. When asked as to where you want to install Windows you'll find approximately 16GB of unallocated space. Put the new install onto this disk.
Note: Ignore any warning about not being able to boot up off this disk and proceed with the install.
Now continue with the install of the second copy of Windows 7. Because Windows 7 is .VHD aware the system will make all the necessary changes to the book loader ... but there is a catch! The catch is that the new virtual install with become your default install and the system will boot up into this install automatically (this is done so the Windows installation isn't halted when it reboots). Don't worry though, that can be changed. You'll also notice that both installs are called "Windows 7" in the boot manager - don't worry, we'll change that too!
OK, once your second install of Windows has finished, here's how to fix the boot loader so that you boot by default into the "real" Windows 7 rather than the one in the .VHD file.
To fix the boot manager, boot into either OS, launch a Command Prompt ad an Administrator (right-click on the shortcut and choose Run as administrator) and type the following:
bcdedit /v
Now copy the identifier of the .VHD install and type (substitute the ID for the x's):
bcdedit /set {xxxxxxxx-xxxx-xxxx-xxxx-xxxxxxxxxxxx} description "Windows 7 - VHD"
The above changes the description for your VHD installation to "Windows 7 - VHD" so you can tell them apart.
Finally, if you'd rather have the .VHD install at the bottom of the boot list do this:
bcdedit /displayorder {xxxxxxxx-xxxx-xxxx-xxxx-xxxxxxxxxxxx} /addlast
Have fun!
<< Home >>