Setting up the 2.5 TB hot-swap array

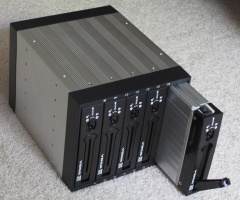
Continuing from yesterday's blog where I introduced you to the cheap 2.5 TB storage array, we're going to look at how this is installed in to the PC. Once all the drives are attached, you'll need to toggle on all of the drives using a paper clip. This AMS array is so jam packed with drives that there isn't any room to put in a real button so there is a tiny button that can only be pressed on/off with a paperclip. In the picture to the left, the five on/off toggle buttons are located at the bottom below the release handle. I made the mistake of not seeing the sticker on the side and I couldn't figure out why the unit was seemingly dead. This feature turns out to be quite handy because it makes it easy to turn on/off drives because it's sometimes hard to identify which drive belongs to which volume and which volume to install the OS in.
The chassis (Cooler Master CAV-T03-UW) pictured to the left is the same rig I used to build the PC in this tutorial. This chassis turned out to be the wrong choice for this particular application because the drive bays had tiny little metal lips that help hold single 5.25" drives in place which prevented me from plugging in a 3-bay device. I had to spend an hour carefully folding the metal lips back in to place so that I could install the hot-swap drive cage. It wasn't pleasant and easy to get cut working in such a tight space. I would suggest looking for a chassis that has no dividers between the drive bays if you want to plug in a drive array.
The motherboard has been swapped out and replaced with an Intel DG965WH G965-based motherboard. Since I'll be reviewing the Intel G965 against the AMD 690G motherboard, this will let me kill two birds with one stone so I can test RAID performance in the Intel 965-based ICH8R 6-port on-board RAID controller for a huge RAID performance article. I'm also using the on-board video on the G965 motherboard since I'm not currently testing video performance. If anyone is wondering why I'm using the Intel motherboard for the huge RAID article and not the AMD-based motherboard, the AMD board doesn't do RAID5. But I'll do some RAID testing on the AMD board when I do the shootout between the G965 and the 690G.
The power consumption at the wall for this set up with a Core 2 Duo E6600 2.4 GHz processor was 105 watts with all 5 hot-swap hard drives turned on and about 120 watts with the RAID5 array at full throttle. The system spiked to 240 watts during the initial boot when all 5 disks were spinning up from 0 to 7200 RPM. My estimate is that the drives take just under 10 watts in idle and 30 watts during the initial spin-up at boot time.
The AMS DS-3151SSBK drive cage is a passive pass-through system that simply functions as a hot-swap extension of your on-board or add-on RAID controller. It comes with 5 long SATA cables that have metal locking mechanisms on the connectors ensuring that they snap in to place and lock on. Be sure to pinch the metal clips before unplugging a connector so that you don't break something. Other than the on/off buttons for each drive in the front, there is a high/low fan switch in the back of the drive cage that controls the fan speed. The low-setting is sufficient for 7200 RPM drives and the high-setting is needed for higher RPM drives.
The Intel 965-based ICH8R on-board RAID controller has six ports near the bottom of the PC chassis pictured above. I wanted to be sure that I matched up the port numbers to the drive numbers on the hot-swap chassis to make things easy to troubleshoot in the future. The motherboard is labeled port 0 to port 5 and the AMS drive cage is labeled port 1 to port 5. Therefore I used port 0 for the SATA DVD-burner and ports 1-5 for the hot-swap cage. However, I was surprised to find that some of the port numbers didn't match up with what the Intel RAID BIOS reported and I had to manually figure out the mapping. I'm checking with Intel on this issue right now. I ended up taking a permanent marker and I labeled the SATA cables with the numbers reported from the RAID BIOS and I matched those numbers up with the drive cage. When looking at the drive array from the front, I had the drives going from left to right 1 through 5.
I went in to the Intel ICH8R BIOS with the CTRL-I key and set up drive 1 as standalone and drives 2-5 as a RAID5 array. Since I was testing RAID performance, I didn't want the OS to be installed on any part of the RAID5 array. Unfortunately, the RAID5 array kept coming up as Drive 0 which is the first drive in the Vista setup screen even though the standalone 500 GB drive was set to first boot. Since Vista insists on installing a system partition on Drive 0, I had to disable the RAID5 volume and that's where the on/off switches in the front of the AMS drive cage came in handy so I didn't have to unplug four of the drives. Once Vista was installed, I could turn on the four drives belonging to the RAID5 array and Vista still managed to boot from Drive 1. This is kind of an annoying quirk and I'm hoping Intel can explain why I can't set the volume ordering so I don't have to do this kind of hack. Also note that Vista doesn't need pre-install storage drivers like you did with the F6 key with previous NT-based operating systems in Windows XP and Windows Server 2003. In fact if you do install the drivers from the floppy even if you download the latest, it will mess up the Vista install process. I learned all these quirks the hard way buy you can avoid these pitfalls.
Once I got the RAID5 array running and formatted in Vista, I installed IOMeter to run some RAID performance tests. I knew that the Intel ICH8R RAID controller had insane performance levels but the write performance was horribly slow which would have made it impractical to do the IOMeter testing since it would take more than a day just to prepare the drive by filling it with test pattern data. An Intel engineer told me that I had had to install the Matrix storage drivers and enable write-back caching in the Matrix driver control panel and that did the trick. Preliminary results show an unreal level of performance. I've worked with a lot of servers before and I've never seen more than 30 MB/sec (240 mbps) write performance on a RAID5 array because parity calculations are costly performance wise. But the ICH8R RAID controller was writing the test pattern data at the rate of roughly 190 MB/sec (megabytes per second) which is roughly 1.5 gbps! These are performance numbers that I barely see in Enterprise storage gear costing ten to a hundred times more money per gigabyte! I'll be following up with the official results in my RAID article.