The Definitive Guide to SEO for Images: 6 Steps to Image-Ranking Success

After receiving a couple of emails regarding SEO (Search Engine Optimization) in relation to images, I thought I would take some time to list out 6 steps you can use to help your images rank higher in image search (such as Google Images, Bing Images, etc.). As an added bonus, these steps will also aid in helping your pages rank higher in normal Web search! This isn't some rehash of the same run-of-the-mill advice you get on images (or so I hope, at least :) ), so, without further ado, here are 6 steps to image-ranking success:
Image Name
This is about as simple as it gets, but it really needs to be mentioned. Please, please, please do not name your images in a non-descriptive manner (e.g. q43fj8qs.jpg)! Likewise, don't leave your images named as they are when you offload them from your camera, mobile phone, etc. (e.g. IMG01148.JPG, DCIM0001.JPG, et al). You want to name your image something that describes the image within a keyword term or two. For example, if you have a picture with your cat in it, name the image something like "cat.jpg" or -- even better -- "black-cat.jpg" if it's a black cat. Better still might be something like "black-cat-running.jpg" or similar. Don't worry about getting super-descriptive with the image name; just shoot for an overall topic that covers the image. I'll show you how to go into more specific detail about an image in an upcoming step.
To note, while it's debatable as to if you should use an underscore (_), a hyphen (-), a period (.), a space ( ), or some other character to separate multi-word-named images (e.g. my-image-name.jpg vs. my_image_name.jpg vs. my.image.name.jpg, etc.), I, personally, like to use hyphens. The reason for that is because I like the way the image name looks in the URL. With that said, the method I see Google using throughout their Web empire is underscores (e.g. hot_tamales.jpg)! Whatever you choose, rest assured that it's not a huge deal how you separate your words. Don't use a space, though, because that space gets formatted with a %20 (the HTML code equivalent for a space) in the URL which tends to add additional fluff between words and make a URL look quite nasty. :)
Image Metadata
Photographers are undoubtedly familiar with the metadata that is added to images taken with any decent camera: Model number, time, date, bit depth, dimensions, et al. But that's not all that can be added to a photograph. If you're not a photographer, then you may not be familiar with this, but there's a whole section that allows you to add information about an image: Title, description, comments, author, et al. Basically, if you right-click on an image and view its properties, there's a "Details" tab (in Windows, that is -- I'm not sure about Mac or Linux) where you can add some additional information to an image. If you can't see that information, save your image as a JPG instead of whatever format it's currently in and then try.
It has been a widely-debated topic for quite a while as to if Google pays attention to image metadata, but I'm under the impression that they do. To what extent, though, is unclear. And if they don't yet, then the time is near when they will. For one, Google's new WebP image format contains a specific container which preserves metadata. From the WebP help page (bold emphasis added by me):
This section provides information on the RIFF container for WebP users who want to be able to save and parse WebP metadata.
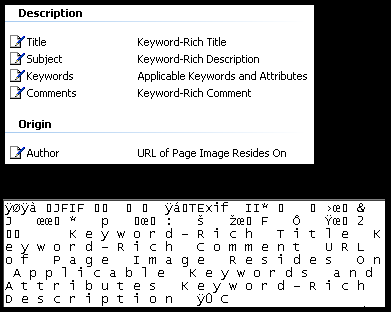
Lastly, for Google to find metadata in an image is simple. As you may or may not know, Google places more emphasis on information located at the top of a Web page. Luckily, an image's metadata is stored at the *top* of it! If you would like to verify this for yourself, simply right-click on an image you've stored metadata in, select "Open with..." and then choose Notepad. As you can see in the image below, the metadata you see in the properties window of the image is exactly what shows up at the top of the image when opened in Notepad (albeit in a different order):
To be clear, adding metadata isn't about cheating the search engines; it's about making it easier for them to learn what your image is about (they want to know!). Just don't be spammy and unnecessarily list keywords. Be smart about it and be fair.
Title and Alt Text
Remember in the "image name" section above when I said I would go more in-depth into ways to add more specific information to your images? Well, in addition to the previousy-discussed image metadata, now it's time to discuss that. The format is simple; you just need to figure out what you want to populate the fields with. For all of your images, you should link to them either one of two ways:
Display an Image Without Linking It: <img src="http://www.yoursitegoeshereinthisspot.com/keyword-named-directory/keyword-in-image-name.jpg" title="Keyword or Keyword-Rich Description Here" alt="Keyword Here">
Display an Image While Linking It: <a href="http://www.yoursitegoeshereinthisspot.com/keyword-named-directory/keyword-in-image-name.jpg" title="Keyword or Keyword-Rich Description Here"><img src="http://www.yoursitegoeshereinthisspot.com/keyword-named-directory/keyword-in-image-name.jpg" title="Keyword or Keyword-Rich Description Here" alt="Keyword Here"></a>
The former is good for if you want to load a full-sized image within a page while the latter is good for if you want someone to click on a thumbnail to see the full-sized image or to be taken to an outbound link after clicking on an image of any size. Whichever you choose, use the title="" section to either place your keyword or a keyword-rich description of the image. If you rest your mouse on top of an image with title="" text, you will see it pop up in a little window:
The alt="" text is what loads in place of your image instead of a red 'x' if the link is broken or if it doesn't load immediately. Even if a person never sees that text, spiders (the things that crawl the Web for search engines) will, so make sure you put them to good use!
Image Location (URL)
The location of your images can play a role in ranking as well. For instance, if you are writing a post or creating a gallery about giant purple robots, create a directory called giant-purple-robots to place all the images in! This will help search engines and people understand more about what that URL/directory is about should they land directly into it from an image search!
Bad: http://www.yoursitegoeshereinthisspot.com/images/image.jpg
Good: http://www.yoursitegoeshereinthisspot.com/giant-purple-robots/keyword-in-image-name.jpg
Likewise, creating a new folder for individual galleries and posts can help you in avoiding the "duplicates" issue (i.e. If you just have one image directory, what happens if you name an image "kittens.jpg" and then months later, you want to have another image named "kittens.jpg?" They can't coexist in the same directory!). Also, make sure you leave your image directories open (that is, don't make them forbidden or add blank index.html files, etc.) so that spiders can easily find any other images/content you may have in any given directory should they try to crawl that directory directly!
Image Size and Load Time
It's always a great idea to make your images as small as possible where file-size is concerned. The smaller the image size, the faster the load time (which Google has confirmed plays a part in ranking). If your thumbnails rank instead of full-sized images, that's okay! If your image is something that a person is truly searching for, they'll visit the page the image is located on so as to click on it for the full-resolution version. Luckily, Google makes this very easy in their image search results pages.
Now, something you may also want to consider (I actually *just* thought of this, so I don't have any hard data to suggest this actually being beneficial or not) is creating 4 sizes of your images and store them all in your directory -- even if you only link to one of them: Thumbnail, small, medium, and full-size. The idea behind this is creating multiple-dimensioned images that people can find if they utilize Google's size filter on the image results page:
Your metadata can remain the same through all the images, but make sure you name your images something like "keyword-small.jpg," "keyword-medium.jpg," keyword-large.jpg," etc. Again, that would clue in searches that the image they've found is of a certain size and it allows you to easily fit all the images in the same directory without naming issues. As for cluing in the spiders, Google and Bing are good with determining size based on dimensions.
Building Links for Images
While the aforementioned tips relate to on-page/in-image factors (that is, factors you can control directly with the image and on the page(s) of your site), here's an off-page factor you may want to take into consideration. Put simply, if you want jump-start your images to rank for specific keywords, then build links to them using the keywords you want them to rank for as anchor text!
Example: <a href ="http://www.yoursitegoeshereinthisspot.com/keyword-named-directory/keyword-in-image-name.jpg" title="Keyword Here">Keyword Here</a>
Link-building is far and away the most arduous part of SEO, so don't expect a walk in the park where finding places to add full-on source like that is concerned. You may have to use what's made available to you on the pages (forums, blogs, et al) you're interested in posting your image(s) on. With that being said, it's worth noting this technique just in case you find yourself needing and/or able to utilize it.
Conclusion
Bear in mind that these steps are to be put in place if you're interested in getting images to rank and help an overall page rank for specific content. If you have image galleries and no other text, using the methods above will allow you to get some text onto your images so that search engines can make intelligent decisions about them. If you're posting an image on a post that has a lot of text, then adding the aforementioned to your images can help your pages rank just a little bit more for the keywords you specify! With that said, if you are creating an online gallery or something for your family to see and you don't care about the rest of Web seeing them, then don't worry about renaming anything and going through all these steps.
Above all, remember that there is never a guarantee that you're going to immediately (or ever) rank well for something, so don't put all your eggs in one basket. I'm not selling you a dream here; just some best practices. Overall, make this approach just one more tool in your SEO toolbox. You don't always have to utilize all of these steps (I didn't for the images in this post), but in conjunction with all the other good usability and SEO methods out there, they only stand to help you -- even if only just a tiny bit! Remember to select good keywords and don't forget about localization, either (that is, if you take a picture of something in Charlotte, NC and that's relevant to the picture, make sure you include Charlotte, NC somewhere in the metadata, title/alt, etc.)! Search is getting more localized day-by-day, so utilize location-awareness where feasible/possible.
I hope you enjoyed this post as I certainly enjoyed writing it! Do you have any tips you would personally like to offer where ranking images is concerned? Please let other readers know via the comments below!