Hands-on review: Kodak Photo Books with SmartFit technology

Being that the holidays are coming up and you might be scratching your head over what to get someone, a printed photo book could be a thoughtful idea.
Back in September, Kodak revamped its photo book creation process with the integration of SmartFit technology, which lays out an entire photo book within minutes. I got a chance to get a hands-on look at the process and the results, so take a look and see if you like what you find.
CREATING THE BOOK
If you haven't already done this, the first step is to create a free account with the Kodak Gallery. (You'll actually get 50 free prints just for doing this.) Then you'll be instantly brought to a window where you can create a folder and upload your photos. I uploaded 104 photos within 30 minutes. A recommended number to start off is really about 50 photos. I wasn't planning to use that many, but I wanted as many options as possible.
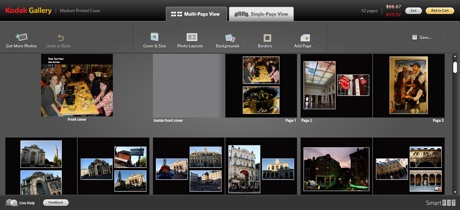
Once that is done, just head to the "Album Options" drop-down menu and select "Create Photo Book." Then hit "Auto-Create" and voilà! Your book has been created. You can either call it quits here or drag and drop items as you please. I definitely chose the latter.
You can drop anywhere between one and six photos to a single page. In actuality, the more photos per page, the cheaper your book might turn out. More on costs later...
For example, if I stopped short without doing anything to my book and decided to get a medium-sized version with 104 photos and 52 pages, it would come out $49.92. I don't really want to pay that much, nor do I even want a photo book that big! So it's time to edit.
As far as design goes, there's plenty of room for your own personal touch there too. There are over 40 different background patterns available now, and approximately 70 total should be ready by the end of the year. You can have the same background for the whole book, or different patterns on varying pages. Then there are other small tweaks, like fonts, borders, captions, etc.
The pricing scale is based on the amount of pages in the book and then the cover and size. You can opt between hardcover or softcover, and books can be made in small, medium, or large. For reference, the large ones (80 pages maximum) can truly serve as coffee table books, while the medium books (100 pages max) are the standard size you'd want on your bookshelf. If you're giving out multiple photo books with the same theme and photos, then small (104 pages max) might be the ideal selection. (FYI, the minimum amount of pages is 14.)
And if you thought you didn't have any more decisions to make, then there's the cover material. The three options there are leather, linen and matte. All of this can seem a bit overwhelming, and depending how serious you are, very time consuming. So definitely set aside some time in your calendar if you plan on making a photo book. (And in case you can't, there is a Save function so you can come back and edit again later.)
What did I end up with? 93 photos on 39 pages in a medium-format book with regular matte surface cover. The final and cost turned out to be $61.13 including shipping. Definitely more than I wanted to pay, but I didn't want to sacrifice any more images.
Production turnaround is 2-3 days, and shipping is an estimated 5-7 days via USPS. There's also the (much more expensive) overnight option if this is a last minute gift or project.
Some little extras you should know about the production and quality:
- Photos aren't dropped into the book in order alphabetically by file name but rather by the date the image was snapped.
- Unfortunately, you can't print text on the back of the book or spine at this time.
- Nor can you add page numbers, but both of these items might be available in the future.
- Two lines of text on the front maximum.
- The image print quality is 300dpi.
- Kodak has integrated its "Perfect Touch" technology for optimizing photos and reducing red-eye.
To find out how the book turned out, just read more.
THE FINISHED PRODUCT
The turnaround time was astounding. I completed the book and submitted it for publishing on November 2. Two days later, I received an e-mail from Kodak saying that my book was ready to ship. It was on my doorstep by end of day on November 5. Note that I opted for standard UPS ground shipping, which takes up to 5-7 days.
Given that we're getting into the thick of the holiday season, the publishing and shipping process won't be this fast for most consumers, but I was still impressed.
As for how the book turned out, I was also impressed. There aren't many (if any) surprises given that I put the entire thing together. But I was happy with the final product, which was placed on the coffee table and then passed around at a recent housewarming party.
Also know that if you ever want to reprint this book or edit it for another project in the future, it should be saved and ready to edit in your Kodak Gallery account at any time.
