X

Gallery: Here's what's inside the Palm Pre

The folks at RapidRepair weren't satisfied being one of the first owners of a Palm Pre - they had to take it apart and see what's inside. Take a look.
By Andy Smith, Contributor
309518.png
1 of 15 Andy Smith/ZDNET
The folks at RapidRepair weren't satisfied being one of the first owners of a Palm Pre. They had to take it apart and see what's inside.

You can replace screens and batteries but be careful, you may void your warranty.

Credit: Rapid Repair

309519.jpg
2 of 15 Andy Smith/ZDNET
Prepare
  • Tools required: Small Phillips Screw Driver, Small Flathead, Pliers, solder iron, exacto razor & Safe Open Tool
  • Repair Toolkit available HERE
Gather all neccesary tools and place your Palm Pre Phone on a clean flat surface, use a soft cloth or towel to place under it.

Credit: Rapid Repair

309520.jpg
3 of 15 Andy Smith/ZDNET
Nice looking phone. It comes with a manual, earbuds (not Apple), pouch, USB cable, and charger.

You want to be sure to only use the OEM charger otherwise you will fry the phone.

The box has a slick design, similar to the original iPhone box.

Credit: Rapid Repair

309521.jpg
4 of 15 Andy Smith/ZDNET
Check out the back of the phone, small and sleek.

Credit: Rapid Repair

309522.jpg
5 of 15 Andy Smith/ZDNET
To get started, push the tab on the bottom of the phone to remove the back panel. This should be pretty easy to do since the battery is user replaceable.

Total of six screws must be removed at this point.

Credit: Rapid Repair

309523.jpg
6 of 15 Andy Smith/ZDNET
Remove the battery so we can expose the 2 clips on the side of the back panel bezel. You can use the razor blade or small flathead to push the clips out. These 2 clips are on the outer edge of the phone.

The tabs secure the top of the keyboard bezel.

Credit: Rapid Repair

309524.jpg
7 of 15 Andy Smith/ZDNET
To remove the keyboard bezel you must use a nylon safe open case tool and spudge all the way around until the bezel pops up. This will remove the back panel partially.

Credit: Rapid Repair

309525.jpg
8 of 15 Andy Smith/ZDNET
Before you pry the back panel bezel all the way off, you must 1st disconnect the communications board cable pictured.

Credit: Rapid Repair

309526.jpg
9 of 15 Andy Smith/ZDNET
Now we can see the entire front panel with components revealed.

Credit: Rapid Repair

309527.jpg
10 of 15 Andy Smith/ZDNET
Let's step back to the front bezel and remove the antenna wires to expose the comm board. This board houses chips for GPS, wireless, etc.

Remove the small metal plate with the razor (pictured) so you can unplug the antenna.

Credit: Rapid Repair

309528.jpg
11 of 15 Andy Smith/ZDNET
We want to focus on removal of the front bezel slide with keyboard. There are 2 clips (bottom corners) to start removal of the keyboard.

Remove the one visible screw, then slide the keyboard in and out to reveal 2 more hidden screws. One hidden screw is located under the ribbon which connects the comm board to the system board.

Remove the two larger board clips at this point. (camera board and comm board clips).

Credit: Rapid Repair

309529.jpg
12 of 15 Andy Smith/ZDNET
We can see the front panel internals now. There are 3 small flip clips to remove. Clips used for: Digitizer, ear piece speaker and mic/LED panel.

Remove the gray tape to expose the actual clip to the LCD.

After the clips are removed, remove the board to expose the Palm Pre LCD screen.

Credit: Rapid Repair

309530.jpg
13 of 15 Andy Smith/ZDNET
Now that the system board is removed, we can concentrate on removal of the heat shield. Use a pair of needle nose pliers along with a heat gun or solder iron to get started.

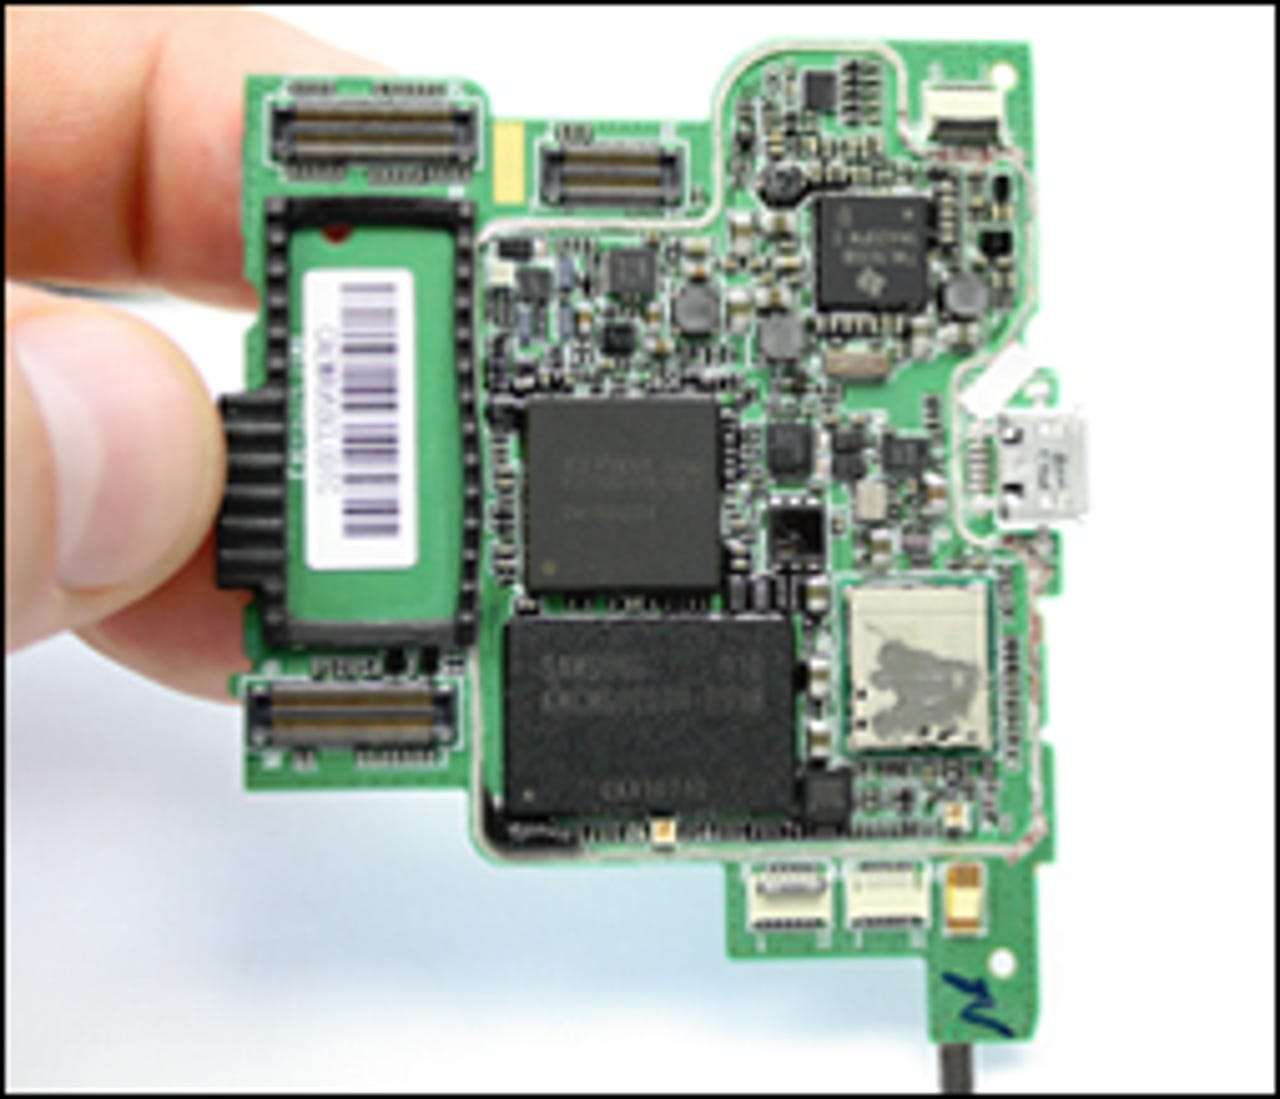
This step is very difficult, don't try it unless you need to identify the chips.

Chips seen here:

Texas Instruments CPU TWL5030B/ 94A20PW C

Elpida K2132C1PB-60-F/ 09100N024

Samsung 910 KMCMG0000M-B998, 8GB NAND memory for storage is suspected.

Credit: Rapid Repair

309531.jpg
14 of 15 Andy Smith/ZDNET
After removal of the board from step 8 we can clearly see the LCD/digitizer combo.

This component is problematic from a design point of view. It mimics the terrible iPhone 1st gen LCD/Digitizer module.

Currently we have not found a way to separate the LCD from the digitizer. Looks like people will be paying for both parts if one should fail.

Credit: Rapid Repair

309532.jpg
15 of 15 Andy Smith/ZDNET
Look at all the glorious parts and modules. Reverse this guide to put it back together. Good luck.

Credit: Rapid Repair

Related Galleries

Holiday wallpaper for your phone: Christmas, Hanukkah, New Year's, and winter scenes
Holiday lights in Central Park background

Related Galleries

Holiday wallpaper for your phone: Christmas, Hanukkah, New Year's, and winter scenes

21 Photos
Winter backgrounds for your next virtual meeting
Wooden lodge in pine forest with heavy snow reflection on Lake O'hara at Yoho national park

Related Galleries

Winter backgrounds for your next virtual meeting

21 Photos
Holiday backgrounds for Zoom: Christmas cheer, New Year's Eve, Hanukkah and winter scenes
3D Rendering Christmas interior

Related Galleries

Holiday backgrounds for Zoom: Christmas cheer, New Year's Eve, Hanukkah and winter scenes

21 Photos
Hyundai Ioniq 5 and Kia EV6: Electric vehicle extravaganza
img-8825

Related Galleries

Hyundai Ioniq 5 and Kia EV6: Electric vehicle extravaganza

26 Photos
A weekend with Google's Chrome OS Flex
img-9792-2

Related Galleries

A weekend with Google's Chrome OS Flex

22 Photos
Cybersecurity flaws, customer experiences, smartphone losses, and more: ZDNet's research roundup
shutterstock-1024665187.jpg

Related Galleries

Cybersecurity flaws, customer experiences, smartphone losses, and more: ZDNet's research roundup

8 Photos
Inside a fake $20 '16TB external M.2 SSD'
Full of promises!

Related Galleries

Inside a fake $20 '16TB external M.2 SSD'

8 Photos