10 top Vista tweaks, part 2

Part 2: As I noted in the first installment of this series, some of my favorite productivity-enhancing techniques don’t involve custom code or registry edits. Instead, they involve learning how the basic building blocks of Windows work, and then rearranging those components to cut steps out of the tasks you perform most often.
In today’s installment of this two-part series, I share some of my favorite tweaks for getting maximum mileage out of Windows Search. I also explain the inner workings of volume shadow copies and how you can make better use of these automatic backups with System Restore and the Previous Versions feature. I show how to get quick access to your local and network data files by combining shortcuts in a single, easy-to-reach location, and I explain why hybrid sleep should be the default on every desktop PC.
Just as in last week’s edition, each tweak gets its own page in this post. I’ve also put together a gallery of instructions, each one annotated with step-by-step instructions so you can follow along. The two pieces are a matched set for each entry in the list; if you look only at the text or only at the gallery, you’re missing the complete picture.
Here’s a quick list of what’s in part 2:
6. Save your favorite searches
The Start menu search box works just fine for quick, ad hoc searches. To really tap into the power of Windows Search, though, spend a little time to create searches that bring together the types of files you use most often (Word documents modified this month or last month, e-mail messages from Fred or Rick, and so on). Then save those searches so you can reuse them later or copy them to another computer.
7. Fine-tune your search settings
Speaking of Windows Search, did you know that there are three separate areas where you can tweak settings that control search behavior? Use these tweaks to make Start menu searches more useful, simplify the complicated advanced search syntax, and add IFilters to search inside types of files that aren’t supported by a default Vista installation.
8. Make the most of System Restore and shadow copies
Did you know that System Restore in XP and Vista use completely different techniques to save snapshots of data? In this tweak, I explain why you might want to increase the amount of space set aside for volume shadow copies. I also introduce a free utility that lets users of Windows Vista home editions find and restore files from automatically created backups.
The fastest way to get to files in any network location is via a shortcut. And the best place to save those shortcuts to network locations is in the Computer window. You can add shortcuts to shared folders, FTP sites, or websites where you publish files. Here’s how.
In XP, you have standby and hibernate. Vista adds a third power state, called hybrid sleep. Here’s what you need to know and how you can tune a desktop system to take advantage of this useful mode.
Tweak #6: Save your favorite searches -->
6. Save your favorite searches
As I’ve argued previously, Vista's built-in search tools are its killer feature. And although Windows Search works well out of the box, a handful of minor tweaks can improve its performance and usability and make it more likely you’ll find the file or e-mail message you’re looking for when you need it the most.One of the simplest tweaks is also one of the most powerful: After using Windows Search, save the criteria so you can reuse that search. When you do so, your search criteria, including the location, search terms, file types, and Windows Explorer sorting/grouping options, are saved as an XML file in %userprofile%\Searches. With a library of saved searches, you can make short work of repetitive tasks. My collection of saved searches, for example, includes shortcuts to display all the Word documents I’ve created this year, grouped by date; all the e-mail messages I’ve received this month; all the blog post drafts I’ve started; all digital pictures I’ve taken this year; and so on. If I open any of these saved searches, I can further refine it by entering additional search terms in the Search box or filtering with the lists available from Windows Explorer column headings.
Here’s how it works:
1. Start by choosing the search scope – the location (or locations) where you want to search.
- To search the entire index, press Windows logo key+F to open the Search window
- To search within a single folder and its subfolders, open that folder in Windows Explorer.
- To search multiple locations, open the Search window, click Advanced Search, click the drop-down list to the right of the Location box, and then click Choose search locations from the bottom of the list. You can combine locations from local storage and network shares.
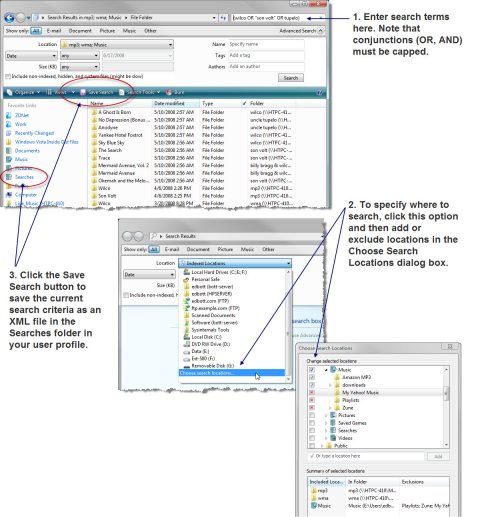
2. Next, enter your search criteria. You can do this by entering a simple search term in the Search box in the upper right-hand corner of the Explorer window, or use the advanced search syntax, or display the Advanced Search pane and choose criteria from the boxes there.
3. Select the type of data to be displayed in the search results, using one of the six choices in the Search pane. The default option is All, which does not filter the results at all. You can choose E-mail, Documents, Picture, or Music to restrict the results to those types of files (adjusting the available column headings ot match). Or click Other to display folders and files that don’t match any of those four groups.
4. Sort, group, and filter the search results using column headings.
5. Click Save Search and supply a descriptive name. The search criteria are saved as an XML file.
To reopen a saved search, go to the Searches folder in your user profile and double-click the icon you saved. Because these are simple XML files, you can copy them to other computers and use them as well. You can also create shortcuts to any saved search and use them wherever you prefer, including the Favorite Links bar, the Start menu, the desktop, or the Quick Launch toolbar.
Tweak #7: Fine-tune search settings -->
7. Fine-tune your search settings
As I noted in the final installment of my Fixing Windows Vista series, the most important tweak you can make is to install Windows Search 4, a major update to the engine that powers Windows Search (the update makes no noticeable interface changes). With that task out of the way, tweaking Search capabilities means going to three different dialog boxes, each of which deals with a completely separate aspect of search. In the illustrated step-by-step instructions for this tweak, I explain where to find each of these settings and what you should and shouldn’t do with each one.- Start menu search behavior. When you click Start and begin typing in the Search box, your search results include programs first, but they also include just about anything else that matches what you’ve typed. The full list includes e-mail messages, Internet Explorer Favorites and history, and files and folders stored in your user profile. To change these options, right-click Start, click Properties, click the Customize button on the Start menu tab, and scroll down to the block of Search options. You can exclude any of these groups by clearing its check box. You can also expand the search to the entire index instead of just the files in your profile.
- Folder Options. The default settings on the Search tab are correct for most users. The one exception? Select Use natural language search if you want to be able to create and save complicated multi-field searches without having to use the strict search syntax. With natural-language search enabled, you can type email from Fred or Rick received this week instead of the more daunting kind:email from:(Fred OR Rick) received:this week. The strict syntax is more useful if you want perfect control over results, but the more relaxed natural-language syntax is slightly easier to use. In either case, you’ll want to learn the ins and outs of the search syntax to get best results
- Advanced Indexing Options. Windows Search can search for file names and properties such as date and size for any sort of file, but it can only find content inside those files if you’ve installed an IFilter that understands how to open the file and unlock its contents. I’ll discuss IFilters in more detail in the rest of this post. To check that the file contents are being indexed properly, open Indexing Options in Control Panel, click the Advanced button, and click the File Types tab. For each important file type, be sure that Index Properties and File Contents is selected and that the correct IFilter is listed.
Now, about those IFilters. The IFilter format has been around for years, powering Microsoft’s search capabilities on servers and workstations, including the full-text search services in Microsoft Exchange, SQL Server, and SharePoint Portal Server. An iFilter written for any of those servers should work just as well on Windows Search. Many IFilters are installed automatically along with programs such as Office 2007 and Adobe Reader or Acrobat version 7 or later. If you don’t have those programs installed, you can download alternatives, usually free, such as the Microsoft-supplied IFilter pack for Office 2007 documents and the the Foxit PDF IFilter. There are also IFilters for StarOffice and OpenOffice document files, and WordPerfect 12 Service Pack 2 reportedly includes an updated IFilter that should work fine with your WPD files.
On any Windows Vista system, I typically install the Microsoft Filter Pack, which includes IFilters for Office 2007 and Visio and, most importantly, adds support for searching filenames within Zip files.
You can find an index of available iFilters at MSDN Filter Central. Others are at ColumbiaSoft, at IFilterShop, and at IFilter.org. Some IFilters are available through Citeknet as well, and their offerings also include an IFilter Explorer that allows you to examine and tweak the IFilters installed on your system. The Citeknet website appears to have been abandoned in late 2006, and no one responded when I used the Contact form to send a message.
Tweak #8: Tune up shadow copies and System Restore -->
8. Make the most of System Restore and shadow copies
System Restore may be the single most misunderstood feature in Windows Vista. Although the name and basic interface are the same as the System Restore feature in Windows XP, the technical underpinnings have changed dramatically. If you’re following advice originally written for XP, you might want to rethink some of your decisions.First, a little background. In Windows XP, the primary purpose of System Restore was to help you recover from problems caused by incompatible drivers, bad DLLs, and registry errors. To help you roll back those changes, the system took regular “snapshots” of the system state, each of which required a relatively small amount of space. As a result, on a Windows XP system you could easily have access to System Restore snapshots going back weeks or months.
In Vista, those snapshots are taken by the Volume Shadow Copy Service, which also keeps track of changes to data files for the Previous Versions feature. At regular intervals, the system makes a block-level comparison of every change made to the volume (that’s Windows-speak for a drive or partition identified by a drive letter). Those changes are stored in the extraordinarily well-hidden System Volume Information folder, with default permissions that allow access only to the System account. Shadow copies ignore large system files that don’t require backup, such as the pagefile, hibernation file, and offline message stores for Exchange accounts. But it tracks changes for just about every other kind of file. As a result, the snapshots typically take up much more space than their XP counterparts, but the benefit is that you can often recover an old version of a deleted, changed, or damaged file without having to look far.
The Previous Versions user interface in Windows Explorer is available only on Vista Business, Ultimate, and Enterprise editions. If you use Home Basic or Home Premium edition, however, you’re a second-class citizen. Although Vista creates those shadow copies, their contents are not available for easy retrieval. But a crafty third-party developer has stepped up with a utility that lets you access those files on any Vista system.
On any computer running Windows Vista, I make sure to check (and if necessary, tweak) three settings. Here’s how you can do the same:
- Make sure that restore points are automatically created on every drive that needs protection. This setting is available via the System option in Control Panel. The Automatic restore points list on the System Protection tab shows every drive that has a drive letter and is formatted with the NTFS file system. A check mark means that shadow copies are being created on that drive. I recommend that you always enable automatic restore on the system volume. For drives that contain only data files, select the check box if you want to be able to recover previous versions of files as needed; clear the check box if the files are regularly backed up elsewhere and you don’t need additional backups via shadow copies.
- Fine-tune the amount of space that shadow copies use. In Windows XP, you did this with a slider. In Vista, this setting can be adjusted to a specific size by opening a Command Prompt window and running vssadmin resize shadowstorage. Most versions of this tip that I’ve seen at other sites assume you want to reduce the amount of space used. However, under some circumstances you might want to allocate extra space for shadow copies. Vista initially allocates 15% of the drive space, or 30% of available free space, whichever is less, for storing shadow copies. On a system volume that is 149GB in size, the initial size of the volume shadow storage is roughly 20GB. If you store data files on a separate partition, you could easily increase the volume shadow copy space to 30GB or even 40GB. That tweak greatly increases the likelihood that you’ll be able to recover from a problem or restore a file using Previous Versions. (On the illustrated step-by-step instructions for this tweak, I show how to use this command line to increase the volume shadow space on the C: drive. For details on alternative ways to manage shadow copies, see Vista Hands On #16: A smarter way to manage System Restore space.)
- For systems running home editions of Windows Vista, install the free ShadowExplorer utility. It runs as a stand-alone program and allows you to open any shadow copy and retrieve files or folders from it. The interface is not as slick as what you get with Windows Explorer, but if you’re desperately seeking a valuable file that you inadvertently trashed two weeks ago, you won’t care about the rough edges.
I also make it a point to check System Restore settings every week or two just to verify that everything is working as expected. For fast access, create a shortcut using the command Systempropertiesprotection.exe, which opens the System Control Panel with the correct tab already selected.
Tweak #9: Add network shortcuts to the Computer window -->
9. Bring network files closer
For reaching data stored on local drives, the Computer window is normally the least efficient place to start. Likewise, the Network folder takes you the long way around (and occasionally makes you wait while it enumerates every computer on the network). If your goal is to quickly access data stored on another computer, the solution is to add shortcuts to your favorite network locations in the Computer window. Mapped network drives appear here automatically, but you can also add shortcuts to any of the following types of network locations:- Any shared folder on a local network that can be reached with a UNC name
- FTP sites (anonymous or password-protected)
- SharePoint servers
- Any website that supports WebDAV
For use with local shared folders, this technique is preferable to mapping drives, because it doesn’t require that you use drive letters and it allows you to give the network shortcut a descriptive name. You can see an example in the screenshot gallery that accompanies this post, along with illustrated, step-by-step instructions for adding an FTP site as a network shortcut.
To get started, use the standard keyboard shortcut, Windows logo key+E; that opens the Computer window in Windows Explorer.
Next, right-click any empty space in the Computer window and choose Add a Network Location from the shortcut menu.
Click Choose a custom network location and follow the instructions to enter the UNC name of a shared folder or a URL to an FTP or WebDAV site.
Note that you cannot create a shortcut directly to a remote computer; the shortcut must point to a shared folder on that server.
The final tweak I make in the Computer window is to group all the icons by type. That sorts local hard drives into one group, removable media into another group, and network locations into their own group.
Tweak #10: Master power management -->
10. Master power management
It took 18 months’ worth of updated drivers and patches, many of them rolled into Service Pack 1, but most of the sleep and hibernation issues that plagued Vista in its early days are fixed now. If you haven’t yet taken advantage of some of the new power management features in Vista, these tweaks might help you save some money on your electric bill and keep your office a degree or two cooler.If you previously used power management settings in Windows XP, you’ll need to learn about hybrid sleep, which is a Vista-only setting that improves performance for desktop systems. The trouble with using XP’s Stand By mode on a desktop PC is that it doesn’t offer a safety net. If you have a power outage, or accidentally hit the power button or pull the plug, your saved state (and any open files that you hadn’t yet saved) are gone in a few milliseconds. The alternative, hibernation, saves the contents of memory to a file on the hard disk, which saves your data files but leads to a delay when you resume.
That’s where hybrid sleep comes in. When this mode is enabled, putting the PC to Sleep saves a hibernation file and then puts the system into a low-power mode similar to the old Stand By. When you’re ready to resume, you should be back to work in a few seconds. If the power shuts down, no information is lost; when you restart, the system finds the hibernation file and uses it to resume. The only penalty you pay for using hybrid sleep is that the initial sleep action takes slightly longer than usual.
You don’t need hybrid sleep on a notebook, of course. In that case, the system automatically switches from Sleep to Hibernate if the battery level gets to a Critical level where data loss might occur.
On desktop and notebook systems, I typically tweak three settings. All of them are available from the Power Options dialog box in Control Panel:
- Power plan. Except under unusual circumstances, I use the built-in Balanced plan, or the equivalent plan provided by the PC or notebook OEM. (For a Sony VAIO, this is VAIO Optimized; for a Dell, it’s Dell Recommended.) On a desktop PC, you might be tempted to use High Performance. The only reason to choose this option is if you want to make sure the system doesn’t shift into a lower processor mode or go to sleep while you’re performing a background task.
- What the Power buttons do. On notebooks, I like to set the power button to Hibernate and use the lid and sleep button to go to sleep. On desktops, I set the power button to Sleep as well.
- Advanced Power Options. The Advanced Settings tab for each power plan lets you fine-tune what that plan does. For desktops, make sure Hybrid sleep is on and Hibernate is set to Never. For notebooks, hybrid sleep should be off.
Of course, you know that you can power down the system from the Start menu by clicking the arrow to the right of the Lock button and then choosing Shut Down from the menu. If you want that option be a bit more accessible, create a shortcut using the Shutdown command. The command shutdown /s gives you a 60-second warning; shutdown /p /f forces all running programs to close and shuts down with no further warning. If you change your mind after initiating the shutdown sequence with the /s switch, you can abort it using (naturally) the /a switch: shutdown /a.