Hands-On: Solus Linux and the Budgie desktop

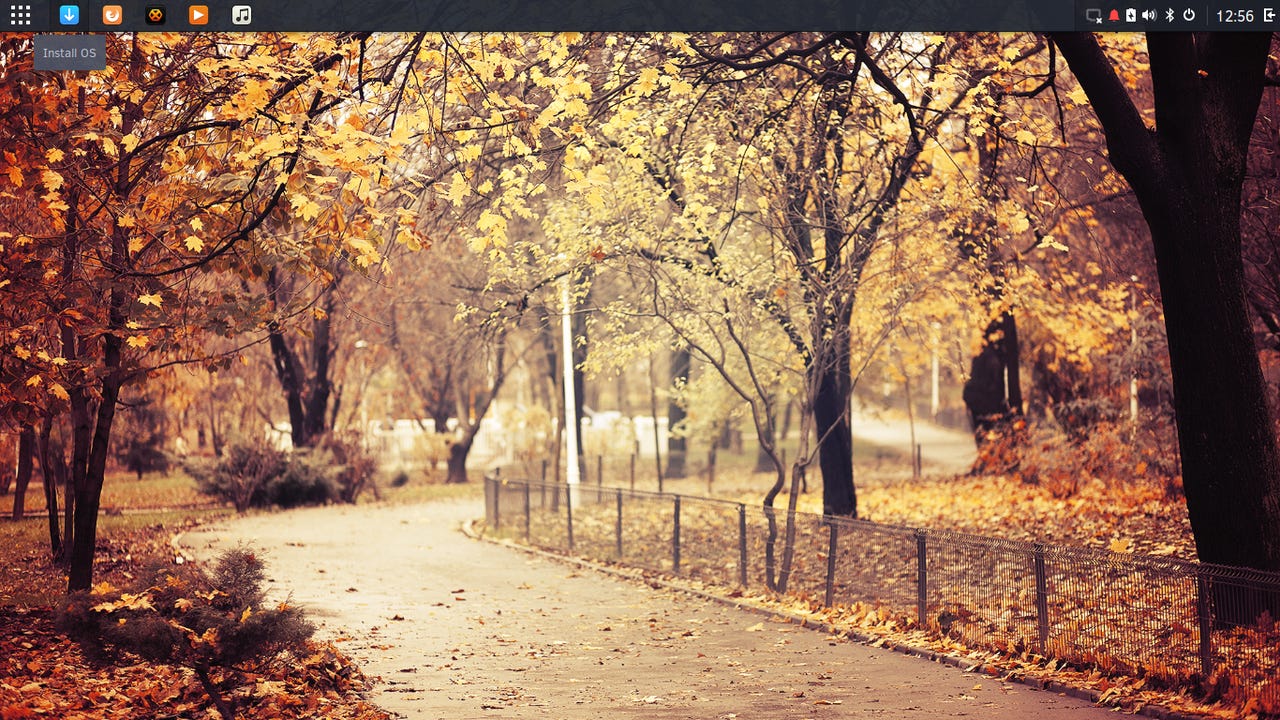
Solus 2017.01.01.0 Live with the Budgie desktop.
I have heard from a number of people recently suggesting that I take a look at Solus Linux. Since I have not tried a completely new distribution in a while, and I don't want to get bored or stale, I decided this would be a good time to give it a try.
A quick perusal of the Solus web page seems promising. I like the fact that Solus is built from scratch, not just another Ubuntu (or whatever) derivative. I am also impressed by the fact that the Solaris team has developed the Budgie Desktop to suit their own needs and preferences. I think that says a lot about their competence and ambition.
The latest Live Image is Solus 2017.01.01.0 (no prizes for guessing what the release date was), and the Release Announcement makes for some very impressive reading. Lots of good information about what is new and improved, both in the operating system and the Budgie and MATE desktops. Lots of pretty screen shots, and a very extensive Full Changelog.
The ISO images are available on the Solus Download page. The standard version has the Budgie desktop, and there is also a Solus MATE version available. For purposes of this post I will only be looking at the Budgie version. The download files are just under 1GB, and they are hybrid ISO images so you can either dump them to a USB stick or burn them to a DVD to produce a bootable Live image.
Solus supports both MBR and UEFI firmware, but not UEFI Secure Boot. Booting the Live USB stick brought up the Budgie desktop shown above. There is a relatively typical looking panel across the top of the screen. The first icon at the left end of that panel is the Solus Installer.
It looks like Solus uses their own installer (at least I don't recognize this one offhand). I don't want to bore everyone (and myself) with a long-winded step-by-step walk through the installation process, but there are a few points that I would like to mention. So I will show screen shots of each step, and just comment on the most important, different or interesting bits.
- The initial screen just asks if you want to Install to disk or Continue using the live preview. Seems a bit of an odd question, since I clicked on the installer to get here...
- The next screen asks for the installation language, which will also be the default language of the installed system.
- The next screen is more interesting, it offers to determine your location automatically. If you have an internet connection, it will try to get your location from that. This is purely a convenience, to save a bit of time and trouble in the following screens for the keyboard layout and timezone. If you don't have an Internet connection, don't worry you will be able to enter the necessary information manually.
- I had a wireless network connection for this installation, and the automatic location determination correctly found my location in Switzerland.
- If your location has already been automatically determined, you will probably get a list of location-appropriate keyboard layouts and your timezone will already be set properly.
- These three screens are the heart of the installation process: the disk layout.
- The usual options of installing alongside existing systems, erasing everything and using the entire disk, or manually specifying the partitions and mount points.
- As usual for my multi-boot installations, I chose the manual partitioning option.
- The manual partitioning screen is pretty typical, but it does not have any way to create new partitions so if you are going to take this route, you have to create the layout you want before running the installer.
- This installation was on a UEFI firmware system. The installer will find an EFI Boot partition and list it here. My system has two EFI partitions, but I could never get the installer to let me choose between them, it just found one that it liked and that was it.
- User account information. This is the only installer I have ever seen which will let you create more than one user account during installation. That's a nice touch.
- The installer now has all the information it needs, so it shows a summary
- You get one last chance to confirm that you really want to install
- Installation progress display.
- The actual installation was the fastest I have ever seen. I couldn't believe how quickly the progress bar was moving or how soon it said that it was done and ready to reboot.
Rebooting after installation completes brings up a screen which looks identical to the Live system screen.
Solus Linux 2017.01.01.0 with Budgie desktop
As I said at the start, this is my first look at both the Solus Linux operating system and the Budgie desktop. So far it I think it looks good: it's clean and simple and not radically different from other common Linux desktops. There is a panel at the top of the screen, with an application menu at the left end, some launcher icons, space for active window icons across the middle and some controls and indicators at the right side.
The Budgie Menu is quite interesting. At first it looks like a pretty typical Category/Detail type of menu, with categories such as Accessories, Internet, Office and so on -- and of course All. But as I started using Solus a bit, and starting a few different applications from the menu, I realized that it was actually building a sort of Favorites menu at the top of the All list.
Budgie Menu
I used the screenshot application, and the next time I went to the Budgie menu the Utilities category was at the top of the All list, with the screenshot application listed under it, and then all the rest of the complete category lists followed that. Then I started a terminal window, and the next time the Budgie menu had added the System Tools category at the top of the All list, with Terminal listed under it.
That was not the only thing that surprised me about the Budgie menu, though. The Category lists are initially alphabetic, but after I had been using Solus for a while I noticed that the applications I had used were being moved to the top of their own Category lists as well. That was a bit confusing at first, because I was looking in the wrong place, but once I noticed what was happening, I found it to be extremely convenient.
Software updates are handled in a different way on Solus. Shortly after I logged in the first time, I got a notice that there were updates available. There is a button included on this notification to open the Software Center, or it can be started from the panel icon.
Solus Software Center Updates
The Software Center shows updates in three major groups, with the Required Updates group automatically selected for installation. Clicking on the categories expands them to show a detailed list of updates.
Clicking Update Selected at the top right of the window will start the installation process. A typical status bar and text is displayed at the bottom of the window while the installation is in progress.
While I am in the Software Center application, I want to mention the Solus package repositories. They choose to build and maintain their own repositories and application libraries. This means that they do not "automatically" have thousands of applications and utilities available in some upstream repository; but it also means that what is available has been chosen with some care, and has been compiled and tested by Solus developers.
The Solus Software Center
One of the reasons that Solus installed so quickly is that it actually does not include a lot of applications in the base distribution. There's no LibreOffice (or other office suite), there's no photo management applications, there's no GIMP (or other graphic editing application)... there's not even a simple vim or vi-style text editor! If you need or want any of these, you just have to go to the Software Center and install them.
For example, if you want a full office suite, LibreOffice is there; if you want a smaller and lighter option, Abiword and Gnumeric are there. For graphics there is GIMP and Inkscape; for photo management and editing you can choose Gnome Photos, Fotoxx or Shotwell; for text editing choose from vim, emacs or geany.
I like the flexibility that this approach provides. You get to choose what you have installed, and in the process of making that choice you might very well find something new and different that you weren't aware of. Equally as important, you do not start out with hundreds of different applications installed that you don't need or want, or might not even be aware of.
In the short time I have been using and testing Solus and the Budgie desktop, I have really only started to scratch the surface. The major question about the operating system itself is how stable and well-supported it will be over time. It is a rolling-release distribution, so it should be getting a pretty steady flow of updates. That will require a significant and continuing effort on the part of the Solus developers - but because they have kept the system relatively small and the focus sharp, it also gives them the opportunity to provide a more consistent and reliable platform.
The Budgie desktop seems particularly good to me. It is built on top of the Gnome stack, so a lot of it will look familiar to a lot of people. It has stayed close to the generally accepted look and feel so new users are able to pick it up quickly and easily, but will still be able to learn new things and enjoy the benefits of new features and capabilities. I haven't even started trying to customize the desktop yet, but from what I have seen in the documentation that looks very promising as well.
So far I have installed Solus on four different laptops, including both MBR and UEFI firmware systems, and ranging from the brand new ASUS X540S that I got just a week or two ago all the way back to the Samsung N150 Plus netbook, and it has installed and run just fine on every one of them. At this point I expect that it will become a permanent part of the group of distributions I install on pretty much every system.