'ZDNET Recommends': What exactly does it mean?
ZDNET's recommendations are based on many hours of testing, research, and comparison shopping. We gather data from the best available sources, including vendor and retailer listings as well as other relevant and independent reviews sites. And we pore over customer reviews to find out what matters to real people who already own and use the products and services we’re assessing.
When you click through from our site to a retailer and buy a product or service, we may earn affiliate commissions. This helps support our work, but does not affect what we cover or how, and it does not affect the price you pay. Neither ZDNET nor the author are compensated for these independent reviews. Indeed, we follow strict guidelines that ensure our editorial content is never influenced by advertisers.
ZDNET's editorial team writes on behalf of you, our reader. Our goal is to deliver the most accurate information and the most knowledgeable advice possible in order to help you make smarter buying decisions on tech gear and a wide array of products and services. Our editors thoroughly review and fact-check every article to ensure that our content meets the highest standards. If we have made an error or published misleading information, we will correct or clarify the article. If you see inaccuracies in our content, please report the mistake via this form.
How to use Microsoft's AI-powered Clipchamp to create a video montage - for free

Let's say you've shot a video or series of photos that you want to turn into a full video production, but you're not sure where or how to get started. Microsoft's free Clipchamp application can help.
This free video editor built into Windows 10 and Windows 11 can use AI to generate a video for you. Pick the clips and photos you want to use, choose a style, select an aspect ratio, and add music. Clipchamp will then put everything together.
Also: How to download YouTube videos for free
You can edit and tweak the video in the tool's Timeline or leave it as is and save it as an MP4 file. Clipchamp works the same in Windows 10 and Windows 11, so you can use it in either edition of Windows.
How to Microsoft's AI-powered Clipchamp tool
1. Launch Clipchamp
Launch Chipchamp from Windows 10's or Windows 11's Start menu or All Apps screen. On the program's home screen, click the "Create a video with AI" button.
2. Add media
You should see the Auto Compose window with four options: "Upload media," Style, Length, and Export.
Also: How to screen record in Windows 10 or 11
At the "Upload media" screen, enter a title for your video and then upload the photos or video clips you wish to add. Click the window to manually add the files from File Explorer or drag and drop them. Click the plus icon if you want to add more files. Click the "Get started" button to move to the next section.
3. Choose a style
You should now see the Style section, where you can pick the style for your video. Clipchamp should suggest a specific style for you. Click the thumbs down or thumbs up icon to see a different style. When you've found the style you like, click Next. Otherwise, click the "Choose for me" link if you want Clipchamp to determine the style.
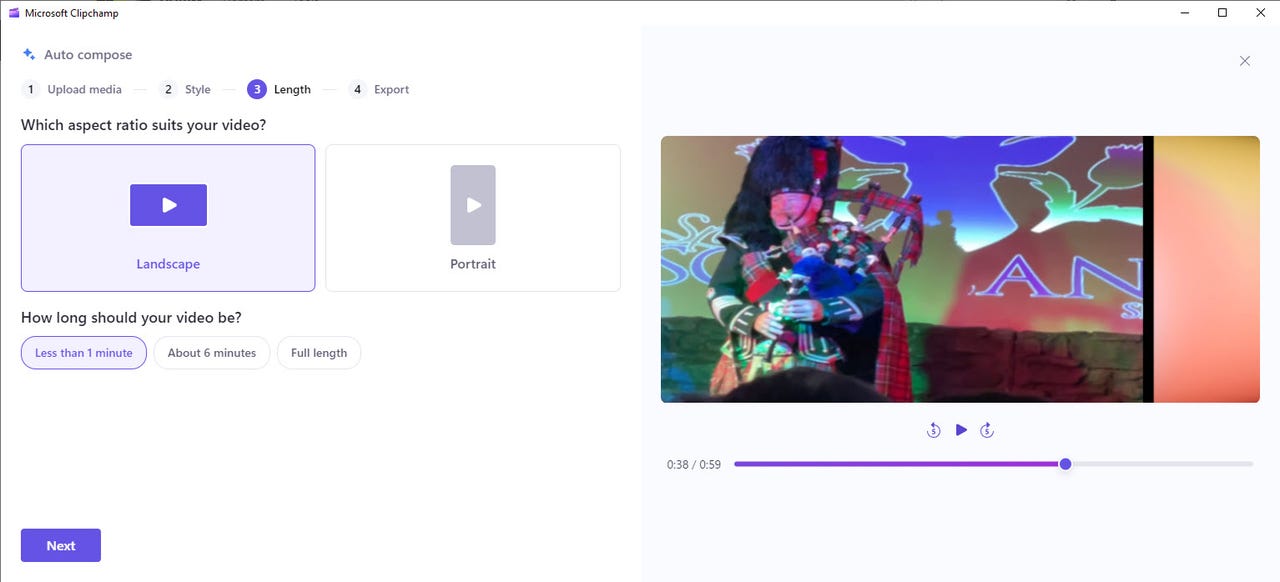
4. Specify size and length
The next screen should prompt you to select the aspect ratio and length of your video. Choose between landscape and portrait mode. To determine the length, select one of the options, such as "Less than 30 seconds," "About 1 minute," or "Full length." When you're done, click Next.
5. Choose the music
Next you should see the Export section, where you can choose the music. Click the current suggested track to see other choices. Click Preview under the thumbnail for each piece of music to hear how it sounds. You can also opt for no music.
Also: How I gave my audio recordings an instant quality boost
Otherwise, select the music you want to add and then click the left arrow next to the word Music. To set a different music track, click the link for "Create a new version." Click the arrow next to the word Music to return to the Export screen.
6. Edit in Timeline
You now have two choices. You can edit your video in the Timeline to make any manual changes you wish or directly export it as is. To view and modify the video, click the "Edit in Timeline" button. In the Timeline window, you can perform any tweaks you like -- add or remove media, change the order of the clips, alter the music or font, apply templates or transitions, include animations or stickers, add filters and effects, and choose other aspect ratios. When you're done, click the Play button to preview your video.
7. Export your video
From the Timeline, click the Export button at the top to export your video. If you decided not to use the Timeline, click the Export button from the Auto Compose window.
Also: How to turn on live captions in Windows 11
Either way, the Export screen shows you the progress of your video's creation. When your video is ready, click the Open File link to play the video in your default media player.
8. Save your video
If you wish to keep the video, click "Save to your computer" to save it locally as an MP4 file. To store it online, scroll down the window to view the different services you can use to save or share the file: OneDrive, Google Drive, YouTube, Dropbox, and LinkedIn.