Apple Vision Pro tricks: How to take perfect screenshots and recordings (and avoid weirdness)

Given how new the Apple Vision Pro is, and how big a departure it is from previous Apple product platforms, a lot of people are going to be writing about it. That's a particular challenge, because the Vision Pro (and any XR experience) can't be easily represented in the 2D world most of us work in.
Also: Apple Vision Pro review: Fascinating, flawed, and needs to fix 5 things
What you see on your flat screen -- whether they're screenshots or recorded videos -- will be substantially different from what one sees inside the Vision Pro's secluded environment. That said, Apple's VisionOS does offer both screenshot and screen recording capabilities, and since those are the tools we have to communicate to the 2D world, they're the tools we'll be using.
In this article, I'll show you how to take both screenshots and screen recordings. I'll also showcase some interesting spatial computing artifacts of that process. Let's dive in.
How to take a screenshot or screen recording with your Vision Pro
The two ways to take a screenshot on Vision Pro
You have two options for how to take a screenshot. The first, which is useful if you can stabilize your head before taking a shot, is to press both the top button and the digital crown simultaneously.
Once you do that, you'll hear an old-fashioned camera shutter sound, and a 1920x1080 image will be dropped into your Photos stream.
Here's an example:
I prefer the second way, which is simply to ask Siri to take the shot. All you have to do is say "Siri, take screenshot," and the AI will handle the rest. I prefer this second method because -- if I have my head and view exactly where I want it -- I don't have to move my body, arms, and potentially the display to press the buttons. Doing so could change the view from the image I wanted to take.
So that's how it's done. Now for the weird part.
How to handle screenshot weirdness on Vision Pro
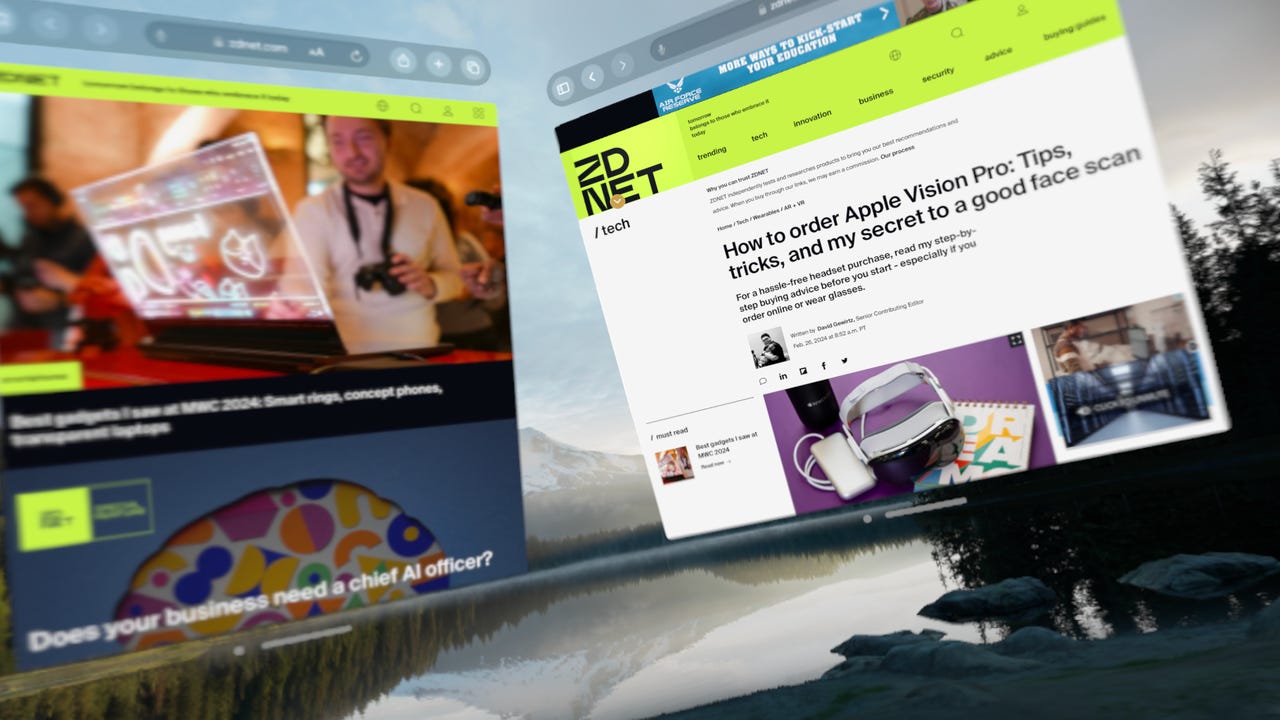
With only one example, you might not have noticed a weirdness that's super-apparent in other screenshots. Look at this example of two ZDNET pages side-by-side:
Notice how much more clear my article is than the page on the left. Here's another image of my article. This time, notice how much more clear the area in blue is, compared to the area in red.
This is not a mistake. It's actually how the Vision Pro renders its screen. Those blurry screen areas are what's projected to the wearer. When using the device, the effect is not that noticeable.
That's because the Vision Pro relies heavily on eye tracking. Not only is eye tracking used as a pointing mechanism in the UI, but it's also used to tell the Vision Pro what to render completely and what it can use less processing power to present.
In the first image above, even though I had two web pages on the screen, I was looking at my article. As such, the front page of ZDNET was only in my peripheral vision, and the Vision Pro knew it could slack on quality because I wasn't paying attention to it.
Also: 3 Apple Vision Pro mistakes you should avoid at all costs (or you'll lose everything)
Likewise, in the second image, I was looking at the text I've highlighted as the blue area. Because I wasn't focused directly on the text I've highlighted as the red areas, the Vision Pro knew it could get away with devoting less processing power to render those sections of the image.
My operational tip from this observation is simple: Be sure to focus on the part of the screen that you want to showcase when you're taking a screenshot. That will make that area more crisp.
Now, here's a second weirdness I experienced. Take a look at the bottom row of this screenshot:
Here's that row after I brought it into Photoshop and cropped it so you can see it better:
On the left, you can see the blurring behavior we just discussed. Now, notice how all the screenshots of the Photos library are tilted one way or another? That's because I had one heck of a hard time trying to capture a screenshot of the web page without the tilt.
I carefully lined up the horizon of the lake (I'm using the Mount Hood environment) so it was level. And yet, try after try, I could not get a level image. Finally, the far right one turned out to be mostly level, but I felt like my head was tilted quite far to the right. I also couldn't capture a second image that didn't tilt.
Also: Could the Apple Vision Pro make you like flying economy class (or hate it a little less)?
It's quite frustrating, and either an artifact of the Vision Pro or of my slightly tilted psyche. Either way, it's weird and annoying.
How to capture a screen recording on Vision Pro
To initiate a screen recording, look up to the top of the screen until you see the Control Center dot. Focus on that and click. On the Vision Pro, a click is made by tapping your fingers together. Whenever I say "click," from here on in, I am referring to that process of tapping your fingers together. (Because constantly repeating "tapping your fingers together" would get really old, really fast.
VisionOS will bring up the Control Center. This should be familiar to anyone who's used iOS before. Because we've been talking about screenshots, you should know that I've used Photoshop to crop each screenshot, rotate it to make it fairly level, and resize it to 1920x1080. When using Vision Pro screenshots to illustrate something, I'll always tweak them in Photoshop for the best learning potential.
In any case, to begin a recording, press the screen recording button:
Now, close the Control Center by glancing at the X and clicking. Go ahead and do all the actions you want to appear in the recording. When you're done, look back up at the top of the screen for the recording dot, which is now green. Click it to end your recording.
VisionOS will present a dialog telling you your recording has been saved, and it will be in your Photos library.
Recordings, like screenshots, are only 1080p despite the device itself having a resolution of 3660×3200 per eye. This is what I mean by recordings and screen captures not doing the device justice. Not only is the Vision Pro capable of rendering a 3D environment, but it's doing so in a far higher resolution than screenshots and recordings can convey.
Also: How to order Apple Vision Pro: Tips, tricks, and my secret to a good face scan
In any case, if you want to see a sample recording, here's an unedited version of one I did while writing this article. If you watch it, you'll also see that I'm still having quite a bit of difficulty picking up and moving windows in the Vision Pro. I'm sure that will resolve itself with practice. I've only been able to use this device for a little over a day.
As you can see, I had problems with tilt here as well. My recommendation is to do a test shot and figure out how you have to hold your head. Also, I think I moved my head too fast for the recording. When recording, try to move your head much more slowly than you think necessary. This will prevent 2D video viewers from experiencing disorientation and nausea while watching.
So there you go. Have you been using the Vision Pro? Have you made any screen recordings or captured any video? Let us know about your experience in the comments below.
You can follow my day-to-day project updates on social media. Be sure to subscribe to my weekly update newsletter on Substack, and follow me on Twitter at @DavidGewirtz, on Facebook at Facebook.com/DavidGewirtz, on Instagram at Instagram.com/DavidGewirtz, and on YouTube at YouTube.com/DavidGewirtzTV.