Windows 10 tip: How to disable unwanted startup programs

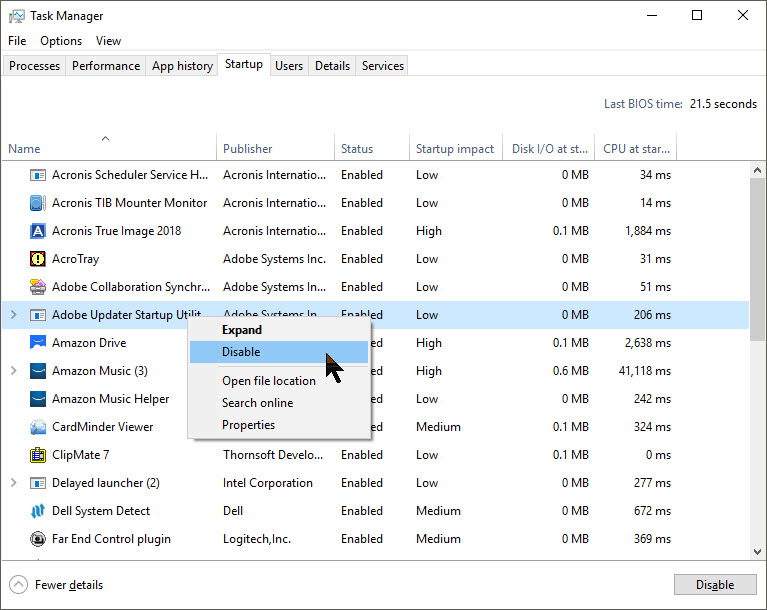
Right-click the column headings to add details about the impact of auto-starting programs.
Every time you start your PC, Windows checks in more than a dozen places to see if you (or, more likely, some program you installed) has specified that a program should start automatically. Those auto-start programs can run as a result of entries in the Windows registry, scheduled tasks, Group Policy settings, even the ancient Win.ini file.
Most of the time, auto-starting programs are benign and useful. You almost certainly want your cloud file storage utility to run automatically so it can sync changes and new files added to OneDrive or Dropbox while you were away, for example.
But other auto-start programs are simply resource-draining vampires, placed there by program developers who decided their little icon in the system tray should always be visible, even though you rarely use their software.
In older Windows versions, you probably became accustomed to managing a limited selection of these nuisances using the Msconfig utility. Windows 10 offers control over a wider range of auto-starting programs directly from Task Manager.
To start, press Ctrl+Shift+Esc to open Task Manager and then click the Startup tab. (If you don't see any tabs, click the More details link at the bottom to expand Task Manager to its full glory.)
That tab displays a startlingly long list of programs that have been configured to start up every time you turn on your PC. The performance impact of each entry in the list is categorized as Low, Medium, or High in the Startup Impact column. (Right-click that heading and choose the Disk I/O at startup and CPU at startup columns to see even more details, as shown in the screenshot above.)
To prevent a program from starting automatically, click its entry in the list and then click the Disable button at the bottom of the Task Manager window. To re-enable a disabled app, click the Enable button. (Both options are also available if you right-click any entry on the list.)
Disabling a startup entry doesn't uninstall it, nor does it prevent that program from running when you decide you need it. To completely remove an unwanted program from the startup list, you'll need to use the original installer app (assuming the developer included that capability) or a utility like the excellent AutoRuns, part of the Microsoft Sysinternals collection.
PREVIOUS AND RELATED CONTENT
Ed Bott's extensive collection of Windows 10 tips, organized by category.
Windows 10 setup and configuration tips: Don't settle for default settings
Ed Bott's extensive collection of Windows 10 tips has been freshly updated for the Fall Creators Update. This page includes the most popular tips for getting Windows 10 configured exactly the way you want it.
Windows 10 productivity tips: Making everyday tasks easier
This page includes the most popular tips for working smarter.
Windows 10 performance and troubleshooting tips: Run faster, smoother, longer
The most popular tips for performance and troubleshooting.
Windows 10 networking and security tips
This page includes tips for configuring networks and managing security settings.