Fedora 23: A walk through my favorite Linux installer - Anaconda

After a one week delay, the final release of Fedora 23 should be available tomorrow.
I have done walk-throughs of the installers for Manjaro, openSuSE, and Ubuntu recently, and I have been looking forward to continuing this with Anaconda, which is by far my favorite of the installers. While the other installers seem to be a simple linear walk through all of the steps which may be required to perform an installation, I think Anaconnda is very nicely designed and engineered to provide a logical view of the necessary tasks and easy access to those which are required, without forcing you to go through every single one whether you really need to or not.
The Fedora 23 ISO images will be available from the usual Fedora Download pages for Workstation, Server, and Cloud versions, with the usual variety of desktops including the 'official' Gnome 3 version and the alternate 'spins' for KDE Plasma, Xfce, LXDE and MATE.
The ISO images are in 'hybrid' format, so they can be copied directly to a USB stick or burned to a DVD. The resulting Live media will boot and install on both MBR (Legacy) boot and UEFI firmware systems, including UEFI Secure Boot.
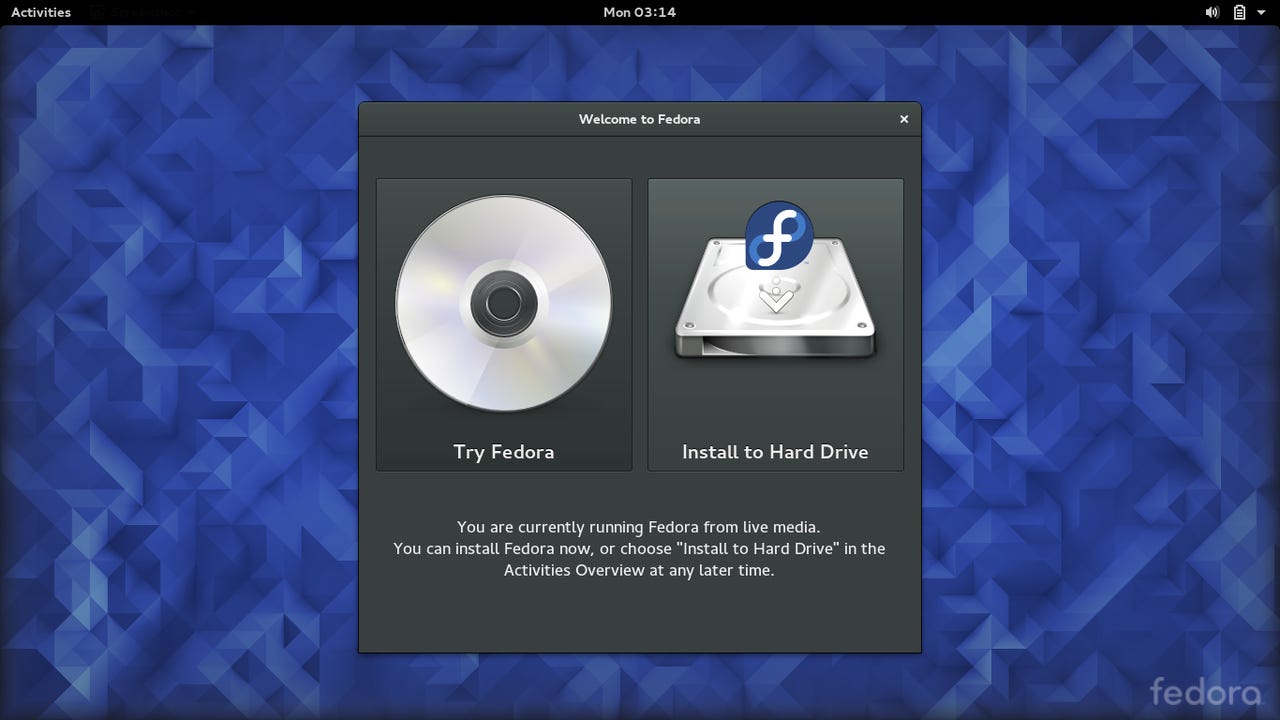
When the Live image is booted on an MBR system, it presents options to "Start Fedora Live", and "Troubleshooting", while on a UEFI firmware system it also offers the choice of "Test this media & start Fedora Live". In either case, when the Live system boots the first screen it shows is the "Try or Install" selection.
It is important to note that at this point, the full Live system is running, with all utilities and connectivity available. If you want to have a network connection during the installation, this is the place where you should configure and verify it, for example. Likewise, if you want other media present and mounted, or you want to make some other changes to the disk partitioning before installation, you can do that here.
If you choose the Try Fedora option, the window will close and you will be left with the Live system running normally, so you can use it, test it, or whatever else you want/need it for. You can still proceed with the installation sometime later, without having to reboot, by starting the installer from the Gnome Activities launcher (just type 'install' in the search bar).
When you choose Install to Hard Drive the next step is the Welcome and Language Selection screen.
If you have an active internet connection when the installer runs, Anaconda will make an educated guess at the language based on your location (determined from your IP address). This guess is reasonably good, unless you happen to be living in an area or country where three or four different languages are used - and especially if you happen to be some strange American who is living in such a country, and you want to work in a language which is not one of those three or four...
Anyway, whatever language you choose here will be used for the installation dialog, and also as the default language on the installed system. You may also notice the very small keyboard icon at the top right corner of the window, which at this point is still indicating a US keyboard. You don't need to worry about that yet, it will be taken care of later.
Once the language has been determined, Anaconda puts up the "Hub" screen, where all of the other installation tasks can be accessed.
Here you can see that a couple of interesting things have happened. Because Anaconda knows that I am in Switzerland, the Timezone is still set to "Europe/Zürich". Good stuff. But because I have manually changed the language from German to English, Anaconda has decided to be 'helpful' and has set the keyboard on "English (US)". Well, unfortunately it is rather tedious to get a US keyboard here, and when you have one you then end up struggling to type accented characters, so I long ago adjusted to using a Swiss German keyboard. (For a good time, give an American a real French "AZERTY" keyboard to type on. They invariably start to use it but after a couple of keystrokes they jump back like there is a live rattlesnake on the desk).
I also found one other small problem at this point. If I left the language on German in the previous screen, then when I got to the Hub the keyboard was set to one of the standard "German" layouts. But Anaconda obviously knows that I am in Switzerland... it would be nice if it were set to "German (Switzerland)". It's not a big deal to change, though - see below.
Anyway, the point here is that from this "Hub" screen, you can get to whichever parts of the installer dialog you need to deal with, but you are not forced to plod through each and every one of them. In my case, the timezone is correct so I don't need to go there, as are the network and host name. If you have a wired network connection, it should come up automatically, and if you want a WiFi connection you should set that up immediately after booting, as I mentioned on the first screen above. So if you don't care what the host name and domain are set to (most casual home users will not), then you don't need to go through the Network & Host Name screen.
Also note the highlighted warning across the bottom of the window. Anaconda will not let you start the installation until all of the required information has been provided, so this bar is displayed and the Begin Installation button is not yet active.
The first spoke that I always go to is the Keyboard screen, to preserve my sanity when typing the information in the other areas.
What I have done here is add a layout by clicking the "+" button, then chosen "Swiss German", then removed the default "English (US)" layout by selecting it and clicking the "-" button. If you are going to have multiple keyboards, or switch between keyboards, you could leave them all defined here and just set their priority by using the up/downbuttons.
There is a text input box where you can test the keyboard layout, and you can see that the small keyboard icon at the top right has changed to "ch" for my Swiss German selection.
The keyboard icon at the right end of the Add/Remove/Up/Down row will bring up a window which shows the layout of the selected keyboard,
As far as I know there is no way to play the "Guess my keyboard" game, such as you can in Ubiquity. Not a great loss, other than the entertainment value. What you can do here, though, if you are looking for entertainment value, is press keys while the keyboard illustration window is displayed; it will highlight the key that you pressed. If the key it highlights is not in the same location as the one you pressed, then you might have a problem... remember, though, that laptop keyboards are often compressed compared to their "full-size" relatives, so thiings like arrow keys, edit/location keys and the numeric keypad might be different.
For the next step I have gone into the Time & Date screen, even though that is not necessary in my case because Anaconda has already set it correctly.
Here you can select the location (timezone) either by clicking on the world map, or by choosing from the Region and City drop-down lists. If you have Network Time on (which it is by default), you can't set the time manually.
The next step is the big one - the Installation Destination, also known as disk layout or disk partitioning.
The first thing to do here is just select the destination disk drive. If you are preforming a 'normal' basic installation, you will simply select the system disk (the second drive shown above is simply the Live USB stick I am installing from). If you have special conditions, such as network drives or other kinds of hardware you can choose or activate it here, and likewise if you want the disk encrypited, you specify that here.
If you are doing a Legacy Boot installation, and you want to specify the bootloader location somewhere other than the MBR sectors of the disk, you can do that through the Full disk summary and boot loader option at the bottom of the window. I have been told that this can be used for other 'special cases', but I have not personally had such a case yet. Thankfully.
The important thing for me in this screen is the 'I will configure partitioning' option, because I have to manage my over-complicated disk layout myself. Again, if you are doing a normal installation on a 'typical' system, you can leave this on 'Automatically configure partitioning' and Anaconda will do the right thing. But whatever you do, both here and in the next screen, Anaconda will not make any changes to your disk until you click Begin Installation in the main Hub screen.
Because I have chosen manual disk partitioning, the next screen that comes up is this:
Now you still have another chance at a reasonably simple "default" configuration. Under the New Fedora 23 Installation there is an "automatic configuration" option. If that still doesn't meet your needs, there is a list of the logical disk layout presented below that. I love this list, it just makes so much sense to me. Every other Linux installer that I have seen shows you a simple physical layout of the disk partitions, but that doesn't give you any idea of how the partitions might be used together, and some of them don't even show the partition labels or any other information to show what they might be used for. Believe me, a list of sda1, sda2, sda3... is not tremendously informative at this point. In such cases I am frequently reduced to making notes about what is installed where, and what partitions I want to use for this installation before I start the installer.
The screen shot above was taken on my T400 laptop, which is a Legacy Boot system, and which has a variety of other Linux distributions installed as well as Windows 7 Professional. What I want to do is install Fedora 23 over the existing Fedora 22 installation, which you can see about halfway down the list. When I click on that item in the list, it opens up to show what partitions are used in that installation.
Here I have opened several of the items in the list, so you can see how each of them is laid out. They each have their own root partition, but they all use the same swap parition. All I have to do is select the root partition from the existing Fedora installation, then in the input fields to the right I specify that it should be mounted on "/" (root) in the new Fedora installation, and it should be reformatted, then click Update Settings.
Now the root partition has disappeared from the Fedora 22 item, and been added under the New Fedora 23 installation.
If there were free space still available on the disk drive, I could click "+" to create a new partition, or if I wanted to delete an existing partition in order to make room for the new Fedora installation, I could click "-". If I got confused (or scared), there is a "reset" (undo) button.
Ok, the last thing I would like to do is add the swap space to the new Fedora 23 Installation, and the nice people who develop Anaconda have actually made it possible to do that now. All you have to do is highlight it in the existing installation (in fact, when the same swap space is used for all as it is here, you could highlight it in any of them), and then check the Reformat box at the right and then Update Settings.
Unfortunately things aren't that simple on planet Jamie. It turns out that when you have multiple Linux installations, and they all use the same swap partition, if you reformat that partition some rather ugly things happen. (I learned this the hard way first from installing Debian) For one thing, any other Linux installation which activates the swap area by UUID will subsequently fail because that identifier changes when the swap partition is formatted. In addition, if the other installations are using the swap area for Hibernate/Restore, they will also lose that ability - and if any of them use the contents /etc/default/grub to generate grub.cfg files, they (or you) are likely to be even more confused or to be confused for a longer time.
The bottom line here is that if Fedora is your only Linux installation, then go ahead and set up the swap partition at this point by reformatting it. But if you multi-boot other Linux partitions, you almost certainly don't want to do that here, just go on without defining a swap area and then add it manually when you boot the installed system.
One other thing that you can't see here because this was done on an MBR system. If you are installing on a UEFI firmware system you will also have to specify the EFI Boot partition. You can either choose the existing partition - but DO NOT FORMAT that partition, or everything else you have installed will be very unhappy with out - or you can create a new FAT format partition for this purpose. If you use the "automatic" partitioning option, Anaconda will always create a new EFI Boot partition rather than try to puzzle out the existing one. Considering that these boot partitions tend to be very small (a few hundred MB at most), this is not such a bad idea.
When you have completed the changes in this screen and click Done, Anaconda will display a window which shows everything that it is going to do which actually impacts your disk.
This looks ok, all it is going to do is format the existing Fedora 22 root partition. You should check this list very carefully, make sure that you understand everything that is going to happen, and then click Accept Changes. Remember, though, that whatever changes there will be, they will still not actually be done at this point, they only get made when you complete the Hub screen and Start Installation.
For illustration purposes only, I have also gone into the Network & Host Name screen.
Not much of interest here; as I said, if you want/need to set the host name or domain, this is where you come to do it. I suppose there might be some unusual situations where you need to come here to set up networking, but I can't imagine what they are. In general, networking should be configured and working fot the Live system, and they will simply be used as-is by Anaconda.
Finally, you end up back in the Hub screen, with all necessary information defined.
Note that the warning bar has been removed from the bottom of the screen, and the Begin Installation button is now active. One small but very nice change in recent versions of Anaconda is that you used to come back to this screen when everything was defined, and it would still have the warning displayed for anything from a few seconds to a minute or more, which Anaconda was still figuring out whether it was happy or not, then the warning would suddenly disappear and the installation button would wake up. Now, you don't get back to the Hub screen until it knows it is ready to install.
When you click Begin Installation, Anaconda immediately starts working in the background. This is the point when the disk changes are really made. There is no supplemental "Are you really, really sure that was the button you meant to click" prompt at this point, which suits me just fine, but those who are more conservative than I might wish for one last confirmation.
While the installation is running, Anaconda presents the final input screen, where you can enter the root password, and optionally define a user account and password.
Again, Anaconda tells you with a highlighted warning bar that it isn't going to complete the installation until you provide the minimum information required here. What it wants is at least a root password, so when you click on that option you get this screen.
There is some moderately serious password quality checking applied here, so weak/useless/mindless passwords will not be accepted, and you won't be able to get back out of this screen until you enter something reasonable.
I also always create my user account, the screen for that is:
Again, password quality checking is used here.
Finally, all of the necessary information has been given, and Anaconda is chugging along performing the installation tasks. Progress is shown by the bar at the bottom of the window, along with a short description of the specific task being performed.
When the installation has finished, the window will change to this. Not only is there no automatic reboot (I'm still not convinced that I like that happening in the openSuSE installer), there is not even a button here to reboot. All you can do is click Quit, which will return you to the live desktop. There you can check or change whatever you want, and then make a normal reboot by clicking the right end of the top panel.
Ok, that was long-winded even by my standards, but I hope it was worthwhile. As I said at the beginning, this is my favorite Linux installer, by quite some margin. It feels to me as if it was not just "created" as a long plod through all of the tasks, it was "engineered" as an efficient and versatile means of doing what is necessary, with a maximum flexibility and reliability.
I know that a lot of people don't agree with me about this, and I always see a number of moans and groans about Anaconda when a new Fedora release comes along. But I believe that Linux installation is not a simple task, and installers which try to treat it as if it were will eventually either come up short, or get into trouble. In the simplest cases, Anaconda can get you through the installation with something like six or seven mouse clicks. But when the going gets tough, or complicated, Anaconda has the wherewithal to handle that as well.
More on Linux and open source:
- Hands-On with openSuSE Leap RC1: A walk through of the installer
- Hands-On: KaOS Linux 2015.10
- Thus versus Calamares: Comparing Manjaro 15.09 installers
- Upgrading my Linux-Windows multi-boot system to Windows 10
- Hands-On: Linux UEFI multi-boot, my way
- Hands-On: Linux UEFI multi-boot, part two
- Building a pre-release Linux testbed with openSuSE, Fedora, Ubuntu, and more