Hands-On with openSuSE Leap RC1: A walk through of the installer

The openSuSE Linux 42.1 Leap Release Candidate 1 (whew, that was a mouthful) was made available on their download page yesterday (click on 'switch to Development Version' at the top of the page to get it). Although I will be running their Tumbleweed advanced development version on most of my computers, I am planning on keeping Leap on one or two of them, so I have been downloading and trying the pre-releases as Leap development has progressed.
Rather than delve deeply into what is still technically a pre-release version, and thus still subject to last-minute changes and fixes, what I would like to do with this post is make just a few general comments about my experiences with the Leap distribution, and then walk through screenshots of the installer.
I recently posted about the Manjaro installer(s), and I plan to do the same for my absolute favorite Linux installer, Anaconda, when the upcoming Fedora 23 release is available, so I hope this provides a good way to compare a representative sample of the various Linux installers in use today.
Ok, first some general observations and opinions. There has been some concern in the user community since it was announced that the openSuSE 'stable' release would be merged with the commercial SuSE Linux Enterprise (SLE) distribution. To be honest, I am one of those who has been concerned about this, so I have been watching the pre-release versions pretty carefully ever since Milestone 1 was released.
So far I haven't seen anything unusual or out of the ordinary for openSuSE development. There is, of course, the leap in version numbers from 13.2 to 42.1, but hey, if Microsoft can jump from 8 to 10 for no good reason, then why not? The development itself, and the versions of the Linux kernel and other packages, has been typical for an openSuSE release cycle. The kernel in RC1 is 4.1.10, the KDE desktop is Plasma version 5.4.2, Firefox is 41.0.1, and so on.
Overall functionality also seems to be good. On most of the systems I have, Leap installs and runs, and supports all of the hardware with no problem. One exception to this is the Aspire E11 which has a Broadcom BCM43142 wi-fi adapter that requires non-free firmware. With the previous versions of openSuSE I could get the necessary driver and firmware from the packman community repository, but it appears that this has not been adapted for Leap yet, so I have not been able to get wireless networking going on that system. I hope that will be resolved by the time the final release is made.
So the bottom line on this release is positive, so far. Now let's walk through the installation process.
The first step, of course, is to download the ISO file. During the development / pre-release cycle, there are usually only two ISO images available, either the full 4.2GB DVD installer image, or the tiny (< 100MB) Net installer image. Both of these offer a choice of desktops during installation. The desktop-specific Live images usually only come along with the final release. I have only tried the DVD installer, so the following screens and descriptions are taken from that. Also note that the full installer image is about 4.2GB, so although it will fit on a single DVD, it will not fit on a 4GB USB stick, you'll have to use at least an 8GB stick.
The DVD installer image boots directly to the installation program. Although there is no 'desktop' in the GUI sense, this is a Linux system running, and there are virtual (CLI) consoles running, so if you need to get to something else during the installation process, you can switch to another console with Ctrl-Alt-Fx (for x=2, 5 or 6) and then back to the installation process with Ctrl-Alt-F7. Oh, I should also mention that on the Aspire E11 the touchpad didn't work with the installer image, so I had to use an external USB mouse. This did not carry over to the installed system, though, the touchpad worked fine there.
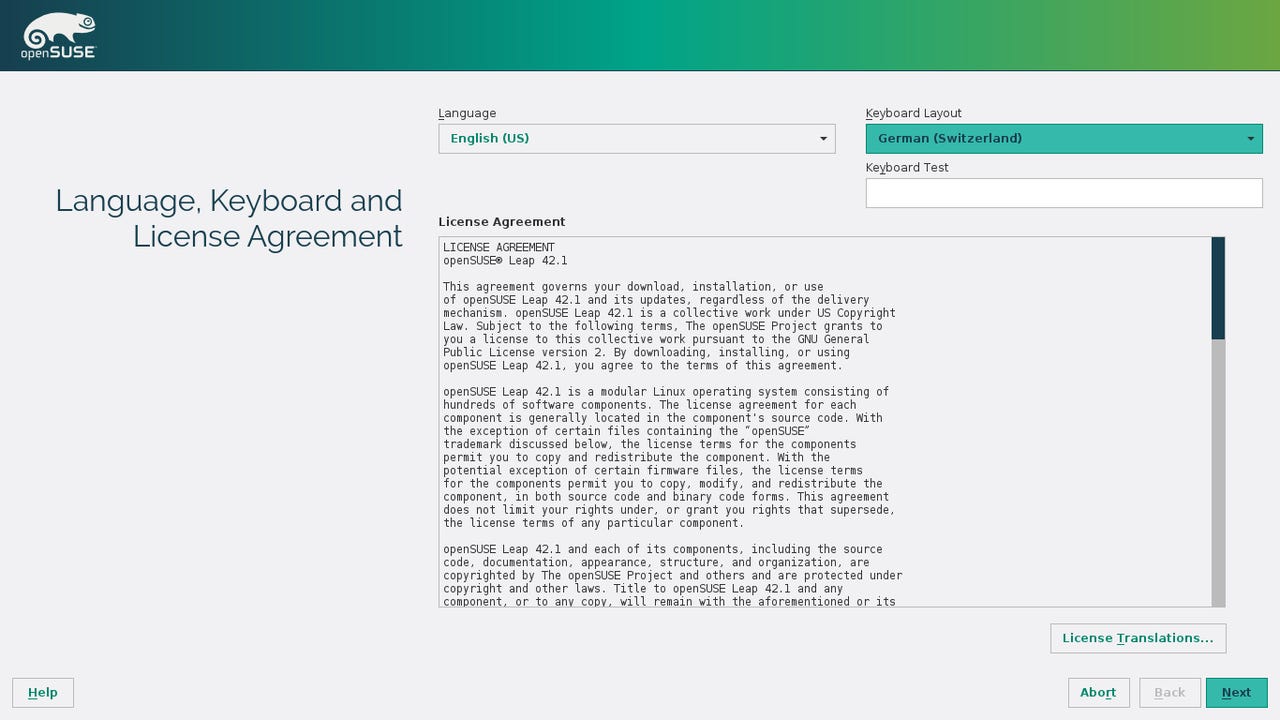
The first screen presents the openSuSE License Agreement, and gives you the opportunity to select the installation language and the keyboard layout. Whatever language you choose here will be used both for the dialog of the installation itself and for the base language of the installed system. Likewise the keyboard layout you choose here will be used for the installation process, including the alternate text consoles, and for the installed system.
The next screen is the network settings. As far as I can tell, unless you are planning to do a network installation (from the NET installer image), or you want to pick up additional packages or updates from the network during installation, this screen is not relevant. Here you can see that Leap does not detect the Broadcom wireless adapter in the Acer E11. I simply click through this screen without changing or worrying about anything.
After some probing and initializing, the installer asks if you want to add any other repositories or products to the installation. Again, I click through with no changes.
Now we are getting to the real meat of the installation. This is the initial suggestion for disk partitioning, based on what the installer found currently on the disk drive and its default for layout and partition types. Basically what it has done is taken the first EFI Boot partition that it found (sda2), the first Linux swap partition it found (sda6), and then it found a bunch of unallocated disk space so it wants to create two new partitions, one BtrFS for root and one xfs for home.
First, I want to change the basis for its proposal, because I don't want a separate /home partition (I keep my data separate in a different way). I do still want a BtrFS root partition, but if I wanted to use LVM, or some other format (ext4 or whatever), I could change that here as well.
After making that adjustment, I go back to the Suggested Layout screen above, and then choose the Expert Partitioner option to get the following screen:
What I am going to do here is tell the installer not to create the new partition (sda18), but rather to reformat the existing partition sda7 and use that for root. I do that by double-clicking on sda18 and then choosing 'Delete', and then double-clicking on sda7 and choosing 'Edit'.
This gets me back to the Expert Partitioner screen, which now shows the layout that I want:
When I then 'Accept' this layout, it takes me back to the Suggested Partitioning screen, which now shows the actions the installer is going to take. Here you will see that any changes to existing partitions are shown in red.
With the disk layout taken care of, the hard part of the work is done. Please remember that this looks a bit more complicated for my multi-boot system than it would for an ordinary system which was going to be running only Linux or dual-boot Linux/Windows. In most normal cases, you would be able to accept the partitioning suggestion of the installer with no changes.
Next up is nice and simple, choose the Time Zone and clock setting.
The Time Zone can be selected either by clicking on the map, or by choosing from the drop-down lists of Region and Time Zone. If you are going to be running only Linux, you can choose to set the hardware clock to UTC, but if you are going to dual-boot Linux/Windows, you have to leave that un-checked.
Next you can choose your desktop.
For openSuSE installations, I always use KDE for medium to large systems, and Xfce for netbooks. Of course you can choose whatever makes you happy, including a text-only (CLI) 'Minimal Server' installation.
Next is the User Account creation:
There are a couple of special things to notice here. By default the system administrator (root) password will be set the same as your user account password; if you don't like that, un-check the box and enter the root password here. Also, by default you will be automatically logged in when the system is booted, so again if you don't want that, un-check the box.
At this point we are done with the installation/configuration input. The summary screen shows what we have entered, and what the installer is going to do with it.
The installer has noticed that this is a UEFI-firmware system, so it is going to install grub2-efi and it is going to enable Secure Boot, so it will also generate the necessary "shim.efi" file for Linux Secure Boot.
The installation will take something like 15-30 minutes. You have a couple of choices for entertainment while it is running. By default you will see the Slide Show:
Now, I know that we all love these propoganda slide shows, especially when we get to see the entire thing somewhere between two and ten times while the installation is running. But if you get bored by that, you can click on 'Details', and watch exactly what the installer is doing as it goes along.
The other alternative is to read the Release Notes while the installation is running.
Of course, I would hope that you had read the release notes before starting the installation, but perhaps you would like to read them in more detail, or more carefully, while the installer is doing its thing.
So, there you have it. Quite a few screens to walk through, but nothing terribly difficult. Once the installation has completed and the system has rebooted, if you chose the KDE desktop you will end up with something like this:
It's another three weeks until the final release of openSuSE Leap. Based on what I have seen so far, I am looking forward to it.
Read more of my blog:
- Hands-On: KaOS Linux 2015.10
- Thus versus Calamares: Comparing Manjaro 15.09 installers
- Upgrading my Linux-Windows multi-boot system to Windows 10
- Hands-On: Linux UEFI multi-boot, my way
- Hands-On: Linux UEFI multi-boot, part two
- Building a pre-release Linux testbed with openSuSE, Fedora, Ubuntu, and more