Hands on with the i3 Window Manager: Installing, configuring and using

I recently happened to notice that there was a new point-release (4.12) of the i3 Window Manager. In keeping with what seems to be their general approach, the release was extremely low-key; I only noticed it because I check their home page from time to time.
When I saw that the latest version number had changed, I dug around for a while and finally found the Release Notes, which list the changes and bug fixes in this version. The update does not change the basic appearance or operation of i3 - this is, after all, a point release - but they do clean up a lot of minor issues. I was probably most impressed by the fact that there were documentation and man page updates included, because I really like projects which don't neglect the paperwork.
I then started checking the package managers for the various Linux distributions that I keep loaded, and found that a number of them already included the updated version. Those already offering 4.12 include Debian testing, openSuSE, Manjaro, Fedora, Korora, Sparky and Kali; those which do not yet have it include Debian stable (4.8), Ubuntu (4.10), Linux Mint (4.7) and Linux Mint Debian Edition (4.8).
While I am on the subject of i3, I think this is a good time to put together a 'cookbook' of how I use it, in hopes that it will make it a bit easier for others to get started. The specific 'recipes' that I am going to include are:
- Installing: What packages are actually needed to get normal functionality
- Configuring:
- Appearance: Window decorations and such
- Keyboard mapping: Adding convenient commands
- Startup Processing: Getting auxiliary programs running
- Using: Some (hopefully) useful tips
Please remember that this is only Jamie's Stuff, the authoritative documentation is on the i3 Documentation page. What I intend to do here is show how to get i3 installed and running with a minimum of fuss. Oh, and while I am talking about documentation, the i3 Reference Card is absolutely invaluable when you are getting started with i3.
Installing: If you want to use i3, the first thing you have to do is get it installed (duh). There are two ways to approach this - choose a Linux distribution which already has an i3 desktop, or add the necessary packages to a distribution with some other desktop. The first option is by far the easiest, if you are willing to load a new distribution, and there is one excellent candidate that I am aware of - Manjaro Linux i3. The Manjaro Community members who maintain this version have done an excellent job of not only integrating the necessary packages but of customizing, extending and generally polishing the distribution. This distribution will give you by far the best results for the least investment of time and effort.
There is one warning here, though. Because of the extensions and integration, if you start with the Manjaro i3 distribution you will not be able to produce the same installation using any other distribution without significant effort - if at all. Basically, Manjaro i3 spoils you, and it is surprisingly difficult to get over that when you set up other i3 distributions.
A lot of users don't want to load a whole new distribution just to try out i3. The alternative is to add the necessary packages to an existing Linux installation - but that is not quite as easy as it sounds.
It requires more than just the packages named "i3.....", so I have made a brief list here of what packages are required, and in some cases details of why they are required or what they are used for. After having added i3 to a number of different distributions, I think that openSuSE might be the simplest, so I am going to use that as a base, and then I will list the differences in packages and configuration for other distributions.
To add the i3 Window Manager to an existing openSuSE Tumbleweed KDE distribution, you need to add the following packages - either from the CLI using zypper install .... or using the GUI Software Management utility:
- i3, i3status, i3lock: These three packages are the heart of i3. The i3 package includes the window manager itself, i3status provides the status bar across the bottom of the screen, and i3lock is a screen-lock utility.
- dmenu: This is the most commonly used application menu utility for i3.
- feh: An image viewer, particularly useful for setting the wallpaper for i3.
- xautolock: An inactivity timeout/lock utility
- dunst: This is a simple notification utility. It isn't absolutely required to get i3 working, but if you don't install it then you won't get notification about things like wireless network status.
- NetworkManager-gnome: On openSuSE, this is the package which contains nm-appliet, which provides a Network Manager icon on the i3 status bar, to give you information and management access to wireless (and wired) network connections.
- scrot: A screenshot capture utility
That is a comfortable package list - it's more than the absolute minimum you would need to get i3 working. Remember, that is the package list if you are adding i3 to an existing openSuSE KDE system. Other systems might have some of those packages already installed, they might have some meta-packages which include several of these in a single group, and they might have some different names or groups. Here are examples based on the systems I have tried so far:
- Debian - Stable/jessie/8 includes an older version of i3, I would not recommend installing it. Testing/stretch now includes i3 4.12, that's the way to go.
- The i3 meta-package includes i3-wm, i3lock, i3status and suckless-tools (which contains dmenu) so you can get all of those installed with one selection in synaptic or apt-get.
- network-manager-gnome includes nm-applet, so if you already have the Gnome or Xfce desktops installed, nm-applet is probably already there.
- feh, dunst and scrot will probably have to be added.
- Fedora - Time for a small rant. The Software utility is useless for installing these kinds of packages - I can't even get it to list anything for "i3". If you add the Gnome Packages utility you cat get some of them listed, but not all - even though I know they all exist, and the worst of it is that some of what it lists is nonsense. Example: search for dunst and you get nothing, but search for dmenu and you get dunst. Huh? Anyway, forget about the stupid GUI Software/Package installers, and get what you need from the CLI:
- dnf install i3 i3lock i3status dunst - this will also install dmenu and dzen2.
- dnf install feh xautolock scrot network-manager-applet
The Gnome desktop manager (gdm) does not notice that the i3 Window Manager has been installed, so it has to be restarted. One simple way to do this is to reboot after all the i3 packages have been installed.
- Sparky and Kali - Derived from Debian testing, so the procedure is the same.
- Korora - The same as Fedora, but at least it has yum-extender included, which can be used to select and install the packages.
Configuring: As with any desktop, configuring the i3 Window Manager is largely a question of personal preference. You should set it up so that it is comfortable for the way you want to work with your computer. I have already posted about How To Setup i3 on Kali, so the following will be repeat some of that, but it will be extended here based on my experience since then. I will also write this based on openSuSE rather than Kali, and then I will also discuss some of the differences necessary for Debian and Fedora.
I am going to do just a bit of customization in each of three categories - Appearance, Startup and Keyboard mapping. My intent is just to show what can be done with a few simple examples, so that you can then take over and really configure i3 the way you want it.
Appearance: These will just determine how the windows look on your display. Do you like title bars, borders, or nothing at all? I prefer only a narrow border and no title bar on tiled windows. I have also included keyboard commands to change between three common window decorations, just to make it easy to try out alternatives.
# Window decoration
new_window pixel 2
bindsym $mod+u border none
bindsym $mod+z border pixel 2
bindsym $mod+n border normal
Startup: When you log in, the i3 window manager can automatically execute some programs. One very common use of this feature is to display the wallpaper, because unlike most other desktop managers, i3 doesn't consider the wallpaper to be its job. Depending on what session manager you are using, you might have cruft left on the screen when you login, so a fresh wallpaper display cleans things up.
# Autostart programs
exec --no-startup-id ~/.fehbg
exec --no-startup-id nm-applet
exec --no-startup-id xautolock -time 5 -locker "i3lock -i /usr/share/wallpapers/Ethais/contents/images/1366x768.png"
There are several interesting things there. I use feh to display the wallpaper, and I run it manually the first time (because I need to figure out what wallpaper I want to use, anyway). When run manually with one of the --bg-xxx options, feh creates a file in your home directory containing the command you used, and makes it executable. From that point on, you don't have to hard-code or otherwise remember the background display command, you can just execute that file. If you want to change the wallpaper, just run feh again manually with the new image file, and it will update the command file. Nice.
Some people prefer to use nitrogen for wallpaper management. It has one very nice feature, it will traverse a directory hierarchy and show you all the possible image files it finds, so you can choose the wallpaper interactively. If that sounds interesting to you, just install the package nitrogen, read the manual page and give it a try.
The second line starts an applet which adds a Network Manager icon to the i3bar at the bottom of the screen. You don't want to try to use i3 without this, or something like it. In the same category, if you plan to use Bluetooth devices you should add blueman-applet to be auto-started in the same way.
The third line starts up the X11 automatic screen locker, and tells it to use the i3lock program to do the actual locking/unlocking. I chose some random image (a wallpaper, actually) to be displayed when the screen is locked. If you don't specify an image file, the screen will simply be white, which is pretty awful. Some people like to create a blurred snapshot of the current screen on the fly, and use that for the screen lock. That's just a bit too much fiddling about for my taste, and besides my poor old eyes are getting bad enough, I don't need something to make me think they have suddenly gotten a lot worse.
Keyboard mapping: People who use i3 generally hate to take their hands off the keyboard, even just to use a mouse or trackball. i3 can be configured to put all sorts of handy things at your fingertips, so here are just a few examples:
# Custom keybindings
bindsym $mod+F2 exec --no-startup-id dolphin
bindsym $mod+F3 exec --no-startup-id firefox
bindsym $mod+F4 exec --no-startup-id gvim
bindsym $mod+0 exec --no-startup-id i3lock -i /usr/share/wallpapers/Ethais/contents/images/1366x768.png
bindsym Print exec "scrot -e 'mv $f ~/Screenshots'"
bindsym $mod+Print exec "scrot -ue 'mv $f ~/Screenshots'"
bindsym $mod+Shift+0 exit
The first three lines just bind some common applications to some Fn keys combined with the Meta-key. You can start pretty much any application you want this way, so feel free to experiment.
The next line gives me the possibility to lock the screen manually, rather than waiting for the activity timeout to lock it. Please note that in the default i3 configuration file the same key sequence is already used, so if you want to add this function, you have to comment out the existing line as well.
The next two lines make it easy to take screen shots - something I do quite a lot, as you might imagine. Just press the Print Screen key to take a shot of the entire screen, or Meta-Print Screen to take a shot of only the active window. The interesting bit here is that it uses the "exec APP" command line option to get scrot to move the screen shots into a specific directory.
The last line just lets me logout with getting nagged. The default i3 configuration file includes a binding for Meta-Shift-E to logout, but it asks for confirmation first. I hate getting nagged, and the chances of me pressing Meta-Shift-0 by mistake are exceedingly slim.
Using i3: Once the necessary packages have been installed, you should reboot to make sure that the session manager notices that the i3 Window Manager is available. In some cases (with some session managers) it is enough to logout, but to be sure just reboot. Then when the login screen comes up again, there will be an icon that looks like a gear, or a wrench, or just a simple drop-down list of available desktop sessions where you can choose i3.
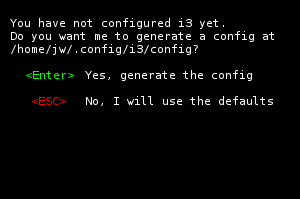
The first time you login with i3, it will ask if you want to create a standard configuration file. I suppose it would be possible to say No at this point, and then manually create the configuration file (or copy a configuration file from some other system), but I would strongly recommend accepting the default to start with.
You will then be asked what you want to use for the Meta- key. The default here is the Super key, sometimes call the "windows" key, but you could also select the Alt key. If you want to use some other key, you can manually edit the configuration file later to change this.
When these two questions have been answered a standard config file will be generated, and you will be logged in and ready to use the i3 Window Manager.
At this point you are ready to start using i3, and you should have a screen similar to the one shown here:
The background/wallpaper will probably be different, and it may even be a bit messy with some left-over windows and other cruft from the login process. Not to worry, we will fix that with the changes to the i3 configuration file.
If you are comfortable using the vi editor, you can just press Meta-Enter to start a terminal emulator, and then vi .config/i3/config:
If you prefer a GUI editor, you can start one by pressing Meta-d to get the dmenu application menu / launcher, and then enter the editor name (leafpad, kwrite, whatever).
In this screen shot I have jumped ahead just a bit, by leaving the terminal window with vi running, and opening a second window with kwrite. The window manager will make a decision about tiling based on the screen dimensions; if you have a wide-screen display it will default to horizontal tiling (windows are opened side-by-side), on narrow screens (such as traditional 4:3 ratio) it will default to vertical tiling (windows opened above/below each other).
Whichever way you choose to edit the configuration file, add the lines shown above to the end of the file, then save it.
A lot of people (including me) don't like horizontal tiling in most cases, so i3 gives you the option of changing the layout. If you go back to the empty screen, as it was when you logged in, and then press Meta-v then i3 changes to vertical tiling. Of course you can't tell this right away, but when you open two windows it will look like this:
I find that to be much better for the browser, because lots of web pages don't look good (or sometimes even don't work properly) when they are cramped horizontally. But it isn't really necessary in most cases for the terminal window.
The i3 Window Manager actually makes "containers" for these objects, and the Meta-v and Meta-h (horizontal tiling) commands apply to those containers. So if I now want to open a file manager window, I can move the cursor to the terminal window, hit Meta-h to set horizontal tiling, then hit Meta-d to use dmenu to find and launch my file manager (I have pcmanfm installed on this system).
Good stuff!
Ok, I know this is getting pretty long, and it is teetering on the edge of getting rather complicated, but there is one more tip I really want to pass along. When you are using a tiling window manager, there are times when you need for a window to have more space, or more flexible space than it can get when tiled. One solution is to just go to another workspace (virtual desktop), but I don't want to go into that right now. The other option is to float the window, by pressing Meta-Shift-Space:
Zowie! Is that ever good! I can now move and resize that floating window using the mouse, just as I do with most other window managers. The float command is a toggle, so when I am done with this window I can just hit Meta-Shift-Space again, and it will be tiled with the other windows again.
That should be enough for now - but there is still one thing left to do. After making the changes to the config file, you have to logout and log back in again to get them to take effect. (Technically not absolutely necessary, but getting the auto-start programs sorted is a bit tedious, so logout/login is the easiest choice)
First, close all of the open windows. It's never a good idea to logout with open windows and/or running applications. Then press Meta-Shift-e, and you will get a "nag bar" at the top of the screen, like this:
Click "Yes, exit i3" to logout. When you login again, the updated configuration will be used, and in the future you can logout using Meta-Shift-0, without the nag bar.
I really dislike the nag bar.
There's a lot more to explore, to do and to learn about i3. There are tons of manuals, tutorials and testaments about it on the internet. One good place to start is the i3 Documentation page, where you will find not only the User's Guide and the Reference Card, but also some interesting and useful user-contributed articles.
Read more about Linux and open source:
- Linux and breakfast cereal: Why are there so many flavours?
- Hands-on with Kali Linux Rolling
- How to customise your Linux desktop: MATE
- How to customise your Linux desktop: Cinnamon
- How to customise your Linux desktop: Xfce
- Hands-On with openSuSE Leap RC1: A walk through of the installer
- Hands-On: KaOS Linux 2015.10
- Thus versus Calamares: Comparing Manjaro 15.09 installers
- Upgrading my Linux-Windows multi-boot system to Windows 10
- Hands-On: Linux UEFI multi-boot, my way
- Hands-On: Linux UEFI multi-boot, part two