Fedora Anaconda and Mint Install - Hands-on with two more Linux installers

Last week I made a side-by-side comparison of Calamares and Ubiquity, the former a non-denominational Linux installer and the latter the Ubuntu installer.
This week, since it was just announced that Fedora 24 will be released next Tuesday, I would like to make a similar walk-through of the Fedora installer (anaconda) and the Linux Mint Debian Edition installer.
I need to make a couple of small disclaimers before I start the comparison. First, as regular readers of my blog probably know, I am very partial to anaconda. I think that it is the best Linux installer, because it is well engineered, it is extremely versatile, it handles all sorts of unusual cases very well, and I find it very pleasant to use. I know that a lot of other people don't agree with me about this, and a lot of people dislike anaconda at least as much as I like it. So be it, to each his own I suppose.
Second, and fortunately in this case, I also like the Mint installer quite a lot. To be absolutely clear here, I am talking about the installer which the Linux Mint developers made themselves, and which is used for Linux Mint Debian Edition, not the slightly modified copy of Ubuntu Ubiquity that is used for the Linux Mint numbered distributions. I think it has the best presentation and graphics of the installers, and it was one of the first (along with anaconda) to properly and thoroughly handle installation on UEFI firmware systems, including specifying the EFI boot partition.
Also, to be fair to the Mint installer I should point out that the version I am showing here was included with the release of LMDE 2 over a year ago (April 2015), while the version of anaconda is hot off the press from Fedora 24.
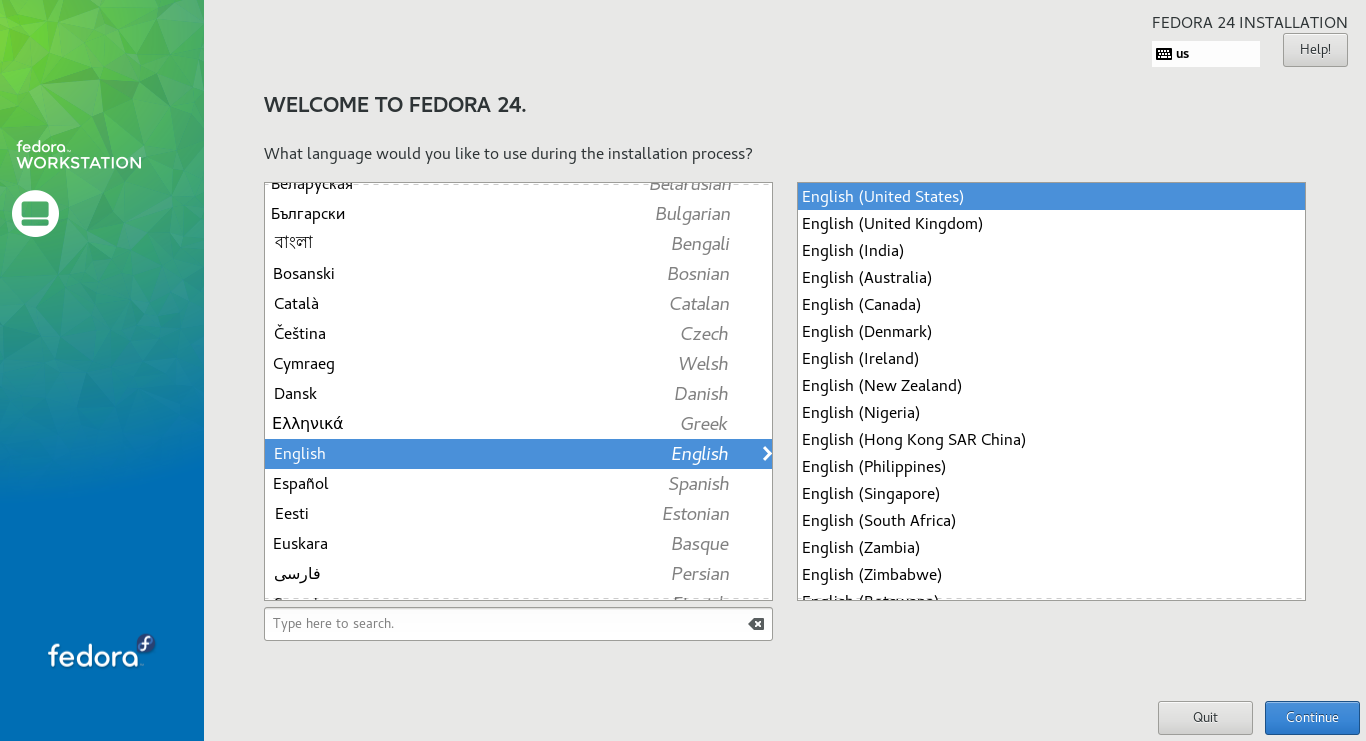
Like pretty much every other Linux installer, both of these start with a language selection window. The language that is selected here will be used for the installation dialog and also as the default language for the installed system.
Both of them will also gather geo-location information if they have an internet connection, and will make certain assumptions and guesses based on your location. In this first screen, for example, they will both adjust the default language to match your location.
The Mint Installer Language screen is one of the few that I am not very pleased with in this installer. It is visually pleasing, with nice little flags by each country and language, which is nice. But it seems to me that it has no default language selected, even if you want plain old US English.
The list is sorted by country, which is the second column, which will confused some people at first. United States (and Switzerland) are at or near the end of the list, so you have to scroll all the way down to select them. Sigh. Not a big deal, but unnecessary aggravation.
After selecting the language for the installation, you land in the anaconda hub.
This is the heart of the installer, and it is one of the things that I like the most about it. Anaconda is not a linear walk through the installation process, it is a hub-and-spoke process where you can perform only the tasks you need, in the sequence you want to do them.
Tasks which are mandatory are highlighted, and you can't actually start the installation process until all of the mandatory tasks have been completed.
When you first arrive at this screen, several of the items will be grey and inactive while anaconda determines the current state and fills in the known values. You don't have to wait for all of them to be ready, you can click on any that are active and perform those tasks while it figures out the status of the others.
The second step in Linux Mint installation is the Time Zone definition. This is another graphically pleasing window, so by now you can see how this installer is going to look.
As with others, you can click on the map to choose your location. As with others, it is difficult to impossible for small locations. At least the drop-down list is nice and easy to use in this case.
I generally go to the 'Keyboard' screen first. Even when the system has an internet connection and anaconda gets the Timezone right, the default keyboard is still US English - at least in my case, although that might be because Switzlerland has several different keyboard layouts.
If you need to change (or simply add) a keyboard, click the 'plus' at the bottom of the left window. A window pops up which shows a list of all available keyboard types and layouts.
If you want to keep multiple keyboards available, you can change their order by using the up/down arrow buttons at the bottom of the window. If you want to remove the original keyboard, simply select it and then click the 'minus' at the bottom of the window.
Click 'Done' at the top left of the window to return to the hub.
Next in line for the Mint installation is the 'Keyboard' screen. This one will be familiar to anyone who has ever installed Ubuntu or Linux Mint.
It has a very nice graphic representation of the keyboard with the appropriate key markings for whatever you have selected. There is also a "type here to test" area, which is one of the few things I think is missing in anaconda.
It does not have the "guess my keyboard" game that is included in ubiquity, but that's not a huge loss.
The 'Time & Date' window contains a world map, which you can click to select your location. If your location is too small to click reliably, you can choose from the Region and City drop-down lists at the top left of the map.
You can also enable/disable Network Time (NTP) at the top right of the window, and (only) if Network Time is disabled you can manually set the time using the controls at the bottom left of the window.
When you are satisfied with the settings, click 'Done' at the top left.
The next step for Linux Mint is the 'User Info' screen. In addition to the usual full name, login name and password, you can add a picture to be associated with the user account.
You can also enable automatic login here... I suppose that is not quite as risky as allowing an account without a password, but it is a close second.
Finally, you have to enter a system name for your computer at the bottom of this window. Not only that, but you are not allowed to use upper-case letters. It's comforting to old dinosaurs like me to see that there are still a few throw-backs to the old days hanging around.
The 'Installation Destination' window is the most complicated - that makes sense, because getting the disk layout is the most complicated job that has to be done. The first screen shows the disk drives available for installation. One small but very nice point here, Anaconda doesn't show the device you are running the Live system from in this view. The display here can range from very simple, as shown here in the case of a simple system with one disk drive, to various combinations of different types of drives on different types of disk controllers, including RAID arrays.
In the simplest case, if you just want to install Fedora alone or alongside an existing installed system (Windows or otherwise), you can just let Anaconda 'Automatically Configure Partitioning', which is the default choice. As I have said before, my case is not so simple so I have to change this to 'I Will Configure Partitioning'.
Either way, click 'Done' at the top left when you are ready to go on.
The Linux Mint installer also arrives as the 'Partitioning' window at this point. This is a pretty hairy beast, and as far as I can tell there isn't a lot of automated help included. You have to create (or select) at least a root partition, and if you are installing on a UEFI firmware system you also have to create (or select) an EFI Boot partition.
In both cases, double-click on an existing partition to select and change it. To create new partitions you have to click 'Edit Partitions', which takes you to another window - you can't create them here. Hmmm. Maybe 'Expert Mode' would help... I have never tried that. More later...
If you selected manual partitioning in anaconda, this will be the next window. I have explained this window several times in previous anaconda posts, so I will make it brief here. The current disk contents are shown here in logical presentation, rather than the physical presentation that most (all?) other installers use. The difference is that instead of presenting a sequential list of all the disk partitions (which often doesn't fit on the screen anyway in my case), all of the partitions used for one installation are grouped under that line in the list.
There are buttons to add and delete partitions at the bottom of the list, and my personal favorite an "Undo" button is there as well.
One important thing to know here is that when installing on a UEFI firmware system anaconda requires that you specify the EFI Boot partition. If you use the auto allocate option, it will simply create a small new partition for the EFI Boot; if you set up partitioning manually you can choose to share an existing EFI Boot partition or you can create a new FAT partition for it.
When you are satisfied with the disk layout, click Done at the top left to return to the hub. If anything you have done with disk partitioning requires changing, deleting or formatting of any existing partition, you will be presented with a window listing all of the modifications and asked to confirm before proceeding. Remember, anaconda will not actually make any changes at this point, noting will really be done until you click Begin Installation in the hub window.
When you double-click one of the partitions in the Mint installer window, you get this Edit Partition control.
The window shown here is for the EFI Boot partition - it will be mounted at /boot/efi/ and as I explained in the previous post of this series, you really, really don't want to format this partition in 99.5% of the possible installation cases. If you create a new partition for this, or you absolutely know that you want to format an existing partition, it has to be FAT.
This is the Edit Partition window for the root partition. You have a lot more flexibility with this one - it has to be mounted on / (duh), but you can format it as you want. Hmm. Another question - on a UEFI system, since the bootloader doesn't have to read the root partition, can it be formatted to pretty much any valid Linux filesystem type? I'll have to check that out.
With anaconda, when you have completed all of the required actions in the hub window, the warning flags and messages will disappear and the Begin Installation button becomes active. When you then click that button anaconda starts the installation process, and at the same time it moves on to the User configuration screen.
This is the Linux Mint Partitions window after I have defined the EFI Boot and root partition for installation. I have included it here so that you can see that it shows which partitions will be mounted at what point, and which partition(s) will be formatted, if any.
You should check this screen carefully before clicking Forward.
Once anaconda starts the installation, the current operation and the overall progress are shown at the bottom of the window. There are two new spokes on this window, where you can set the root password and create an ordinary user account.
There's a bit of propaganda running at the bottom of this window, but at least it isn't full-screen propaganda like most other installers subject you to. I wish more of these would do what the openSuSE installer does, and give you the option of reading the Release Notes or following a detailed installation log while the installer runs.
The next screen in Linux Mint installation lets you specify to where the bootloader is to be located. If you're making an MBR (BIOS) installation this is useful, since you can embed it in an ext4 root partition rather than overwriting the MBR of the system disk. But if you are making an EFI installation this screen is a no-op as far as I can tell. I have tried changing this selection on a UEFI system, and it didn't seem to produce any results, either good or bad.
The root password entry is very simple; there is an indication of the quality of the password you have entered, and whether the two entries match. It seems to me that there is one less-obvious change in this window, anaconda no longer moans and refuses to accept a weak password. Whether this is a good or bad thing is a rather touchy religious issue.
Finally, the Summary for the Linux Mint Installer. Check this information carefully before clicking Apply, because there is no turning back after this.
Unlike many of the modern installers, the Mint installer doesn't fork and start performing the installation somewhere along the way. it gathers all of the information it needs, then gives you a chance to verify it, and only then does it actually start working.
The User Account entry window is very typical - full name, login name and password with verification. Again, it doesn't reject weak passwords any more.
There are check-boxes to make this account an administrator, and in case you want to completely flush your security down the toilet you can un-check the one which requires a password for the account.
At the bottom there is a button to bring up the Advanced User options. In this window you can specify the user's home directory, set specific user and group ID's, and add more group memberships for the user. If you need these options, it is a Godsend to have them here; 99% of users don't need to go to this screen at all.
This is the window that is displayed while the Mint installer is working.
Yes, there is a propaganda slide show running... It just seems to be the thing to do.
At least there is a nice progress bar across the bottom of the window, and a (rapidly changing) current task description just above that. The installation time for Mint Debian is actually very long - more than twice what any of the other versions I usually install take. I'm not sure why that is.
Once you have given anaconda the root password and ordinary usesr information, the installation just chugs along, showing the current task and percentage complete and running the little propaganda show.
The full installation from start to finish typically takes me about 15-20 minutes on my laptops and netbooks with UEFI firmware.
When the Linux Mint installation is complete, you get this little window. Not a lot of information or options here - you can choose to reboot or not. If you don't reboot, you will be returned to the Mint Live desktop, and you will have to reboot manually when you are ready.
This window informs you when installation is complete. There is no reboot option here, the only thing you can do is click Quit, which will then leave you on the Fedora Live desktop. From there you have to reboot using the normal Fedora drop-down menu at the right end of the top panel.
So, there you have it. I hope that this side-by-side presentation gave a feeling of how they compare. I think that it is interesting that despite the totally different approach - linear vs. hub-and-spoke processing - they end up with approximately the same number of steps. I guess that makes sense, since there is approximately the same amount of work to be done.
As I said, please remember that the Linux Mint Installer I used here is over a year old now. I hope that they have continued development on it, and by now it performs the installation much faster (on the order of other common installers), and it has a better disk partition management screen. I guess we will have to wait for the next LMDE release to find out.