Hands-on: A walk through the openSUSE Leap 42.3 installer

I wrote about the latest openSUSE Leap release a few days ago. In that post, I included some details about upgrading an existing openSUSE Leap installation to the new release. Since then, I have performed a fresh installation on another of my systems (the Acer Aspire V), so in this post I am going to include screenshots and a brief description of the installation process.
First, let's repeat some of the basic information about this release. The release announcement on the openSUSE website gives a bit of information (and a lot of propaganda) about the new release.The release notes contain a lot more technical detail, so be sure to read them before starting.
The installation images can be obtained from the Install Leap page. You will see on that page that there are only 64-bit images available; openSUSE Leap no longer supports 32-bit systems. The two images available are:
- complete standalone/offline installer, which is about 4.7GB and can be used for installing a new system from scratch, without a network connection, or for upgrading and existing system to Leap 42.3.
- a minimal (really, really minimal) Network Install image, which is about 85MB and contains only enough to get your system booted and connected to the internet, then everything else that you want to install only what you want to install) will be downloaded.
Be sure to check the integrity of the installation image after you download it. There are instructions for doing this on the download page; at the very least, you should check the sha256 checksum of the image.
Both images are hybrid ISO format, so they can be burned to CD or DVD or dumped to a USB stick to then boot and install. Again, the download page includes more details about this process, including alternatives for creating a bootable USB stick.
A few short comments about minimum hardware requirements, as listed on the openSUSE Leap webpage, and as actually experienced in my installations:
- 2GHz dual-core CPU or better. Well, I have installed this release on my Samsung N150 Plus, which has a dual-core Atom N450 at 1.66GHz, and it works just fine. The system I am going to install on today has a dual-core Pentium 3556U at 1.7GHz, and it works just fine as well.
- 2GB memory. The N150 Plus has exactly this, and it certainly doesn't suffer from limited memory. The Aspire V has 4GB, so it won't be a problem. Depending on what applications I was planning to run, in general I would not be reluctant to install this release on a 1GB system.
- 40GB of disk space. Ahem. Well. Again, this depends on what you are planning to use the system for. The actual installed size of openSUSE Leap 42.3 KDE is approximately 5.5GB. I frequently install to 16GB partitions, with absolutely no problem. If you plan to use the btrfs filesystem, which can be rather aggressive about making filesystem snapshots, you might want to use 32GB. But that discussion is only for the operating system itself. Beyond that, you will have to decide for yourself how much space you need... or just use all of whatever disk you are installing on, and don't worry, be happy!
The installation images are compatible with UEFI and MBR systems, including UEFI Secure Boot configuration.
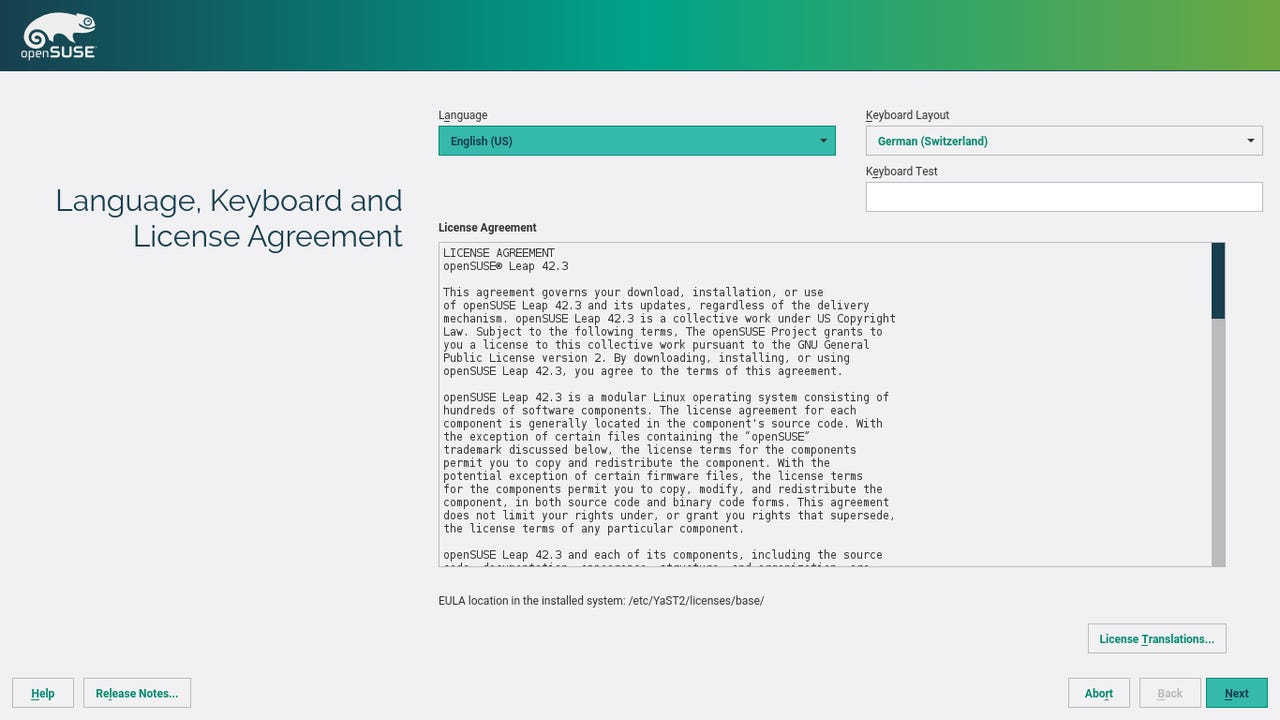
When you boot the installation medium, the first screen is the License/Language/Keyboard selection. If you have a non-US keyboard, this is where you want to configure it -- and you can test it in the input field to be sure. Once the keyboard has been configured here, the installer will use that configuration for the rest of the process.
The next screen is for Network configuration. It will list all of the wired and wireless network adapters that it has found. If you are using the Network installation medium, you will have to complete this (duh). However, when I do a normal 'full' installation, I don't bother configuring the network at this point. You certainly can if you want, but it is not required to complete the installation, and I find it easier and more convenient to configure after booting the installed system.
The next step is disk partitioning. This is going to vary significantly depending on what you have already installed on your disk drive, and what you want to end up with. The installer will analyse the current partitioning and contents of your disk, and will try to make a reasonable suggestion for installing openSUSE alongside the existing contents.
The screenshot shown here is what the installer initially proposed on my Aspire V. It uses a btrfs root filesystem, and a separate partition for /home with an xfs filesystem. If the initial proposal is not what you want, you can select one of the buttons below the partition display in order to modify it.
Edit Proposal Settings will bring up this window, where you can change the filesystem type for the root and home partitions, or you can remove the option for a separate home partition, in which case /home will simply be included in the root partition.
If you choose to use btrfs for the root partition, you have the option to turn off snapshots (they are enabled by default). This would primarily be of interest if you were installing to a relatively small disk, and you didn't want automatic btrfs snapshots to eat up a lot of your disk space.
When you click OK on the proposal settings, the installer will return to the Suggested Partitioning window, showing the results of your new configuration. In my case this was still not acceptable, because I need to shift to the second EFI Boot partition. So now I have to take the Expert Partitioner option.
The Expert Partitioner window gives you lots of interesting information about all of the disks in the system (including the Installation medium itself), and allows you to do pretty much anything you want with the partitions.
Everything here has to be done in very specific individual steps. I want to use a different EFI boot partition (openSUSE Tumbleweed is already using sda1), so I first have to select sda1 and choose "Don't mount", and then I have to select sda10 and select "Mount as /boot/efi".
The same is true of the root filesystem, I first have to tell it not to use the partition in had selected, and then tell it to use sda11 and to format that partition before using it.
When I have made the changes I want in the Expert Partitioner, I return to the Suggested Partitioning window, where it again shows the latest configuration. This is finally what I want, so all I have to do is click Next, and partitioning is complete.
I realize that these steps for disk layout and partitioning may look complicated. But remember, my installation is a very special case, because of the way that I load and use multiple Linux distributions on all my notebooks. For a 'typical' installation, or in particular if it is your first openSUSE installation, simply accepting the initial proposal at this point is not a bad idea.
The next step is the Timezone selection. You can choose by simply clicking on the map, or by selecting the Region and Timezone from the drop-down lists. If you are installing a Linux-only system, you probably want it to set the hardware clock to UTC; if you are installation a dual-boot system with Windows, you probably don't want that.
The next window is User Interface, this is where you select your Desktop. The default is KDE Plasma, and Gnome 3 is also available here. If you don't want a GUI desktop, you can choose Server (Text Mode) to get a CLI-only interface. If you want one of the other supported desktops, choose Custom and then click Next.
Choosing Custom brings up the Software Selection and System Tasks screen. This is where you can choose some other desktop GUI -- Xfce, LXDE, etc.
But keep in mind that when you get here, you also have to select any additional packages and applications that you want installed.
The KDE and Gnome options in the previous screen include a common set of utilities and applications, but here it does not. If you don't specifically select Office Software, Graphics or whatever, they won't be included in the installed system. Of course you can always add them later, and omitting what you don't need, want or use can reduce the overall size of the system.
After the User Interface (and possible Custom Software) has been selected, the next window is for local User account creation. In addition to the usual basic information and password for the initial User account, you can also specify if the root account should use the same password (not a great idea, but a very common choice), and if the default user should be logged in automatically on boot (again, not a great idea from a security standpoint, but a very common choice).
The next window shows the Summary of your input and selections. You should review this carefully to be sure that it is what you want. You can jump directly to any one of the sections that you want to modify by simply clicking on the header of that section.
You can see here that support for UEFI Secure Boot will be included.
When you are sure that everything is the way you want it, click Install. You will then get one last chance to confirm that you are ready to install. Up to this point, there have been no permanent changes to your system, disk or any partitions. When you click Install in this Window, the installation process will start, and the first thing it does is partitioning and formatting.
The installation process typically takes something like 15 to 30 minutes.
When the installation is complete, it will give you a 10-second countdown and then reboot. This can be a bit disconcerting -- openSUSE is the only distribution I know of that does this automatic reboot after installation. If I walk away, or just turn my attention away, while it is installing, and the next time I check it is running an installed system rather than the installer, my first thought is always "Huh? Did the installer crash?" It just takes a bit of getting used to.
So that's the openSUSE Leap 42.3 installation process, in more detail than I had originally intended to present it. This also applies for Tumbleweed, by the way, because it used the same installer.
Read more on Linux
- openSUSE Leap 42.3: Get ready to upgrade
- Hands-on with Sparky Linux 5, powered by Debian
- Fedora 26 is coming: Here's what you need to know
- Debian GNU/Linux: Jessie is out, Stretch is in, Buster is started
- Linux Mint 18.2 arrives: Here's what to look out for
- Raspbian GNU/Linux: New release includes installable x86 image