Raspberry Pi: Hands-on with the Pi-Desktop kit

element 14 Pi-Desktop Enclosure
This is the latest in my adventures to see what sort of useful things can be done with a Raspberry Pi. The friendly people at the Pi-Shop.ch recently added the Farnell element 14 Pi Desktop to their offerings. This kit is not only a nice case, it also includes an add-on board which contains a power on/off button (yes!), a Real Time Clock with battery backup, and an mSATA socket so that you can add an SSD (Solid State Disk) if you want.
There is also a software download available from the element 14 Pi Desktop page which adds the necessary functionality to the Raspbian operating system to make the On/Off switch, RTC and SSD work. Note that this software is required for any of these new hardware bits to work; the printed installation document included with the Pi Desktop implies that it is only necessary if you want to boot from SSD or USB, but that is not true.
Raspberry Pi 3 Model B and Pi Desktop Enclosure
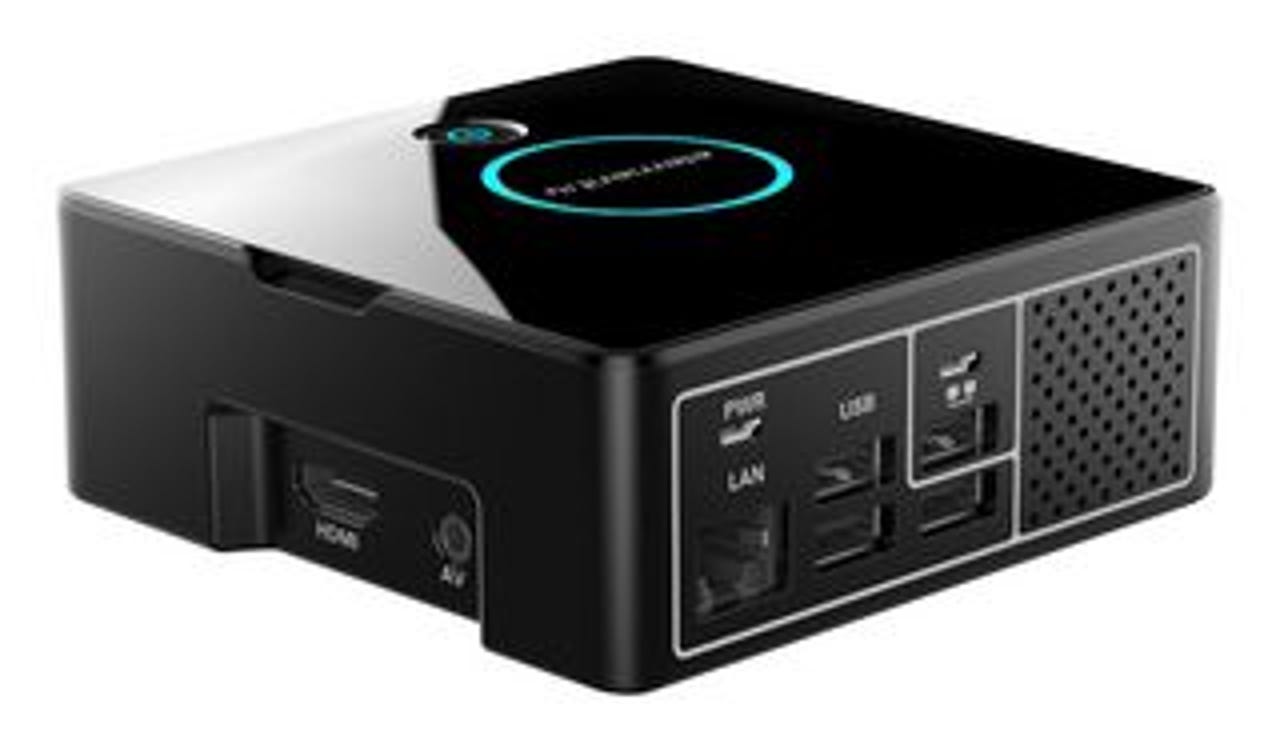
The first surprise that I got was the size of the Pi Desktop enclosure. As you can see here, it is not much bigger then the Raspberry Pi itself. It is 10.8cm square, and 4.3cm high.
Note: The Pi Desktop kit does not include a Raspberry Pi of any kind. I only photographed them together here so show the relative size of the units.
To make a functional desktop system, in addition to the Pi Desktop kit, you will need at least the following:
- Raspberry Pi Model 3 or 2 - the description and documentation don't mention the Model B+, but I'm pretty sure it would work as well
- microSD card, loaded with Raspbian GNU/Linux
- Power Supply
- HDMI Monitor and Cable
- Keyboard and Mouse
Before you start assembly of the Pi Desktop, I strongly recommend that you download the User Manual. The tiny bit of paper included with the kit is an impressive example of conveying a lot of information in a little space, but if your eyes aren't up to reading extremely small print, you will be much happier with the PDF document. Also, the PDF document includes more illustrations and diagrams, it has been updated since the printed document was produced, and it has additional information about usage and technical data.
For purposes of this post I am only going to deal with the kit itself - I am not going to try to connect a camera, add an SSD, or boot from either SSD or USB stick.
Raspberry Pi 3 Model B in Pi Desktop Enclosure
Assembly is very easy, and took me less than 15 minutes. There is a heat sink included in the kit, be sure to stick that on the CPU before you mount it in the case. The Raspberry Pi can only be mounted in the box one way, or the external ports don't line up (duh). The long spacer/screws are used here, to provide sufficient clearance to mount the add-on board above it.
Pi Desktop Add-On Board Mounted
The add-on board goes on top of the Pi, and likewise can only be mounted one way because of the 40-pin GPIO connector and the external connections. The only slightly tricky bit here is getting the GPIO connector to line up and seat properly between the two long spacer/screws used to mount it in the
Pi Desktop USB Type A to Micro Jumper Plug
The Pi and the add-on board are connected via their USB ports, using an external Type A to Micro USB jumper plug. There are several consequences of this which I have not seen specifically mentioned elsewhere:
- You use one of the four USB ports on the Raspberry Pi for this connection, so you only have 3 USB ports left for your own use. I guess that's ok, since you are gaining several new devices via that one port.
- If you choose to connect an SSD to the mSATA port on the add-on board, that device will be communicating with the Raspberry Pi via this USB connection. That means it will be at USB speed, not the significantly higher SATA speed you might be expecting (or hoping for).
Fully Assembled Pi Desktop Enclosure
Also, as you can see in these pictures the power supply connection is now made to the add-on board, not to the Raspberry Pi itself.
One other small tip for assembly. When you put the lid on, the power button goes toward the side of the case with the camera hole. The box and lid are square, so it could be turned in any direction but it has to be this way in order to align the button in the lid with the button on the add-on board.
When you complete the assembly and connect the power supply, you have to press the power button on the case to start the Raspberry Pi. This, and the statements in the printed installation guide, led me to believe that the software download was really only necessary if you wanted to add an SSD. That is not the case, however, and the PDF User Guide has been updated to make this more clear. The power switch, real-time clock and SSD all require installing the additional software package.
First, make sure your Raspbian operating system is up to date:
sudo apt-get update && sudo apt-get dist-upgrade
Next, download the software package:
https://github.com/pi-desktop/deb-make/releases
The download is a zip file, so of course you have to unzip it before installing.
unzip pidesktop-base-1.1.0.zip
Finally, install the software:
sudo dpkg -i pidesktop-base-1.1.0.deb
The numbers at the end of that filename will change if there is a new release.
After the installation completes, you have to reboot the Raspberry Pi in order to bring the new software into use. That's it! You are then up and running with the basic installation of the Pi Desktop enclosure and add-on board.
Once you have the Pi Desktop running, there is one old habit that you need to break. To shutdown the Raspberry Pi, you should press and hold the Pi Desktop power button for two seconds. It will then shutdown and power off the system - thus solving one of the oldest and loudest complaints about the Raspberry Pi. If you still shutdown using the Raspbian GUI start menu, or even (gasp) by typing "shutdown -h now", don't worry. It will still shutdown properly but rather than being down and powered off in just a few seconds, the LED-ring on the Pi Desktop will blink for 30 seconds before finally powering off.
Oh, and one other thing about that power button. If you press and hold it for 5 seconds, it will cut off power to the Raspberry Pi immediately, without running the shutdown process. This is not a good idea, it can cause problems such as corrupted filesystems on the Raspberry Pi. You should only do this if the Pi is hung and not responding to either the 2-second push on the power button on the normal Raspbian shutdown commands.
With the basic assembly out of the way, here are a few other things to think about.
Pi Desktop with Raspberry Pi 3 Model B
If you use a Raspberry Pi 3 Model B for this assembly, you can then get a network connection on the built-in WiFi adapter, and you can connect a Bluetooth keyboard and mouse on the built-in Bluetooth adapter. That means the only external connections you need to the Pi Desktop are the HDMI display cable and the power supply. That makes it a very neat little package on your desk.
If you use a Raspberry Pi 2 Model B for this assembly, you will at least have to add a USB dongle (or two) for the keyboard and mouse, and either a USB WiFi dongle or a wired network cable.
The Pi Desktop documentation doesn't mention using a Raspberry Pi Model B+ with this kit, but the physical specifications of the B+ are identical to the Model 2 and 3, and of course it runs exactly the same Raspbian as the 2 and 3, so it should work. I learned quite some time ago that "should work" and "does work" aren't always the same thing, so I decided to give it a try.
Hooray, it really does work! The assembly procedure is exactly the same, it fits perfectly in the box as I expected. After installing the additional packages and rebooting, everything works just fine, as it did with the Pi 2 and 3.
Of course, if you are really trying to make a general-purpose desktop system, the much slower performance of the Model B+ might be a problem. But on the other hand if you have a Model B+ sitting around that you want to use, then why not?
Pi Desktop Mounting Holes
Something else that I noticed while writing this post, which is not mentioned or illustrated anywhere in the documentation that I have seen, is that the Pi Desktop case has two slots in the bottom so that it could be mounted vertically. That's a nice touch.
The top of the Pi Desktop enclosure has a blue LED ring which gives some information about the state of the system:
- glows when the Raspberry Pi is on
- dark when the Raspberry Pi is off
- blinks while the Raspberry Pi is rebooting
- blinks for 30 seconds and then does dark when the Raspberry Pi has been manually shut down from the GUI or command line, rather than by pressing the power button
A lot of people have complained about the lack of a Real Time Clock on the Raspberry Pi, so it is a welcome addition with this kit. When you boot a "normal" Raspberry Pi, it comes up with the time it was last shutdown. If it has a network connection, after a minute or two it will get the time via NTP, but if there is no network connection, it will simply continue using that last date and time. With the Pi Desktop add-on board connected (and the associated software installed), if there is no network connection after a minute or two the Pi will set the date and time from the Real Time Clock.
I also noticed one minor annoyance. On the Pi Desktop box it says:
An intelligent power controller to enable single button turn on / off / reboot
Yeah, well... two out of three isn't bad, I guess. As far as I can tell there is no way to reboot the Pi using the power button, and the PDF document doesn't say anything about rebooting using the button.
Summary
The Pi Desktop is a nice kit. It is well thought-out and well implemented, as are all of the kits from element 14. If you want to use a Raspberry Pi as an everyday desktop computer, I would certainly recommend this kit with a Pi 3 Model B. This kit solves several of the more vexing problems or limitations of the the Raspberry Pi, including implementing an orderly shutdown with power off, adding a hardware Real Time Clock, and providing a connection for an SSD to vastly increase disk space.