Need a free Slack alternative? How to quickly deploy Rocket.Chat

Have you ever needed the ability to add a chat/collaboration tool but didn't want to rely on third-party services or have the budget to pay for a service like Slack? If that sounds like a situation you find yourself in, you'll be happy to know there are plenty of options available.
One such option is Rocket.Chat, which is a free, open-source platform geared toward team communication and collaboration on Windows, macOS, Linux, Android and iOS. The Rocket.Chat server can be deployed to off-the-shelf hardware (either a server or desktop, though server is preferable) and can be connected to from the desktop or even mobile apps (for both Android and iOS).
First off, you can go two routes with Rocket.Chat. You can install and use the server on your own hardware or you can pay for a cloud-hosted plan. The Community edition (which is what we'll be dealing with) is best suited for 100 users. If your organization requires more than that, you should consider either the Pro or Enterprise cloud-hosted option.
With the option we'll be installing here, you'll get features like:
- Unlimited message history
- 10,000 monthly push notifications.
- Omnichannel Basic (which includes live chat)
- LDAP basic sync.
- End-to-End encryption.
- Customizable permissions.
- Guest users.
- Public and private channels.
- Conferencing server.
- Unlimited apps and integrations.
- Multi-language interface.
- Desktop apps.
- Mobile apps.
If that sounds like something you could use for either your business or your family, let's get it installed. I'm going to demonstrate how simple the installation is using the Linux operating system (specifically Ubuntu Server 22.04). You can deploy the Rocket.Chat server in several ways (such as with Docker, Kubernetes, OpenShift, etc.), but I'm going to go the snap route as that's the absolute easiest method.
With that said, let's install.
Requirements
To succeed with this installation, you'll need a running instance of Ubuntu Server 22.04, a user with sudo privileges, and hardware that meets the following minimum requirements:
- Dual-core (2 GHz)
- 2 GB RAM
- 40 GB of SSD
Let's install it.
Installing Rocket.Chat on Ubuntu Server
You'll be shocked at how easy this is. Log into your Ubuntu Server instance and issue the command:
sudo snap install rocketchat-server
That's it. At this point the Rocket.Chat server is up and running and ready for you to access the web-based interface for configuration.
Accessing Rocket.Chat
Open a web browser that's on the same network as your Linux server and point it to http://SERVER:3000 (Where SERVER is the IP address or domain of the hosting server).
In the resulting window (Figure 1), you'll be prompted to create an admin user.
Rocket.Chat just need an admin user to finish up the installation.
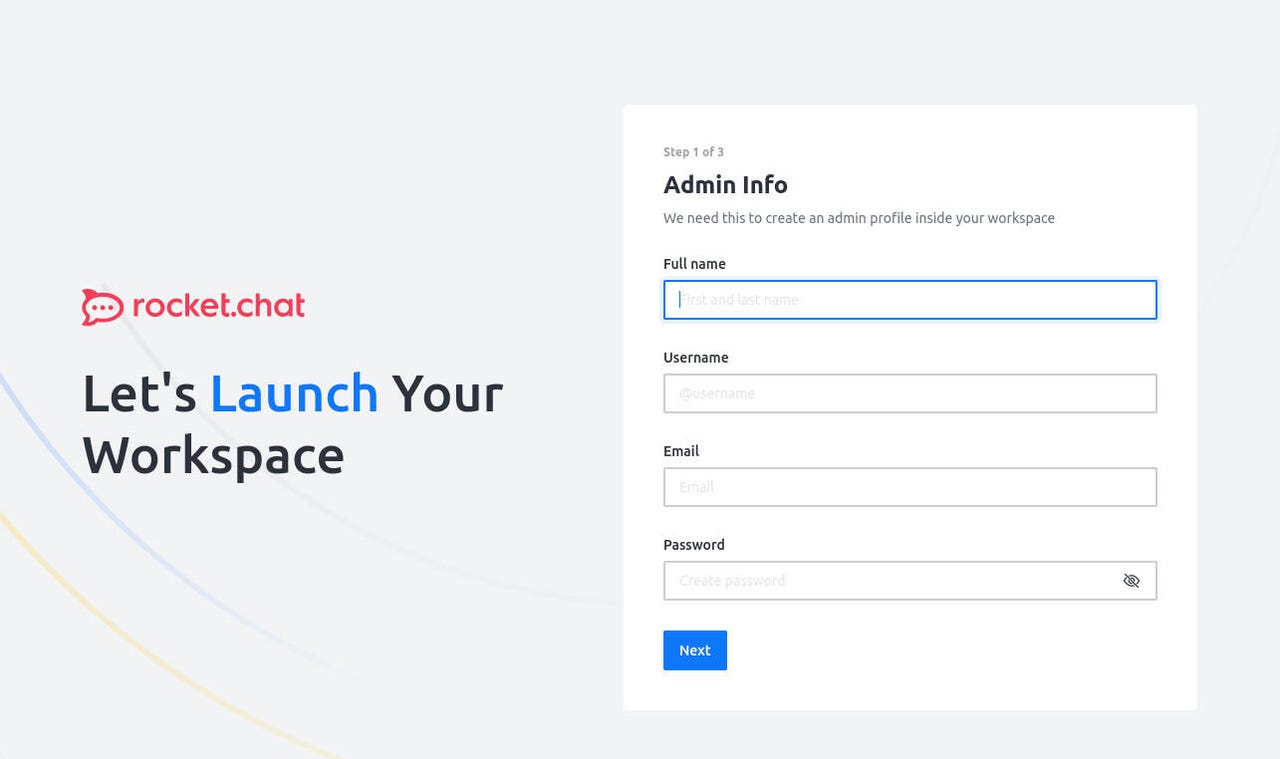
In the next window (Figure 2) fill out the necessary information for your organization and click Next.
A few details about your organization and you're almost ready to go.
Finally (Figure 3), you can either register your server (which gives you a few more features - such as mobile push notifications, third-party integrations, and access to the Rocket.Chat app marketplace) or run it as a standalone service.
The registered server gives you more features than the standalone.
If you register the server, you'll be sent an email with a verification code. Make sure that code matches the one you are presented with in the web interface and click the verification link in the email. You will then be taken to the Rocket.Chat main window (Figure 4), where you can start customizing your chat/collaboration server to perfectly fit the needs of your organization.
You are now ready to start using the Rocket.Chat communication/collaboration server on your network.
And that's all there is to deploying the Rocket.Chat server on your network. I told you it was simple. Next time around, we'll take a look at extending the platform with third-party apps. Until then, enjoy that splendid internal communication/collaboration platform.