Use conditional formatting in Access forms and reports

Microsoft Access
Use conditional formatting in Access forms and reports
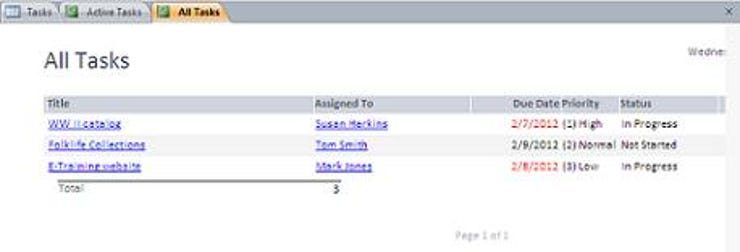
Many Access users would like to highlight report information, conditionally; similar to the way Excel users employ conditional formatting. For instance, the simple report shown below displays a due date in red when it falls within the current week. It's an easy way to visually alert users that a project enters its final week.
Fortunately, this report solution doesn't require a complex expression or even VBA - your users can use a conditional formatting rule. If your users are familiar with Excel, they'll need little training because the feature works similarly in both applications. Before we work through the example, you should know that I based this example on the Events template that comes with Access 2010. You can work with most any report, as long as there's a date field to work with. I entered just three records to keep things simple. To apply this particular conditional formatting rule to a date field in a report (the All Tasks report), do the following:
- Open the report in Design view.
- Select the date field. In this case, that's the Due Date field.
- Click the contextual Format tab.
- Click Conditional Formatting in the Control Formatting group.
- In the resulting dialog, click New Rule.
- The Select A Rule Type option will default to the right option, Check Values In The Current Record Or Use An Expression, so don't change that option.
- Now you're ready to define the rule. Field Value Is is the appropriate option in the first dropdown control, so don't change it.
- Choose Less Than Or Equal To from the second dropdown.
- Enter the following expression: Now()+7. (That period is grammatical and not part of the expression.)
- From the Font Color dropdown, choose Red.
- Click OK. Your report should resemble the one shown above in Report View.
In English, this rule says the following: If the due date falls within the next seven days, display that date in red.
In this example, we applied only one simple rule, but the feature is much more robust. Access' conditional formatting feature is just as comprehensive, flexible, and powerful as Excel's. Use it to alert users conditionally, in both forms and reports.
Microsoft Excel
What to do when Excel's Custom Views option is disabled
Excel lets you create custom views of the same data. It's a flexible tool that your users will want to know about. By creating custom views, they can view the same data in different ways, which is a lot quicker than manually changing settings. For instance, custom views retain hidden columns and rows, some filters, zoom settings, print settings, and more.
When defining a custom view, the first step is to arrange things for the view-set all the properties, flag all the settings, set the filter, and so on. Once the sheet has the specific look, create the custom view as follows:
- Click the View tab and Choose Custom Views in the Workbook Views group. In Excel 2003, choose Custom Views from the View menu.
- Select Add.
- Enter a name for the view, select the appropriate options, and click OK.
To activate a view, repeat step 1. Then, double-click a view from the Custom Views dialog. Or, select a view and click Show.
Users trying to create custom views might run into trouble using Excel 2007 and 2010. That's because the presence of even one table in the workbook will disable the Custom Views feature. The table doesn't have to be in the same sheet as the custom viewing area either. One table equals no custom views.
At this point, users should ensure that the current sheet isn't part of a group, because Excel will disable the Custom Views feature in a group (in Excel 2003 too). If that's not the problem, users have a choice: they can keep the tables and forget about using custom views or they can delete all the tables and define custom views. I don't know of any way to support both in the same file.
If they decide to delete the tables, you can provide the following macro:
Sub ConvertTableToRange() 'Convert all tables in workbook to range. Dim sht As Worksheet Dim objTable As ListObject For Each sht In ActiveWorkbook.Worksheets For Each objTable In sht.ListObjects objTable.Unlist Next objTable Next shtEnd SubThis simple macro will cycle through each sheet in the workbook, removing all tables (ListObject objects) from the workbook. This macro doesn't delete the data, it just removes the table object. Once they delete all the tables, they can define custom views. For better or worse, this macro doesn't remove the table formatting. Nor will it warn you if it finds no tables to convert.
Microsoft Word
Simple steps to convert a list into a formatted Word table
If you have a list in Word, you can quickly convert that list to a table. Generally, you'll do so to change the way the list appears or to apply functionality that's more easily implemented and managed in a table. Now, let's see how easy it is to convert a list:
- First, select the list. (Click the Move handle, the small four-arrow pointer at the top-left corner.)
- Click the Insert tab.
- Click the Table option in the Tables group.
- Choose Convert Text To Table from the dropdown list. (In Word 2003, choose Convert from the Table menu and then select Text To Table.)
- Word does a good job of assuming the table setup based on the list's composition. In this case, Word wants to create two columns, based on the tab characters that separate the two columns. This is correct, so click OK without changing any settings. That won't always be the case, so be sure to check the settings carefully.
Most likely, the table won't be perfect. In this case, you'll probably want to reduce the width of the first column and then add some formatting. With Live Preview (in the ribbon versions), you can quickly format the table by selecting the table and clicking the contextual Design tab and hovering over the many styles in the gallery (in the Table Styles group). To see more styles, click the Table Styles dialog launcher (the arrow in the group's bottom-right corner) to display the entire gallery. Choose any format. In Word 2003, choose Table AutoFormat from the Table menu to find predefined formats.
In this case, the format adds bold to the top row, assuming it's a row of headings, so remove the bold from the second column in the first row. To move the entire table, click the Move handle and drag and drop the whole table.
With just a little work, you can totally change the visual appeal of your document. This is a great time-saver for users with little time and/or skill. Frankly, even your power users will appreciate this tip-just because they know a lot about Word, doesn't mean they want to work harder than they have to!
To remove the table, select it and click Convert To Text in the Data group on the contextual Layout tab. Word will remove the table and its format, leaving the text in its original list form. If you want the list flush with the left margin, be sure to move the table before converting it back to text. In Word 2003, select the list and choose Convert from the Table menu. Then, select Table To Text.
Susan Sales Harkins is an IT consultant, specializing in desktop solutions. Previously, she was editor in chief for The Cobb Group, the world's largest publisher of technical journals,