11 Steps to iPhone screencaps from WITHIN the iPhone, not of it

Erica Sudan of the Unofficial Apple Weblog has posted a freely downloadable utility that when installed on your iPhone, will let you take screen captures not just of your iPhone screen but directly from it.
And then the iClarified Web site has posted an eleven-step tutorial on how to do just that.
So why would anyone want to take screencaps from their iPhone? Plenty of reasons- to incorporate into PowerPoint slides, to boast on Flickr, to export on to online sites or even printed material for home or enterprise use.
I know you can get these images by pointing a digital camera to your iPhone screen, but that's not a guarantee of high-quality. I know from similar attempts that glare and reflection are menaces often encountered in such approaches.
OK, so let me get to the gist of this post.
Here, as described on iClarified, are the 11 steps necessary to take an image of your iPhone screen:
Click here to download Erica's screenshot utility. Double click the zip file to extract it.
On your iPhone press to select Settings from the springboard. Then press to select General. Under General press to select Auto-Lock. Press to select Never from the list of Auto-Lock times.
Find your iPhone's IP Address. Do this by pressing to select Settings from the springboard. Then press to select Wi-Fi from your Settings menu. Now press to select the blue circle with the right arrow next to your connected network. A screen will appear showing your connection details. Take note of your IP Address. Start Fugu by clicking its icon in your Applications folder. If you didn't use Fugu to unlock your iPhone you will have to download and install it now.
Log into Fugu by inputing your iPhones IP address into the Connect to field. Type rootUsername field. Then press the Connect button. If you are prompted for a password it is either dottie or alpine depending on your unlock methods.
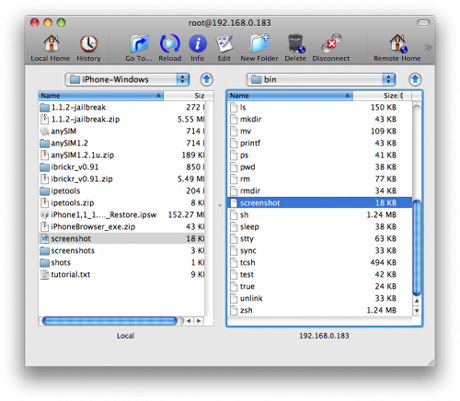
Select the panel to the right and click the Go To... button on the toolbar. A popup window will appear. Enter /bin into the entryfield and click the Go button. Now on the left panel navigate to where you extracted the file screenshot from screenshot.zip. Drag and drop the file screenshot from the left panel to right.
Select the file screenshot from the right panel and press Command+i on the keyboard.
This will bring up an info window for the file. Check all the boxes next to Execute and click the Apply button.
Open a new Terminal window by clicking its icon in Applications:Utilities.
SSH into your iPhone by typing the following at the command line replacing 'ipaddress' your iPhone's IP Address. When prompted for a password just enter 'dottie' or 'alpine' depending on the unlock method you used. ssh root@ipaddress
On your iPhone navigate to the screen you would like to take screenshot of. Then back in your Terminal window type screenshot then press enter.
Go back to Fugu which you should still have running. Select the right panel then click the Go To... button from the toolbar. Enter /tmp into the Go To popup window then click the Go button. In the right panel you will notice a file called foo_0.png. Drag this file from the right panel to the left panel to copy it to your computer. If you open the file with preview you will see it is a perfect screenshot of your iPhone!
