Building a broadcast-quality video studio for Skype in a 10x9 foot space

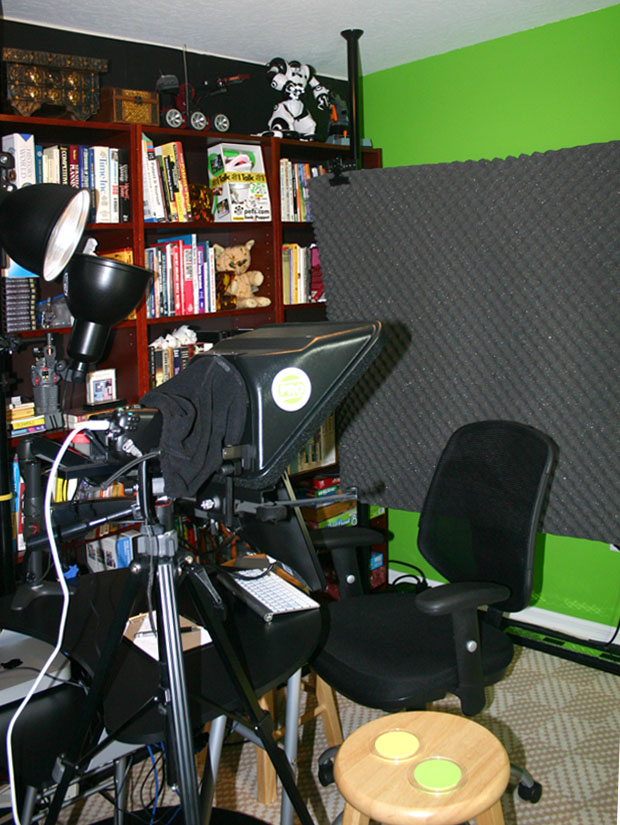
This is the studio in webcast mode, where the egg-carton foam behind is used to enhance the sound recorded. There's not much room for picture taking in this space, so this is taken from the door.
When the editors here at ZDNet and I put together our plan for DIY-IT, one of our key goals was to take you through some of the projects I've been working on. One of the most exciting has been a project I've been working on since about March, building a broadcast-quality video studio for Skype in a 10x9 foot space.
Like most DIY-IT projects of mine, this is a work in progress. I'm adding, tweaking, changing, and improving as I go, and I'll share that with you as well.
How it got started
I've been a renter all my life. However, as housing prices here in Central Florida became more and more affordable, my wife and I decided last February that the time had come to buy a house.
As I've discussed before, part of being a "professional expert" is the need to have multiple streams of professional income. To do that, and also to be a successful book author, you need to promote yourself and, essentially, turn your name into your brand. Over the past five years, I've done hundreds of radio interviews, many network TV interviews, and, now, for CBS Interactive, I do a lot of webcasts and lectures.
See also: And now for something completely different. Welcome to DIY-IT!
In the old rental house, I had my office in a loft that was over the living room and front entryway. That loft office was where I did my interviews and webcasts. It was adequate, but not great. If someone had to leave or enter the house, the front door was right below me (and it creaked). If I had to do a video interview (where I was the interviewee), light was almost impossible to control, and what you could see on camera behind me was less than fully professional. Sometimes you could see the hallway, sometimes my computer desk, sometimes I had a divider up to try to hide it all. It was tolerable, but far from great.
Back to the house story.
When we decided to buy a home, my wife took on the task of hunting for houses during the work day, while I was working on projects with deadlines. Shortly after she started, she found the house we'd eventually buy. When she came home that day, after almost instantly knowing it was "the one," she also told me it had a nice space for a studio.
I'd been unhappy with my office-as-studio space in our old, rented home, but I never really thought I'd have the option to carve out a dedicated studio space. But, as it turns out, the house we bought has a 125-inch by 95-inch room (that's about 10 feet by about 9 feet) that is perfect for a studio.
I think it was probably initially intended as a baby's room or a child's bedroom, but since we don't have kids, I immediately accepted the challenge of turning it into a studio for both broadcast-quality audio and video.
« Previous: Project background
Project goals
Right from the start, I had three key goals for the studio. First, I wanted to be able to do quality audio work, both for the CBS Interactive webcasts and for the radio interviews.
Second, I wanted to be able to connect to network studios and send them live video and audio streams of me, where they could interview me over Skype.
And, third, I wanted to conduct and record interviews of interesting people, where I was able to capture talking-head video of both me and my interviewees.
Skype and green screen
At one time, I used privacy screens purchased from Target, another time I'd just had my desk behind me, and most of the time, the lighting from the room's windows was completely wrong for a good video image. It was definitely not the professional image I wanted to project and -- more importantly -- producers thought the results were usable, but certainly not great.
I wanted to change all that. In production video, chroma key technology (also called green screen) is used to mask out a vivid green background (other colors are also sometimes used) and replace it with anything else. This is how your friendly neighborhood weatherman stands in front of a dynamically changing weather map.
While Skype video is pretty universally accepted as a transmission medium, it has no facility for chroma keying. What your webcam is pointed at is what you get. I wanted to change all that and dynamically insert any background I wanted into my Skype video stream.
Talking to the screen
My other key goal was to overcome a common problem with Skype interviews. When you have a webcam at the top of your screen, but the person you're talking to is in a window on your screen, the video that results is usually a bit peculiar.
You've all seen it. The person on camera is always looking down, instead of at the camera. Sometimes you see a forehead, sometimes you see eyes kind of roll up, sometimes you see a distorted image of a particularly large hairline. It's weird, it's not exactly natural, and it certainly isn't broadcast quality.
So, I thought, what if I used teleprompter technology to project the image of the person I'm talking to right in front of the camera? Then, I'd be looking at and interacting directly with the person on the other end of Skype, but also looking straight into the camera.
Budget
There was one final factor: budget. We'd just bought a house, and as I'll tell you in some of the other project articles, we essentially bought a solid shell, but had to replace most of the systems. Budget was definitely important. My wife and I agreed that I could allocate about $5,000 to the studio project, for computers, cameras, lighting, software, construction ... everything.
This may sound expensive, but since broadcast studios often cost millions of dollars, five grand is pretty cheap. Also, remember that this is my job, how I make my living. Investing this in a hobby would be quite expensive, but I make a good part of my living sending spoken word out to all my audiences. Investing in this studio for me was no different than a manufacturer investing in a new piece of production hardware.
The project begins
So there you go, now you understand my basic goals. Be able to do quality audio and video interviews, be able to control my background dynamically within Skype, generate broadcast quality talking head video, and use teleprompter technology to look straight at the camera, rather than down or off to the side -- and do it all for $5,000 or less.
There are a lot of moving parts in this project. What follows is a short summary of all the elements. Stay tuned for individual articles that'll take you through each piece of the puzzle.
Soundproofing: As it turns out, we moved in across the street from a family with five kids. I needed to be able to sound-proof the studio or the whole project wouldn't work out.
Sound balancing: Soundproofing introduces weird sound characteristics, especially in such a small room. So my next step was finding ways to make sure the sound was rich and deep enough to provide quality results.
Green screen: I found a really neat, inexpensive way to do this. Hint: it involves a Disney product.
Lighting and light stands: Lighting is always a problem, and in a room that's not much more than 9-foot square, you can't have a lot of light stands using tripod legs. I found an almost zero-footprint solution.
Studio computer: I needed a powerful enough, quiet enough, small enough computer to handle all the video and audio processing in the studio space. Plus, it had to run the special software that inserts chroma key video into the Skype stream.
Virtualized control room: You've all seen video studio control rooms, with all the dials, sliders, and buttons on big panels. I needed to make this happen on one computer screen, and so I built a virtual control room using some very slick software.
Camera: I wanted something better, and with more control, than a typical webcam. Here's what I came up with: Finding a camcorder that works with Skype is harder than you might expect.
Teleprompter: I tried a variety of ideas, but the key was I had to go beyond teleprompting software and somehow project a live Skype video window right in front of the camera. Hint: I'm using an iPad.
Motorized pan-and-tilt head: I wanted to be able to easily adjust the camera's position and focus from in front of the camera. I bought a device that failed, because the combination of the camera, teleprompter, and iPad were too heavy. My current attempt to solve this involves Erector sets and a blood pressure cuff.
Studio audio: There are a number of different ways needed to capture audio, depending on where it's going. I wound up using an analog phone, an old mixer, and a cheap mic from Radio Shack. It works astonishingly well.
Studio sound software: Given all the software running in my virtualized control room, I had to route the audio in interesting and creative ways. This required some slick software. I'll tell you all about it.
Studio video production software: For recorded video interviews, there's a need to cut in intros, outros, opening titles, credits, and so forth. There's no shortage of video production programs, and I look at a bunch of them.
Integrating Skype into studio production: This is all about the process. All these pieces have to come together into a final, working piece.
Oh, one final note: I know there are a lot of video conferencing tools beyond Skype. I'll probably test some of them out, but for the broadcast world, Skype is solid enough, cheap enough, and certainly universal. Everyone knows what you're talking about when you talk about Skype.
So there you go. It's a big project. I've gotten most of it working, and I'm now finding and squashing bugs in the production system. Stay tuned. I'll tell you all about the individual project elements in the coming weeks.
