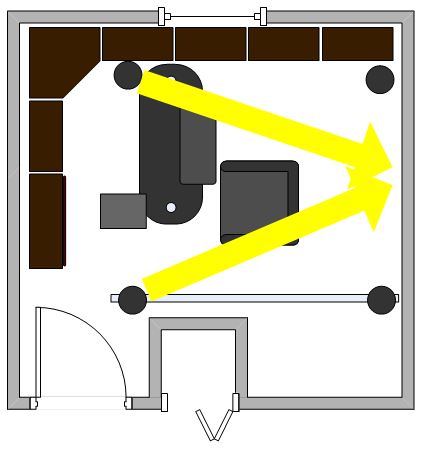
Green screen lighting in the Skype Studio

All projects: DIY-IT Project Guide This project: Build your own, broadcast-quality Skype Studio
When you're doing green screen (also known as chroma key), lighting is critical. The goal is to create a completely consistent, bright chroma image on the screen that's behind the subject.
Since the software picks out anything that's vivid green, you want to be sure you're getting as clean and solid a color field as possible. That's the job of the lighting.

A second challenge is temperature. I'm a big guy, so I normally run hot as it is. But having hot studio lights shooting at me for hours at a time would make the experience unbearable, especially in such a small space. I had to find cool lights.
One very nice lighting technology comes from a company called Lite Panels. These guys make LED arrays that provide very clean, bright, cool light. Unfortunately, this wonderfulness comes at a price, and two 12-inch square Lite Panels would have set me back my entire studio's budget. So I had to find lighting that was both cool and relatively cheap.
Finally, most light stands have large footprints. They have tripods or quad-legs extending out from the bottom of the stand, taking up a lot of space. I don't have that space. I needed to find a lighting structural system that would support all my lighting and take virtually no floor space.
Here's a quick summary of the challenges:
- Very short sight-lines, so limited placement opportunities
- Cool lighting that stays within budget
- A mounting system that has very little footprint
I showed you how I arranged the lighting above, so let's look at the other two issues: lights and structure.
Cool lighting at a cool price
I decided to try out compact fluorescents instead of LEDs. They take a little more space front-to-back (they're much deeper), but they put out a good amount of light and they're only slightly warm to the touch, even after running for hours at a time.
I originally settled on a 55W, 3300 lumen bulb from Adorama. It was cool and put out what seemed like a lot of light. The bulbs cost about $35, the AC light socket was about $6, and the reflector can was about $17. All told, one of these cool CFL lights cost under sixty bucks, not the thousands I'd have had to pay for Lite Panels.
By the way, I'm telling you what I bought and where, because it'll be helpful to you. I want to be clear that I bought this stuff, there's no sponsorship and I sure as heck didn't get any special treatment.
The weird part is I couldn't get the chroma key to work. Oh, I got close, but there was always a smudge all around the sides, and no matter what I tried to do, I couldn't get the lighting to work well enough to properly chroma key my video.
As it turns out, the answer was simple: the bulbs weren't bright enough. I found 85 watt CFL bulbs, and when I put two of them in my lighting cans, all of a sudden, the green screen effect worked perfectly.
The solution, as Tim Allen, used to say, was "more power!"
Expandable AutoPoles provide lighting support
My next awesome discovery were expandable AutoPoles, made by Manfrotto. These stretch out and clamp on the floor and the ceiling. These are also not terribly expensive. A set of two cost under $200, less than a good tripod. What's astounding is that they actually work, and work quite well.
Here's a video from Adorama that shows them in action. I probably watched this ten times before I pulled the trigger on my order.
Studio tour
As it turns out, the lighting for the studio cost me -- for everything -- somewhere around $500. That also included a cross-bar which housed a drop-down paper seamless backdrop that I can use for other photo work, like product shots for reviews.
Here's a short tour of the lighting in my Skype Studio. It's filmed on a little Kodak Zi8 camera, but it gets the job done.
You've probably noticed more than just two lights in the video. I use the extra lights with 55W bulbs for product shot lighting, general room lighting, and to provide a bit of extra punch in corners when needed. The actual green screen chroma key effect works off of just two lights.
Stay tuned for more on setting up your own Skype Studio.