Hands-On: Ubuntu MATE on the Raspberry Pi 2

When the original Raspberry Pi came out, some people had high hopes for it as a low-cost general-purpose desktop computer. Especially because it was running Raspbian (a derivative of Debian GNU/Linux) it seemed like a good prospect. Although it booted to a CLI text console, it also included the LXDE desktop and you could easily configure it to boot to the GUI rather than the CLI. It seemed pretty promising.
Raspberry Pi Model A
Unfortunately, those dreams were for the most part not fulfilled. The combination of a relatively slow single-core CPU, rather small memory (256MB on the A/A+, 512MB on B/B+), and painfully slow disk access on the SD or microSD cards, meant that you had to have a lot of patience to use a Raspberry Pi for everyday home/office tasks. (Yes, I know that early Model B units still had only 256MB of memory.)
Certainly there were those who had sufficient dedication and patience to do it, and in a limited context I was one of them (I have always written my Raspberry Pi posts on a Pi). In fact, once you got the desktop up and running and whatever applications you needed opened, you could work reasonably comfortably. But honestly it was far from a pleasant experience.
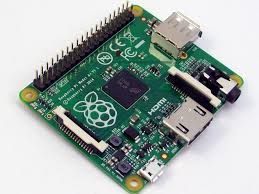
Raspberry Pi 2
Then the Raspberry Pi 2 was born, and the world became a much better place. It has a faster quad-core CPU, and a full Gigabyte of memory. Still the rather slow microSD disk, but hey, two out of three improvements isn't bad. Perhaps even more importantly, the CPU is current enough that it is still supported by the mainstream Linux ARMv7 development branches, so the task of porting various other Linux distributions became a lot less daunting.
There was already an active, dedicated and successful project merging the Ubuntu Linux distribution with the MATE desktop (the logo above translates to "Ubuntu + MATE + Love = Ubuntu MATE"). Because even the Raspberry Pi 2 is still somewhat under-powered by today's standards, and the MATE desktop is one of the less demanding on system resources, and the Ubuntu Unity desktop is a resource pig, it seemed that Ubuntu MATE would be a good match for the Raspberry Pi 2.
The Ubuntu MATE developers took on the task, and did a very good job of it. The result is a distribution that is becoming very popular with those who want to use the Pi 2 for general purpose desktop work. The Raspberry Pi hobbyist and developer communities seem not to have taken to it quite so enthusiastically, but that is the beauty of Linux, isn't it? Now you have a choice!
Until now I have been quite happy to stay with Raspbian, so this will be my first adventure with downloading, installing, configuring and using Ubuntu MATE. I hope that it will be both fun and interesting!
The Ubuntu MATE project has a web page dedicated to the Raspberry Pi, where you can download an installation image. Then you have to copy the image directly to the microSD card for the Raspberry Pi. Note that you have to byte-copy the image to the SD card, not simply unpack the archive to it. If you have any other Linux system you can easily do this using dd (or ddrescue) but if you only have Windows available you will have to get one of the "dd for Windows" utilities to do this.
Ubuntu MATE Disk Partitions
The Ubuntu MATE image contains a 64MB boot partition (FAT16) and a 3.60GB root partition (ext4), so it will fit on a 4GB microSD card - but just barely, so don't get your hopes up. The root filesystem has about 3.3GB of space used, so you are almost certainly going to want to use at least an 8GB card, so that you can resize the root partition to give it more free space.
The easiest way to do this, if you are creating the Ubuntu MATE card on another Linux system, is to use a disk/partition management utility (my favorite is gparted), and simply resize the root (ext4) partition immediately after you have copied the image to the card. (You will probably have to fsck the filesystem first)
If you are using an 8GB card I would recommend simply extending the root partition to the maximum size. That will give you about 50% free space, which is a comfortable start for a new system. If you are using a larger card, you might want to create another new partition to be used as /home (for example), but you still need to extend the root partition so it has enough room to work, so would extend root to 8GB and then make another 8GB ext4 partition for home.
Once the microSD card has been initialized, you just pop it into the Raspberry Pi 2 and boot it up... and this was where I ran into the first major problem.
I use a very old monitor with the Raspberry Pi systems on my desk, and it has DVI connections but does not have HDMI. So I have been using an HDMI<>DVI cable, and that has always worked just fine with every kind of Raspberry Pi (I have A/B/B+/2/Zero) and every operating system (Raspbian, Arch, Pidora, openElec, OSMC, RISC OS).
But when I tried to boot the Pi 2 with Ubuntu MATE, the display continuously blinked on and off. Ugh. It felt like a scene from The Andromeda Strain, sitting there staring at that blinking screen, trying to let it get through the initial configuration to see if it would stabilize when it got to the 'real' boot..
I eventually gave up on that, because it was really scrambling my brain. I got a standard HDMI cable and connected the Pi 2 to a new monitor, and it came up perfectly. Well, except for the fact that it had gotten its knickers in a twist because I had aborted the startup/initialization process several times.
I got that back on track by just exiting the shell that had come up to give me a chance to fix the problem, and it then went on through initial configuration and startup.
If you are experienced with installing Raspbian (or NOOBS) on the Raspberry Pi, the initial configuration dialog and the initial state of the system when it is done will probably seem a bit strange to you. Rather than having the predefined user 'pi' and its standard password, you have to create a user account during the installation.
If you have previously installed and configured Ubuntu on other systems, the configuration process will probably seem familiar. It looks and feels like a reduced version of the Ubiquity installer (which it probably is).
After you finish the initial configuration you will have to login with the account and password that you just created. The default desktop then looks like this (on a 16:9 HDMI monitor):
Ubuntu MATE Desktop on Raspberry Pi .
That's pretty good, it looks like a normal Ubuntu MATE desktop - which is just what it is, but it is running on my Raspberry Pi 2! Way Cool!
At this point I went to the Ubuntu MATE for the Raspberry Pi 2 community topic, where I found that several people had already experienced the blinking display problem and they had already found a solution for it. All I needed to do was edit the boot configuration file /boot/config.txt and change the value of 'hdmi_drive' from 2 to 1. Then I shut down, switched back to the HDM<>DVI cable and the old display, and everything worked just fine.
After a bit more reading of the discussion, and a bit more testing, I found that I could simply remove (comment out) the 'hdmi_drive' line in the config.txt file, and the Linux kernel would select the appropriate driver itself. I am a big believer in minimizing manually-entered specifications, so I am quite pleased with that result. Don't force Linux to do something that it knows how to figure out for itself.
Another thing I learned from the community discussion was that the HDMI display backlight was being left on when display blanking was enabled - not good for power saving. Following the advice given there, I added 'hdmi_blanking=1' to the config.txt file. To be honest, I hadn't even noticed this yet, but after I made the change I saw that the power LED on the display would blink when it went to standby, and it never did that before. Nice.
Now that everything seemed to be working, I wanted to see what Ubuntu MATE really had in it, and what it was like to use it. The first very obvious measure was boot time; from power-on to the Ubuntu login screen on the Raspberry Pi 2 takes about 30 seconds. That's really not bad. From giving your password to having a desktop ready to use is about another 15-20 seconds. So less than a minute total to boot and login.
For comparison, the same Raspberry Pi 2 goes from power-on directly to the desktop ready to use in a bit less than 30 seconds.
It is running Linux kernel 4.1.10 and MATE version 1.10.2. It has the normal selection of Gnome 3 utilities and applications, again as expected because MATE is a shell running on top of Gnome 3, instead of the Gnome shell.
Performance ranges from "Ugh" to acceptable to good. The slowest things are those which require a significant amount of read/write activity on the microSD card. Starting a new application can feel pretty slow, depending on the actual size of the program. But once something is loaded, it really does perform quite nicely.
Ubuntu MATE includes Firefox and Thunderbird, the LibreOffice suite, OMXPlayer, VLC and Totem movie player, Rhythm Box music player, Shotwell Photo Manager and much more.
The MATE desktop can be customized, of course. I recently wrote about that in How to customise your Linux desktop: MATE, so refer to that for details. What I wanted to do on this Raspberry Pi 2 was basically the reverse of what I described in that post - Ubuntu MATE starts out looking like a very traditional Gnome 2 desktop with top and bottom Panels and various menus, launchers and controls spread across them, and I wanted to change it to what I consider a more modern-looking desktop with only a top Panel, a compact menu and the controls and monitors that I use most often.
I moved everything that I wanted onto the top panel, and ditched the bottom panel. I then replaced the Menu Bar with the very compact Main Menu, and grouped the menu and launchers at the left, monitors and controls at the right, and a Window List in the middle. The result ended up looking like this (on a 4:3 DVI monitor):
My Ubuntu MATE on Raspberry Pi 2.
So that brings us to the crucial question - how does it compare to Raspbian, the Raspberry Pi Standard/Supported Linux Distribution. Well, I think that if I was going to use the Raspberry Pi as a general desktop system, and if I only had a Raspberry Pi 2, then I would probably choose Ubuntu MATE over Raspbian.
There are two reasons for this choice. First, MATE has a noticeably more polished look than Raspbian. Ubuntu MATE looks like something I would be using in my office; Raspbian looks like something I would be using in my workshop. Well, DUH! That's pretty much what they are, so I guess it makes sense that they look the part.
Second, the programs, applications and utilities that are included in the Ubuntu MATE distribution are an office / home-office oriented selection. The programs and utilities that are included in Raspbian are an education / hobby / programming selection.
Of course you can adjust either one, and add whatever you want or need. But starting with a distribution which is oriented the way you plan to use it can save you a lot of downloading and configuring.
The other thing to remember is that Ubuntu MATE is only available for the Raspberry Pi 2. If you have any other Raspberry Pi models (A/A+/B/B+/Zero), you'll pretty much have to run Raspbian (well, you could choose Arch Linux or Pidora I suppose. But no Ubuntu MATE).
So if you're going to be switching around between systems, you might choose Raspbian just so you have the same thing everywhere, for the sake of sanity.
Well, that's it, time for a summary. Ubuntu MATE works quite well on the Raspberry Pi 2, and it looks wonderful. It's easy to install, and there is an active and knowledgeable user community to help if you have problems. If you're going to use a Raspberry Pi 2 for everyday home/office things, it could be a good choice. It's prettier than Raspbian, easier than Arch, more up to date than Pidora, so give it a try!
Read more on the Raspberry Pi