Bluetooth on Vista and Mac: Different but equal
Mitch Ratcliffe turns his examination of the user experiences with Windows Vista and Mac OS X to the increasingly prevalent Bluetooth networking technology and its implementation on the two systems.

1 of 12
Mitch Ratcliffe turns his examination of the user experiences with Windows Vista and Mac OS X to the increasingly prevalent Bluetooth networking technology and its implementation on the two systems.
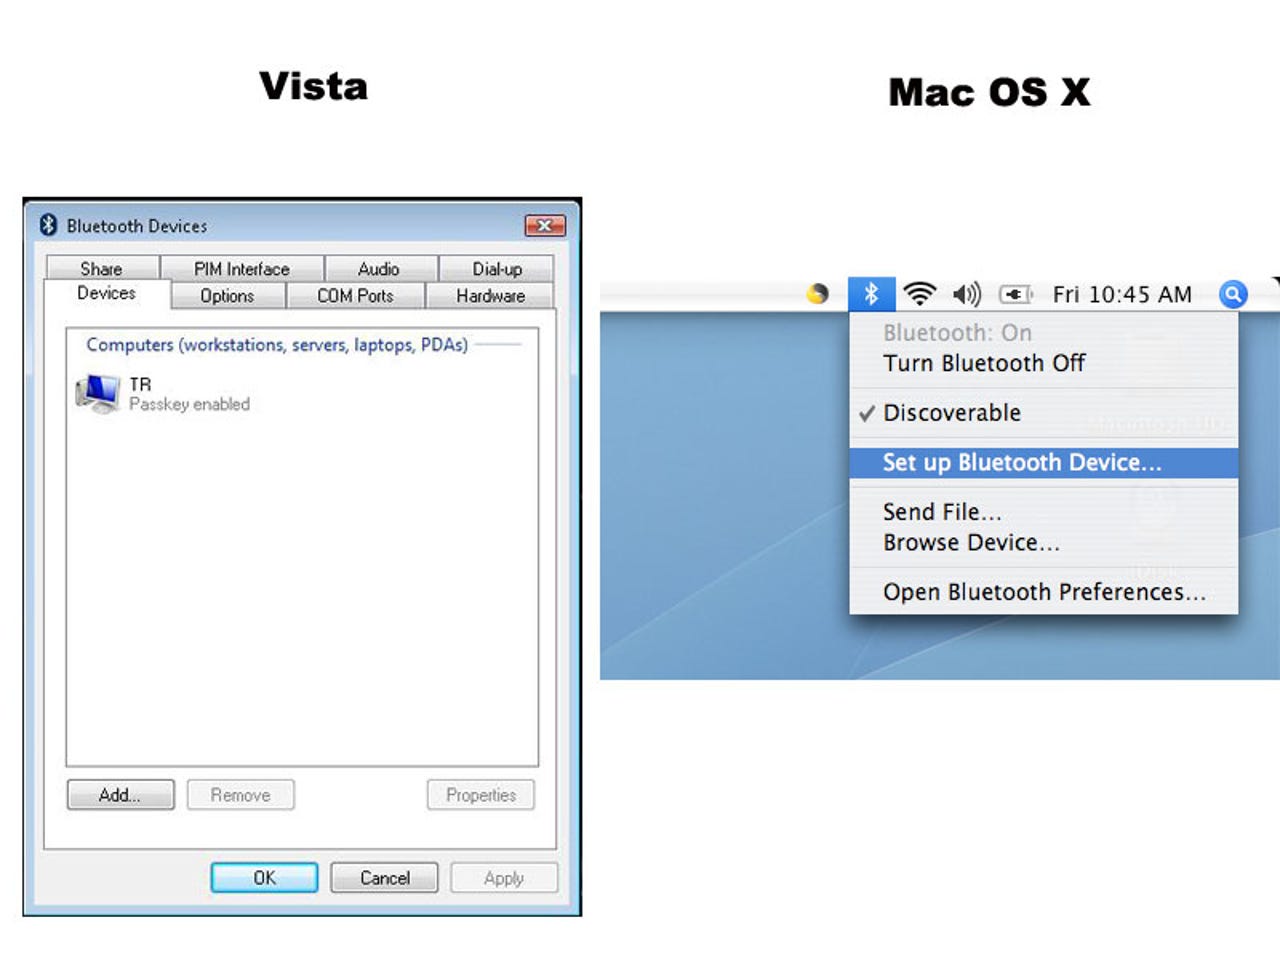
One of the major differences between Vista and Mac OS X where you will find the command to start the process of setting up a Bluetooth device. The Vista Add Device command is in the Bluetooth Control Panel whereas you can begin the process from the Desktop on the Mac by clicking the Bluetooth icon in the toolbar.
Vista handles audio Bluetooth devices, such as headsets in a separate pane of the Bluetooth Control Panel.
2 of 12
There's not a lot of magic to the Bluetooth setup process, at least not in the Harry Potter magic full of flourish sense. Both OSes pop the first step with a short explanation, in Vista's case you must check the box that indicates you have prepared the Bluetooth device to communicate before going on.
3 of 12
Vista begins by searching for available devices, regardless of what they might be, in order to populate a list the user can choose from.
The Mac OS, by contrast, asks what kind of device will be configured. The odd thing about this is that it will still discover other types of devices and try, if, for example, you select "Mobile Phone" from the list, to configure a computer as a Mobile Phone.
The Mac OS, by contrast, asks what kind of device will be configured. The odd thing about this is that it will still discover other types of devices and try, if, for example, you select "Mobile Phone" from the list, to configure a computer as a Mobile Phone.
4 of 12
In this step, Vista presents a list of the Bluetooth devices in range, including those the computer is already paired with. Clicking the device you want to configure moves it along to the next screen.
On the Mac, the assistant begins to scan the available devices based on the criteria provided in the previous screen. However, it will find all the devices.
On the Mac, the assistant begins to scan the available devices based on the criteria provided in the previous screen. However, it will find all the devices.
5 of 12
Mac OS X generates a passkey, which must be entered on the other device with which it will pair, automatically. If the other device requires entry of a passkey, such as a headset with a built-in code, Mac OS X asks the user to enter that number.
It's not really something I think users need to make a choice about, since deciding not to use a passkey creates a security risk—even if it is a one-time connection. Mac OS handles this step more gracefully.
Vista makes this step into a decision for the user. One can: have Vista generate a key (basically, do what Mac OS X does by default); enter a passkey provided with the device; create a passkey of their own, or; decide not to use a passkey.
Vista then reminds you that "You should always use a passkey unless your device does not support one." Well, then, make it easier by having the OS present the appropriate choices. This is a case where the Windows wizard approach becomes unnecessarily complex.
6 of 12
Here, Vista has generated the passkey, which I enter on the other device (you can see what the Mac pairing dialog looks like below the Vista dialog). Once entered, Vista installs the Bluetooth device.
On the Mac side, you can see that even though it is pairing with a computer, the Mac is able to add phone-specific features, such as sharing the PC's Net connection and grabbing audio off its sound card. This, too, can be confusing if you selected the wrong kind of device to begin with.
On the Mac side, you can see that even though it is pairing with a computer, the Mac is able to add phone-specific features, such as sharing the PC's Net connection and grabbing audio off its sound card. This, too, can be confusing if you selected the wrong kind of device to begin with.
7 of 12
Vista asks for confirmation of the pairing, providing information about the ports assigned to the device. Clicking Finish completes the pairing and takes you back to the Bluetooth Control Panel.
The Mac confirms the pairing and asks if the user would like to set up another device or quit. That's the last step if you are setting up just one Bluetooth device.
The Mac confirms the pairing and asks if the user would like to set up another device or quit. That's the last step if you are setting up just one Bluetooth device.
8 of 12
The Mac configuration is done, but Vista takes a final step, returning the user to the Bluetooth Control Panel. Here, another device can be added or the process completed.
9 of 12
Sending a file from the Desktop is easy with both operating sytems. A right-click on a file in Vista will open a menu that includes a Send To option pop-up that include "Bluetooth device." Vista, however, will not send a folder full of files without first compressing it.
That's okay, but Vista's UI doesn't handle compressing the file automatically. Rather it opens a dialog that tells the user to open the folder and select the files they want to send. It does not say that if you want to send the whole folder you should compress it first.
Vista can send multiple files, but it does so as separate transfers.
On the Mac, one begins by clicking the Bluetooth icon in the menu bar, selecting "Send File..." to open a Finder window where they can select a file, files or a folder to send.
10 of 12
In this step, Vista asks where you want to send the files you selected in the previous screen. If you have more than one paired device and want to select one that is not displayed as the default connection, you must browse for it. Windows then seeks connected and other devices in range.
The advantage here is that you could, if you needed to, set up a device from within the device browser by clicking the icon.
The Mac, on the other hand, has opened a Finder window where you can select what files or folder you wish to send. A folder can be sent uncompressed, unlike Vista's Bluetooth, which will only send a folder if it is compressed and handled as a single file.
11 of 12
Vista starts transferring your file immediately, unless it must wait for the receiving device to approve the transfer. In that case, it will wait for a response from the other device.
The Mac now asks the user to select the device to which they want to send the file from a list of all available devices. No browsing needed.
The Mac now asks the user to select the device to which they want to send the file from a list of all available devices. No browsing needed.
12 of 12
After sending the file(s), Vista presents a confirmation dialog explaining the file has been sent. Clicking Finish in this dialog ends the transfer process.
The Mac will complete the transfer of the file and close the progress dialog, unless there is a problem, in which case it will open a dialog alerting the user that the file did not transfer successfully.
What we see throughout this step-by-step tour is that the Vista and Mac OSes take their own approach to configuring, and transferring files via, Bluetooth. Some steps on each side are more or less superfluous, but they get the same tasks done in approximately the same time.
What you prefer will be a matter of taste, not technology.
Related Galleries
Holiday wallpaper for your phone: Christmas, Hanukkah, New Year's, and winter scenes
![Holiday lights in Central Park background]()
Related Galleries
Holiday wallpaper for your phone: Christmas, Hanukkah, New Year's, and winter scenes
21 Photos
Winter backgrounds for your next virtual meeting
![Wooden lodge in pine forest with heavy snow reflection on Lake O'hara at Yoho national park]()
Related Galleries
Winter backgrounds for your next virtual meeting
21 Photos
Holiday backgrounds for Zoom: Christmas cheer, New Year's Eve, Hanukkah and winter scenes
![3D Rendering Christmas interior]()
Related Galleries
Holiday backgrounds for Zoom: Christmas cheer, New Year's Eve, Hanukkah and winter scenes
21 Photos
Hyundai Ioniq 5 and Kia EV6: Electric vehicle extravaganza
![img-8825]()
Related Galleries
Hyundai Ioniq 5 and Kia EV6: Electric vehicle extravaganza
26 Photos
A weekend with Google's Chrome OS Flex
![img-9792-2]()
Related Galleries
A weekend with Google's Chrome OS Flex
22 Photos
Cybersecurity flaws, customer experiences, smartphone losses, and more: ZDNet's research roundup
![shutterstock-1024665187.jpg]()
Related Galleries
Cybersecurity flaws, customer experiences, smartphone losses, and more: ZDNet's research roundup
8 Photos
Inside a fake $20 '16TB external M.2 SSD'
![Full of promises!]()