Search
  • Videos
  • Enterprise Software
  • Windows 10
  • Cloud
  • AI
  • Security
  • TR Premium
  • more
    • 5G Guide
    • Build a Website
    • Hardware
    • Innovation
    • Best Smartphones
    • Executive Guides
    • Best VPN Services
    • Web Hosting
    • See All Topics
    • White Papers
    • Downloads
    • Reviews
    • Galleries
    • Videos
    • TechRepublic Forums
  • Newsletters
  • All Writers
    • Preferences
    • Community
    • Newsletters
    • Log Out
  • Menu
    • Videos
    • Enterprise Software
    • Windows 10
    • Cloud
    • AI
    • Security
    • TR Premium
    • 5G Guide
    • Build a Website
    • Hardware
    • Innovation
    • Best Smartphones
    • Executive Guides
    • Best VPN Services
    • Web Hosting
    • See All Topics
    • White Papers
    • Downloads
    • Reviews
    • Galleries
    • Videos
    • TechRepublic Forums
      • Preferences
      • Community
      • Newsletters
      • Log Out
  • us
    • Asia
    • Australia
    • Europe
    • India
    • United Kingdom
    • United States
    • ZDNet around the globe:
    • ZDNet China
    • ZDNet France
    • ZDNet Germany
    • ZDNet Korea
    • ZDNet Japan

Provision a WordPress site in 30 minutes or less using Amazon AWS Lightsail

10 of 30 NEXT PREV
  • Go to aws.amazon.com

    Go to aws.amazon.com

    Start by pointing your browser to aws.amazon.com and clicking on the Lightsail option. You can also get to Lightsail from your management console.

    Published: October 28, 2019 -- 13:54 GMT (06:54 PDT)

    Photo by: Amazon

    Caption by: David Gewirtz

  • Give Lightsail's free trial a shot

    Give Lightsail's free trial a shot

    We're going to get started using Lightsail's $3.50-per-month tier, which is free for the first month. Unlike most of AWS, Lightsail is not usage-based. It's a fixed-price service, which puts it right into direct competition with Digital Ocean.

    Published: October 28, 2019 -- 13:54 GMT (06:54 PDT)

    Photo by: Amazon

    Caption by: David Gewirtz

  • Login to AWS

    Login to AWS

    Next, you'll be asked to log into AWS. If you don't have an AWS account, you'll want to create one now.

    Published: October 28, 2019 -- 13:54 GMT (06:54 PDT)

    Photo by: Amazon

    Caption by: David Gewirtz

  • Create your first instance

    Create your first instance

    Welcome to Lightsail. Let's start by creating your first instance, the virtual machine that will run your site.

    Published: October 28, 2019 -- 13:54 GMT (06:54 PDT)

    Photo by: Amazon

    Caption by: David Gewirtz

  • Choose a region

    Choose a region

    Generally, it's best to choose the region closest to you. I'm in Oregon, so that's an easy decision.

    Published: October 28, 2019 -- 13:54 GMT (06:54 PDT)

    Photo by: Amazon

    Caption by: David Gewirtz

  • Choose your instance image

    Choose your instance image

    Scroll on down and choose your instance image. This is where most of the magic is done. If you pick Linux and WordPress, Lightsail grabs those images and sets up a fully-working server for you.

    Published: October 28, 2019 -- 13:54 GMT (06:54 PDT)

    Photo by: Amazon

    Caption by: David Gewirtz

  • Choose your performance tier

    Choose your performance tier

    This is where you provision the VM's resources. We're going to choose the $3.50-per-month tier and get a free month. That provides a VM with 512MB RAM, one virtual CPU, 20GB storage on SSDs, and a 1TB transfer limit. For most small WordPress sites, that's enough. I run a larger set of archived WordPress sites (not shown here), and I give them 4GB RAM, which means I spend $20 per month on them.

    Published: October 28, 2019 -- 13:54 GMT (06:54 PDT)

    Photo by: Amazon

    Caption by: David Gewirtz

  • Name it and create it

    Name it and create it

    Next, give the instance a name. This is how you'll see your instance in the Lightsail dashboard. It's not what visitors to your site will see. When you've done that, you're ready to hit Create Instance. Wait a minute or so, and your VM will be created for you.

    Published: October 28, 2019 -- 13:54 GMT (06:54 PDT)

    Photo by: Amazon

    Caption by: David Gewirtz

  • Wait a minute

    Wait a minute

    For me, it took about a minute for the VM to get instantiated. While it's cooking, the name will be grayed out.
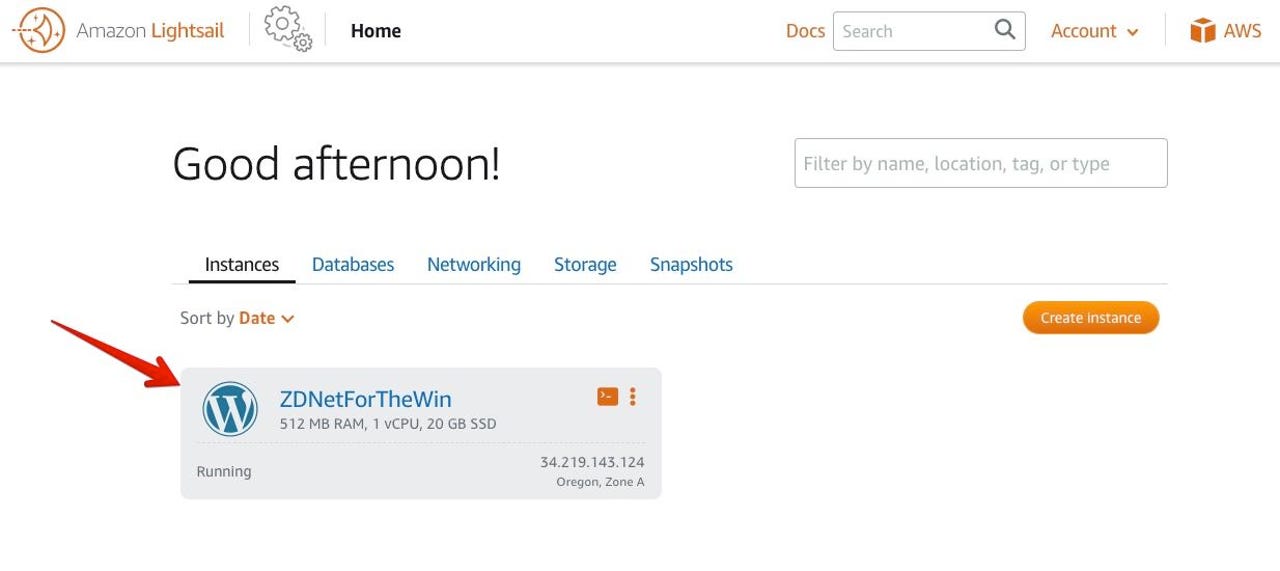
    Published: October 28, 2019 -- 13:54 GMT (06:54 PDT)

    Photo by: Amazon

    Caption by: David Gewirtz

  • It's alive!

    It's alive!

    Once your instance has been created and booted, it'll be shown in blue. Now, it's time to tweak the install. That's next.

    Published: October 28, 2019 -- 13:54 GMT (06:54 PDT)

    Photo by: Amazon

    Caption by: David Gewirtz

  • Enable static IP

    Enable static IP

    Switch over to the Networking tab and hit Create Static IP.

    Published: October 28, 2019 -- 13:54 GMT (06:54 PDT)

    Photo by: Amazon

    Caption by: David Gewirtz

  • Connect your static IP to your instance

    Connect your static IP to your instance

    Static IPs are free on Lightsail, as long as they're tied to an instance. You'll want to choose your instance and then name the IP (it can't be the same as the instance, so I just append Static-IP).

    Published: October 28, 2019 -- 13:54 GMT (06:54 PDT)

    Photo by: Amazon

    Caption by: David Gewirtz

  • Create the IP

    Create the IP

    Once you've got your instance loaded, go ahead and hit Create.

    Published: October 28, 2019 -- 13:54 GMT (06:54 PDT)

    Photo by: Amazon

    Caption by: David Gewirtz

  • There's your IP

    There's your IP

    That's the IP that will be used by your site's visitors. Next, click the Home button at the top of the screen.

    Published: October 28, 2019 -- 13:54 GMT (06:54 PDT)

    Photo by: Amazon

    Caption by: David Gewirtz

  • Create DNS zone

    Create DNS zone

    Next, go back to the Networking tab and click the Create DNS Zone button. This will give you what you need to get your DNS provider to point to your site.

    Published: October 28, 2019 -- 13:54 GMT (06:54 PDT)

    Photo by: Amazon

    Caption by: David Gewirtz

  • Link the IP to a domain name

    Link the IP to a domain name

    I'll be honest. I have no memory of why I registered yourconnectionstore.com, but I must have had something in mind. In any case, it's a domain I own, so we can link it to the IP for demo purposes. We'll be using this as our demo domain for the next few steps.

    Published: October 28, 2019 -- 13:54 GMT (06:54 PDT)

    Photo by: Amazon

    Caption by: David Gewirtz

  • Create that DNS zone

    Create that DNS zone

    Scroll on down and click Create DNS Zone.

    Published: October 28, 2019 -- 13:54 GMT (06:54 PDT)

    Photo by: Amazon

    Caption by: David Gewirtz

  • Get your nameserver list

    Get your nameserver list

    Amazon will now present you with a list of nameservers. You'll need to link these into your domain registrar. We'll do that next.

    Published: October 28, 2019 -- 13:54 GMT (06:54 PDT)

    Photo by: Amazon

    Caption by: David Gewirtz

  • Update your registrar

    Update your registrar

    I manage my domains on GoDaddy. I went in and modified my name server records. Now, this is where things could take as long as a day (but, in my experience, it's usually about 30 minutes). GoDaddy has to update its records, and it needs to propagate nameservers out on the Internet. Basically, go watch a show, have a cup of coffee, or do time on the elliptical, and you'll be good.

    Published: October 28, 2019 -- 13:54 GMT (06:54 PDT)

    Photo by: GoDaddy

    Caption by: David Gewirtz

  • Add an A record

    Add an A record

    Back in Lightsail, it's time to add an A record. You can also add other records, like MX records, but we'll keep it simple for now.

    Published: October 28, 2019 -- 13:54 GMT (06:54 PDT)

    Photo by: Amazon

    Caption by: David Gewirtz

  • Configure your A record

    Configure your A record

    This is important. Be sure to select A (for Address) record. Be sure to put an @ (at-sign) into the field before the domain name. And be sure to select your previously defined Lightsail IP address. Then, hit the little green checkbox (which you can't see in this screenshot, but it's under the blue prompt).

    Published: October 28, 2019 -- 13:54 GMT (06:54 PDT)

    Photo by: Amazon

    Caption by: David Gewirtz

  • DNS setup is complete

    DNS setup is complete

    Your DNS setup is complete. Give it a little while and try your domain name in your browser.

    Published: October 28, 2019 -- 13:54 GMT (06:54 PDT)

    Photo by: Amazon

    Caption by: David Gewirtz

  • There you go

    There you go

    And there you go. Your site is up. But there are a few more steps that'll help you manage it.

    Published: October 28, 2019 -- 13:54 GMT (06:54 PDT)

    Caption by: David Gewirtz

  • Reboot the instance

    Reboot the instance

    We'll save you a step. After installing the site, the console asks for a reboot. We'll show you the console in a bit, but for now, go back to the Lightsail home, hit the drop-down, and select Reboot.

    Published: October 28, 2019 -- 13:54 GMT (06:54 PDT)

    Photo by: Amazon

    Caption by: David Gewirtz

  • Launch the shell

    Launch the shell

    One cool feature of Lightsail is how easy it is to launch an SSH connection to the machine. Just hit the little prompt icon and you'll get a new shell window.

    Published: October 28, 2019 -- 13:54 GMT (06:54 PDT)

    Photo by: Amazon

    Caption by: David Gewirtz

  • Get your WordPress password

    Get your WordPress password

    So here's the one place things are incredibly unintuitive. You have to launch the shell, and then type cat bitnami_application_password to see your WordPress admin password. Bitnami makes the WordPress stack that Amazon uses. Don't worry about me showing you the password. I'll be deleting this instance before you ever see this gallery.

    Published: October 28, 2019 -- 13:54 GMT (06:54 PDT)

    Photo by: Bitnami

    Caption by: David Gewirtz

  • Login as WordPress admin

    Login as WordPress admin

    To make your first login as WordPress admin, go to your domain/wp-admin. So, for our example, it's yourconnectionstore.com/wp-admin/. You'll need to login as 'user' with the password previously presented. I'm not super thrilled with all the cruft in this install, so our next steps will be to delete it and change the username.

    Published: October 28, 2019 -- 13:54 GMT (06:54 PDT)

    Photo by: WordPress

    Caption by: David Gewirtz

  • Delete the plugin cruft

    Delete the plugin cruft

    I like to choose my own plugins, so I'm just going to delete all the installed plugins. I generally recommend you do the same. You may need to deactivate some of the plugins before you can delete them. I had to do that with Jetpack.

    Published: October 28, 2019 -- 13:54 GMT (06:54 PDT)

    Photo by: WordPress

    Caption by: David Gewirtz

  • Create a new WordPress admin

    Create a new WordPress admin

    Using the Bitnami default admin username of 'user' is pretty weak. I like to create a scrambled name, along with a secure password (and I later add multi-factor auth to my WordPress sites). Before we can delete the 'user' admin, we need to create this new admin.

    Published: October 28, 2019 -- 13:54 GMT (06:54 PDT)

    Photo by: WordPress

    Caption by: David Gewirtz

  • Delete the default user

    Delete the default user

    Finally, we'll delete the default admin user.

    That's it. You're ready to rock. Build something great, and let us know in the comments below what sites you've built. We'd love to check them out!

    Published: October 28, 2019 -- 13:54 GMT (06:54 PDT)

    Photo by: WordPress

    Caption by: David Gewirtz

10 of 30 NEXT PREV
David Gewirtz

By David Gewirtz for DIY-IT | October 28, 2019 -- 13:54 GMT (06:54 PDT) | Topic: Cloud

  • Go to aws.amazon.com
  • Give Lightsail's free trial a shot
  • Login to AWS
  • Create your first instance
  • Choose a region
  • Choose your instance image
  • Choose your performance tier
  • Name it and create it
  • Wait a minute
  • It's alive!
  • Enable static IP
  • Connect your static IP to your instance
  • Create the IP
  • There's your IP
  • Create DNS zone
  • Link the IP to a domain name
  • Create that DNS zone
  • Get your nameserver list
  • Update your registrar
  • Add an A record
  • Configure your A record
  • DNS setup is complete
  • There you go
  • Reboot the instance
  • Launch the shell
  • Get your WordPress password
  • Login as WordPress admin
  • Delete the plugin cruft
  • Create a new WordPress admin
  • Delete the default user

Amazon's AWS can be daunting in terms of its almost overwhelming complexity. But Lightsail makes it easy. In this tutorial, we'll show you how to create a full WordPress install in about five minutes.

Read More Read Less

It's alive!

Once your instance has been created and booted, it'll be shown in blue. Now, it's time to tweak the install. That's next.

Published: October 28, 2019 -- 13:54 GMT (06:54 PDT)

Caption by: David Gewirtz

10 of 30 NEXT PREV

Related Topics:

Digital Transformation Data Centers CXO Innovation Storage Cloud TV
David Gewirtz

By David Gewirtz for DIY-IT | October 28, 2019 -- 13:54 GMT (06:54 PDT) | Topic: Cloud

Show Comments
LOG IN TO COMMENT
  • My Profile
  • Log Out
| Community Guidelines

Join Discussion

Add Your Comment
Add Your Comment

Related Galleries

  • 1 of 2
  • IT spending, cloud computing, big data, virtual reality, and more: Research round-up

    All the data that matters to you from the past month in technology news.

  • Julia programming language, cloud computing, cybersecurity worries: Research round-up

    All the facts and figures that matter to you and your business from the past month in technology news.

  • The biggest events in Linux's history

    A year by year summary of the most significant events in Linux's history to date.

  • How Microsoft lost its monopoly in web browsers

    At the dawn of the Internet age, Microsoft used every trick it knew to dominate the World Wide Web. That strategy worked for a few years, but aggressive antitrust enforcement and equally ...

  • Cloud services: 24 lesser-known web services your business needs to try

    In this guide, we've spotlighted 24 cloud-based services that can take your business to the next level. There's a huge world of opportunity and available resources beyond Google, ...

  • Windows 10 May 2019 Update: The new features that matter most

    Windows 10 version 1903, which will be officially dubbed the May 2019 Update, begins rolling out soon. Here are some of the new capabilities you can expect in yet another feature-packed ...

ZDNet
Connect with us

© 2019 CBS Interactive. All rights reserved. Privacy Policy | Cookies | Ad Choice | Advertise | Terms of Use | Mobile User Agreement

  • Topics
  • All Authors
  • Galleries
  • Videos
  • Sponsored Narratives
  • About ZDNet
  • Meet The Team
  • Site Map
  • RSS Feeds
  • Reprint Policy
  • Manage | Log Out
  • Join | Log In | Membership
  • Newsletters
  • Site Assistance
  • ZDNet Academy
  • TechRepublic Forums