How to manage your security questions for a local Windows account

Choose to set up Windows 10 or 11 with a local account, and you're required to select three security questions to answer if you ever get locked out. Those questions include the typical ones, such as your first pet's name, the first name of your oldest cousin, and the name of your first school. But you can always change those questions and their answers if you don't like the initial ones. That option is readily accessible in Windows 10 but not in Windows 11. Here's how the process works.
You first see the option for creating an account early in the Windows setup. Of course, Microsoft wants you to use a Microsoft account so the company doesn't make it easy to choose a local account instead. But it's doable and works the same in Windows 10 and 11.
Also: Is your Windows license legal? Should you even care?
Create a local account
- At the screen asking how you would like to set up Windows, choose the option Set up for personal use.
- The next screen is where you would start veering toward a local account. In Windows 10, select Offline account. In Windows 11, select Sign in Options and then select Offline account.
- At the next screen, Microsoft tries its best to steer you away from a local account. But stay strong. In Windows 10, select Limited experience. In Windows 11, select Skip for now.
- Okay, now you can finally enter the name you want to use for your local account. Devise a password and then confirm it.
Choose your security questions and answers
And that leads us to the security questions, which Microsoft requires you to set up at this point.
- Choose your first security question and then type a response. Choose and answer your second question and then do the same for the third and final question.
2. Finish the reset of the setup and then you're nestled into Windows with your local account.
Switch to a Local Account
Besides choosing a local account from the get-go, you can switch to a local account if you're already using a Microsoft Account to sign into Windows.
- In Windows 10 or 11, go to Settings > Accounts > Your Info.
- Click the link to Sign in with a local account instead. Of course, you're asked if you're sure you want to switch to a local account. Click Next to confirm.
- Enter your Microsoft account PIN. Create a password for your new local account. Sign out and then sign back in with your new local account.
Okay, now there are a couple of problems. Notice that when you switch to a local account, you're not prompted to create the security questions. That means you have to choose to do so on your own. Otherwise, if you need to reset your password, the only option available is to use a recovery drive, which you probably didn't set up either.
And even if you choose a local account during the initial Windows setup, what if you have second thoughts about your security questions at some point? Maybe you think that at least one of the answers may be too easy to guess. Or perhaps you want to change one of the questions. Can you update them? Let's try this in Windows 10 and then in Windows 11.
Update your questions and answers in Windows 10
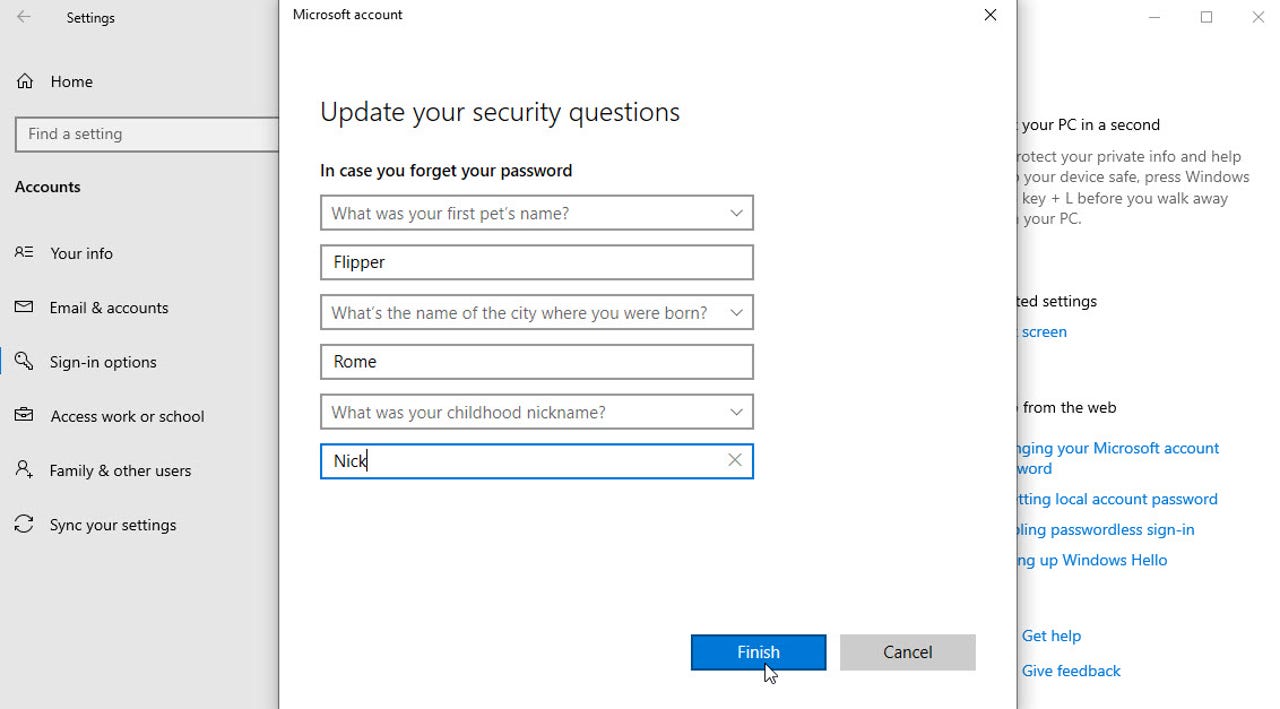
- In Windows 10, go to Settings > Accounts > Sign-in options. Click the option for Password. Then click Update your security questions.
2. At the window that pops up, type your local account password and click OK. You can now choose different questions and answers for each of the three items. When done, click Finish.
Update your questions and answers in Windows 11
Now, let's try the same thing in Windows 11.
- Go to Settings > Accounts > Sign-in options. Click the option for Password. Uh-oh. There is no option for updating your security questions. For whatever reason, either forgetfulness or a lack of concern about local accounts, Microsoft neglected to equip Windows 11 with an obvious way to change your security questions and answers. But no worries. There is an unsupported though perfectly usable workaround.
- Hold down the Windows key and press R to trigger the Run dialog box. In the Open field, type the following string: ms-cxh://setsqsalocalonly.
3. You're then prompted to type your local account password. And you can now update each of the three security questions and answers. Type Finish when done.
Answer the security questions to reset your password
Now let's say there comes a time when you forget your local Windows account password, either in Windows 10 or 11. You've tried a few different passwords, but no dice. You're stuck at the login screen with no way to get in.
- Click the link for Reset Password. The window for your security questions pops up. Answer each of the three questions. Then click the right arrow next to the third answer.
2. Type and then retype a new local password, and click the right arrow. And you're in. But this time, try to remember your password.