Tech
Learn about 'specialty' RAID levels
Scott Lowe covers the last set of RAID levels that you are likely to meet in normal storage infrastructures. In this article, he gives you the specs on RAID 15, RAID 51, and RAID 100.

In my previous two articles in this space, I've explained the
differences between the "single
digit" RAID (Redundant Array of Inexpensive/Individual Disks) levels
and commonly used RAID levels that include a mixture of multiple types of
RAID. In this final article in this series, I'll explain the three most
common "uncommon" RAID levels you may have heard of and how they
compare to the RAID levels most of us are used to.
Be aware that, while these RAID configurations are supported somewhere out there, they may be very expensive to implement. I have personally never seen any of these RAID levels used in a production environment. I do have a SAN with a RAID 50 set in my shop, but that's as close as I get. If you are one of those using one of these RAID levels, post a comment to this article and let us know what you're doing!
RAID 15 (Mirror of parity sets, or RAID 1 then RAID 5)
- Max capacity: ([Number of disks / 2] – 1) x Disk capacity.
- Description: Drives required (minimum): 6 (requires an even number of disks)
- Pros: Want to make really, super sure that your data is never lost due to disk failure? Try RAID 15 or RAID 51 on for size. Extremely fault tolerant. You can lose a great number of disks and not lose data. However, this tolerance is dependent upon which disks happen to fail. If you lose one disk in every mirror set, and both disks in just one of the mirror sets, you'll be fine. If, however, you lose four disks, and they are all part of two mirror sets, you will lose the overall RAID 5 set, which will result in data loss.
- Cons: In this case, extreme fault tolerance brings extreme inefficiency as far as data storage space goes. In a scenario with the minimum number of disks, you will lose more than 66 percent of the disk space to overhead, meaning you get only about 34-percent efficiency. As you add more disks, this efficiency percentage creeps up, but will never reach even 50 percent. Because of this abysmal ratio and because the RAID hardware itself may cost a lot, this scenario is quite expensive and complex to implement.
Figure A |
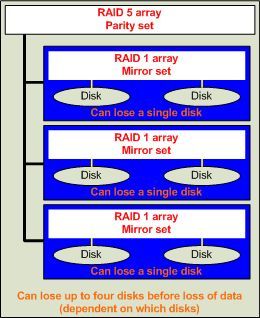 |
| RAID 15 can withstand the loss of a number of disks. |
RAID 51 (Parity set of mirrored disks, or RAID 5 then RAID 1)
- Max capacity: ([Number of disks / 2] – 1) x Disk capacity.
- Description: Drives required (minimum): 6 (requires an even number of disks)
- Pros: Extremely fault tolerant. Again, you can lose a number of disks and, depending on which ones actually die, stay up and running. In a minimum configuration with six disks, you can lose up to four of the disks (one entire RAID 5 array plus one disk in the second RAID 5 array) and remain functional.
- Cons: Again, massive overhead and expense supports this great fault tolerance.
Figure B |
| RAID 51 chews up a lot of space in overhead. |
- Max capacity: Number of disks x Disk capacity / 2.
- Description: Drives required (minimum): 6 (requires an even number of disks)
- Pros: Due to the sheer number of spindles involved, RAID 100 provides very good random read performance. Further, in theory, RAID 100 can support the loss of 50 percent of its individual disks, as long as none of the individual mirror sets (the RAID 1 sets) lose both disks.
- Cons: All the same drawbacks as RAID 1. Like RAID 1, RAID 100 is only 50% efficient. Depending on the implementation, write performance may not be as good as other RAID levels, but it's dependent on how you implement both RAID 10 and the overarching RAID 0 (hardware or software).
Figure C |
| RAID 100 can provide very good read performance. |
There are a ton more RAID levels, but most are proprietary and not very widely used. In this series, I've focused on what you're most likely to see out in the real world.