'ZDNET Recommends': What exactly does it mean?
ZDNET's recommendations are based on many hours of testing, research, and comparison shopping. We gather data from the best available sources, including vendor and retailer listings as well as other relevant and independent reviews sites. And we pore over customer reviews to find out what matters to real people who already own and use the products and services we’re assessing.
When you click through from our site to a retailer and buy a product or service, we may earn affiliate commissions. This helps support our work, but does not affect what we cover or how, and it does not affect the price you pay. Neither ZDNET nor the author are compensated for these independent reviews. Indeed, we follow strict guidelines that ensure our editorial content is never influenced by advertisers.
ZDNET's editorial team writes on behalf of you, our reader. Our goal is to deliver the most accurate information and the most knowledgeable advice possible in order to help you make smarter buying decisions on tech gear and a wide array of products and services. Our editors thoroughly review and fact-check every article to ensure that our content meets the highest standards. If we have made an error or published misleading information, we will correct or clarify the article. If you see inaccuracies in our content, please report the mistake via this form.
How to make a camera obscura to watch the solar eclipse

The 2024 solar eclipse is fast-approaching. If your local library has run out of free solar eclipse glasses and you can't get a pair shipped to you in time, that doesn't mean you have to miss out on quite literally the event of the decade.
Also: April 2024 solar eclipse FAQ: How to watch, what you need, and everything else to know
The camera obscura is an ancient technology that uses a box, a tent, or even a whole room in a building to create a very rudimentary projector. The concept is simple: darken a box or room let light in through a single, tiny pinhole. Astronomers and scientists have been using the idea of a camera obscura for centuries to safely observe solar eclipses and other celestial events involving the sun. With just a few household items, you can make a camera obscura to help you safely observe the eclipse just like Aristotle, Ibn al-Haytham, and Johannes Kepler.
How to build a camera obscura
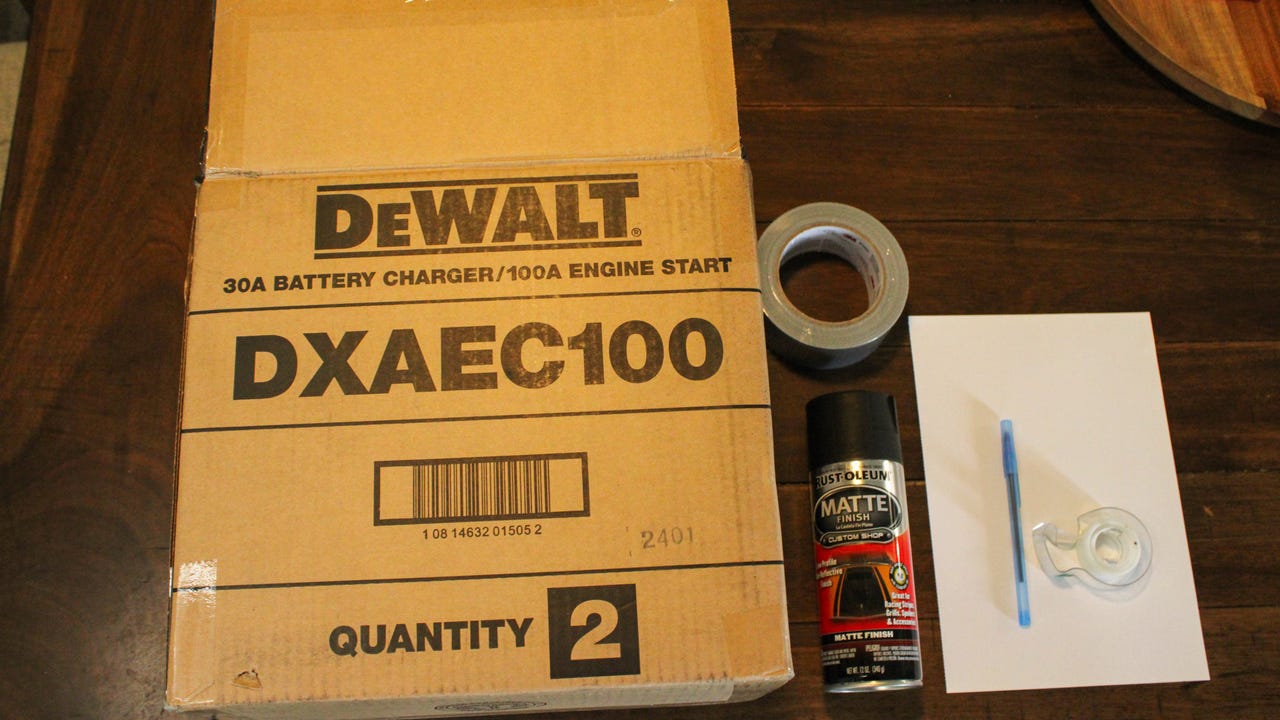
What you'll need:
- A cardboard box (any will do, but preferably between 8 and 12 inches wide)
- A sheet of white paper
- A pen
- Tape
- Scissors or a utility knife
- Black spray paint (optional)
Estimated time: 20 minutes (or five minutes if you're not using paint)
1. Select your cardboard box and paint the inside black
The beauty of a camera obscura is that almost any cardboard box will do, but one that's between 8 and 12 inches wide will give you a better projection image than one that's either very large or very small. Once you've found a suitable box, you can spray paint the inside of it a matte black if you'd like. This helps to create a better contrast and to absorb any errant light that gets in.
2. Attach a sheet of blank paper
If you've painted your cardboard box, you'll want to wait until it's dry to the touch before taping a sheet of blank, white printer or craft paper to one of the shorter ends of the box. You can use any sort of tape, but something like Scotch tape is best since it's transparent and won't block details of your projection.
3. Close and tape the top and bottom of your box
Once your paper projection screen is in place, it's time to tape up your camera obscura. You can also use Scotch tape or something similar, but duct tape and painter's tape are preferable since they're more opaque and will help block unwanted light. Make sure you mark which end has your projection paper on it so you don't accidentally damage it during the next step.
4. Make your aperture and viewing holes
To make the aperture (the part of a camera that allows light in), carefully poke a hole in the end of the box opposite from your projection paper. Make sure it's well off to one side so that your head and shoulders don't block incoming light.
Also: Could the eclipse burn out your iPhone camera? The experts weigh in
To make the viewing hole, use a pair of scissors or a utility knife to carefully cut out a roughly 1-inch square. You want it just big enough to look through, but not so big that it floods the interior of your camera with light. If your viewing hole is too large, you can patch it with some cardboard or duct tape, and try again in a different spot.
5. Test and practice
Once you're satisfied with your aperture and viewing hole placements, you can cover any random holes or gaps in your camera with tape. The more "light tight" you make your cardboard box, the better-looking your projection image will be.
Using a camera obscura is as easy as it is to make: just stand with your back to a window or the sun and look through the viewfinder you've made. It may take some practice to learn how to adjust your body and viewing angles to get the best image.
FAQs
Why is the image I'm seeing upside down?
A camera obscura works in a similar way to the lens in your eyes, which means that images are projected upside down on your retina, and then flipped the correct way around by your brain. Since the camera obscura doesn't have any sort of image processing capabilities, all images you see within the box will be upside down. This takes some getting used to when trying to locate the eclipse or other object you're trying to observe, so I suggest practicing by a window to get a feel for how you need to move in order to center images and locate objects.
The image is dim/blurry. How can I fix that?
If the image you're seeing inside your camera obscura is on the dim side, that means the hole you made to let light in is too small. You can widen it with a pen or a pair of scissors; just remember to supervise children who may be helping.
If the image is too blurry to make out clearly, you've made the aperture hole too large. Thankfully, that doesn't mean you have to start all over again with a new box. Just patch the hole with some duct tape or a small piece of cardboard and try again.
Can I recycle my camera obscura?
If you don't spray paint the inside of your cardboard box, you should be able to place it in your recycling bin for collection and processing as normal. If you did paint the cardboard, it's best to find another craft or classroom project to use it for since the paper can't be recycled.