'ZDNET Recommends': What exactly does it mean?
ZDNET's recommendations are based on many hours of testing, research, and comparison shopping. We gather data from the best available sources, including vendor and retailer listings as well as other relevant and independent reviews sites. And we pore over customer reviews to find out what matters to real people who already own and use the products and services we’re assessing.
When you click through from our site to a retailer and buy a product or service, we may earn affiliate commissions. This helps support our work, but does not affect what we cover or how, and it does not affect the price you pay. Neither ZDNET nor the author are compensated for these independent reviews. Indeed, we follow strict guidelines that ensure our editorial content is never influenced by advertisers.
ZDNET's editorial team writes on behalf of you, our reader. Our goal is to deliver the most accurate information and the most knowledgeable advice possible in order to help you make smarter buying decisions on tech gear and a wide array of products and services. Our editors thoroughly review and fact-check every article to ensure that our content meets the highest standards. If we have made an error or published misleading information, we will correct or clarify the article. If you see inaccuracies in our content, please report the mistake via this form.
These 3 AI tools made my two-minute how-to video way more fun and engaging

Have you used any generative AI tools to accomplish fixes and tweaks that you might have otherwise not been able to do (or justify the time to work on)?
Without AI's help, frankly, I wouldn't have bothered.
Today, I'll show you how I selected and used three AI tools to help improve a short informational video for my YouTube channel. One tool rescued the entire little project, and the others punched up the end result. For this project, we'll be using Adobe's Photoshop Beta, Adobe Podcast, and the latest version of Apple's Final Cut Pro for Mac.
Also: How does ChatGPT actually work?
The project
I had figured out how to solve a problem with my Glowforge, a laser cutter used in many maker projects. I'm using it to make acrylic two-color labels for the special adapters I 3D-printed. The adapters attach various tools to the dust collector I use in my workshop. The video was a simple walkthrough of the problem (the resulting laser cut was the wrong size) and the solution (a checkbox in an options dialog).
In the video, I'm mostly sitting and talking in front of the laser, with some photos and screenshots sprinkled throughout to illustrate aspects of the solution.
Because this was a quick informational video, I didn't put a lot of effort into the production design -- and it showed. Worse, something went very wrong with the audio. Let's start there.
AI #1: Using Adobe Podcast to clean up terrible audio
For some reason, my mic didn't record clean audio as I was reading from my script. I made this video mostly so I'd have a reference for how I solved the problem if I encounter it again, and to share the solution with other Glowforge users.
But it just wasn't worth going back and setting up the camera and prompter, and doing the talking head bit again. Here's an eight-second sample of the original audio:
As you can hear, it's pretty rough. I've tried to clean up other audio before, and the results are never particularly good.
To make this work, I started with the original MP4 video recorded on my iPad. I used QuickTime to export the audio track, an M4A file. Unfortunately, Adobe Podcast doesn't support M4A. I have a Creative Cloud license, so I went into Adobe Audition, opened the M4A, and saved it back out as a WAV. (You can also use the free open-source Audacity program to do the same thing.)
Also: These are my 5 favorite AI tools for work
I then pointed my browser to Adobe Podcast, which is Adobe's experimental AI audio tweaking tool. (It's not only for podcasters. I'm using it to fix my audio for a YouTube video.) This very useful little suite of audio composition and repair tools is available to everyone for free. Just sign up with your email address.
I scrolled down to the Enhance Speech option, hit the Try It button, and uploaded my audio track.
Here's what I got back a few minutes later:
Wow, that's an improvement! Like night and day, isn't it? All I had to do in the video editor was drop out the original audio track and drop this one in. It took me maybe 10 minutes overall, instead of what could have been hours of frustration that would have netted me a result not nearly as good.
AI #2: Using Final Cut to separate performer from background
When Final Cut Pro 10.6.6 was released on May 23, it included a new AI-powered masking tool, the Scene Removal Mask. This tool provides green screen functionality without having to use a green screen.
Here's how it works: You capture a second or two of video with just the background (without the subject in the frame). Then you capture your normal video. If you apply the Scene Removal Mask to the video, you can drop the background out from behind the speaker. At that point, you can put anything behind the person in the video.
Also: Mass adoption of generative AI tools is derailing one very important factor
I started out with a two-minute video that looked like this:
The Scene Removal Mask allowed me to drop out the background. Once the background was gone, I could also enlarge myself to better fill the frame:
But there were still issues with the background that I wanted to fix. For that, let's switch to the new Photoshop Generative Fill features, and then we'll come back to Final Cut to wrap things up.
AI #3: Using Adobe Generative Fill to clean up the background
This is what the camera saw behind where I was sitting doing my talking head bit:
The first thing I wanted to do was remove the 3D printer that was blocking the corner of the Glowforge:
Notice the printer in the image on the left. I drew a selection area around the printer and, in the Photoshop beta, I clicked on Generative Fill. Photoshop knew to remove the 3D printer, draw in the missing area of the wall, and -- here's what amazed me -- the AI drew in the rest of the Glowforge (including the texture and lines) that were originally missing from the image.
I decided the wall was a bit blank, so why not use an old-school Photoshop feature and add a poster? I found a picture of a great Daleks poster from Doctor Who, used Photoshop's non-AI distort feature with a blend mode, and added it into the background.
Also: The 4 best free video editing apps: Free but powerful software
We'll return to the AI Generative Fill in a few minutes, but let's first composite up the changes we've made so far.
Compositing the video image
Back in Final Cut, I brought in the new background image I'd modified in Photoshop. There are three track layers here: a compound clip on the bottom layer that integrates the previously repaired audio, the modified background image, and a masked version of my talking head scaled to fit over the background:
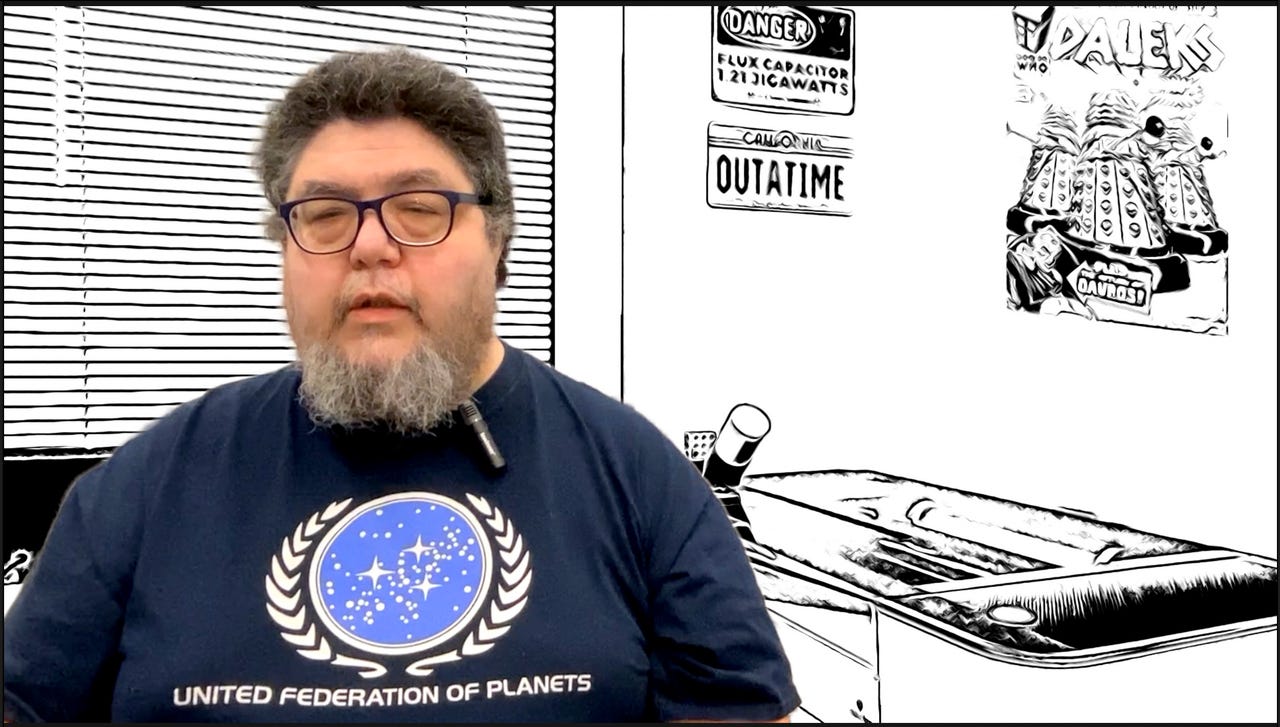
But since I had the "masked" me floating above the background, I decided I could tinker with the background. So, for my opening teaser clip, I applied the standard non-AI Comic Ink effect and placed myself over an ink-style background:
Then, at the end of the video, I replaced the background with a YouTube channel identifier. This was also super-easy because I already had the masked clip of my talking head.
With that, the video was done. But I still had one more place where I needed AI's help.
Using Photoshop AI to move me and fix a window shade
When you're making a YouTube video, the video thumbnail is often as important -- some say more so -- as the video itself. That's because it's the thumbnail that catches viewer attention and gets your video seen.
My channel's thumbnail format has words on the left and bottom, and an image on the right. That image is usually a photo of me in the context of whatever the video is about. The problem was that my talking head was on the left side of the screen.
Also: How to use Photoshop: 5 basic steps to edit a photo
This could have been an easy fix in Final Cut. But I wanted to use Photoshop's new AI background removal feature instead. So I saved a frame from my video and pulled it into Photoshop. I then used the new Photoshop AI background removal tool to mask out the background, and slid my image to the right:
I then composited the background image -- the image that I'd previously prepared for Final Cut under the masked image of me -- and added in the brand styling for my channel. That included the text about the video, the little robot logo, and the yellow sunburst bar along the bottom:
Unfortunately, the gray Glowforge exhaust vent area (with mini Spock, Kirk, and Lab Bear) proved distracting in the thumbnail. Thumbnails on YouTube are much smaller than the image you see above; when sized so small, it simply didn't look right. The red box in the photo above shows the area of concern.
What I really needed to do was extend the white blinds down through the distracting area. Unfortunately, it was a lot harder to clone the blinds than you'd expect. I tried using the Photoshop Clone Stamp tool and even tried to cut, paste, and distort part of the blinds, but it just didn't come out right.
Also: How to create Photoshop actions to share or sell
I think that's because the blinds aren't strictly parallel in the image. They're parallel in real life, but the picture is taken from an angle, which makes every blind element a slightly different shape, with a slightly different angle.
So, I went back to the Photoshop AI Generative Fill feature. I turned off the layers with the text and with me, selected a rectangle around the gray area, and hit Generative Fill. As you can see, the newly generated shades are nearly perfect:
And here's how the full video thumbnail looks, with the clutter removed, the new shade area added, and my image moved to the right:
AI to the rescue
We're used to splashy special effects when watching a big-budget blockbuster sci-fi movie or TV show. But powerful special effects can be at play in even the most mundane productions.
My video is only two minutes and 41 seconds long. All it does is show how to select a checkbox in Adobe Illustrator. And yet, it uses an entire array of special effects, designed to make the production look and sound better.
But here's the thing: Because this is such a mundane video, there's no way I could have justified the hours it would take to mask out my moving head and torso frame-by-frame. It might not even have been worth trying to clone and replicate the portion of the Glowforge obscured by the 3D printer in the background image. And I really did try to extend the blinds using traditional Photoshop tools and gave up after about an hour.
Also: The best AI art generators: DALL-E 2 and other fun alternatives to try
And try as I might, I just don't have the audio engineering chops to clean up the audio that went so wrong during recording. But with the help of AI, I was able to clean it up in post-production.
Each of the AI tools took five to 10 minutes to use. All told, here's a summary of how I used the AI tools:
- Adobe Podcast Enhance Speech: To clean up ruined audio.
- Final Cut Pro Scene Removal Mask: To remove the background so I could scale and move my talking head and torso (which allowed for three custom backgrounds).
- Photoshop Generative Fill: To remove the ugly 3D printer and extend the Glowforge in the background image.
- Photoshop Background Removal: To remove my head and torso from the background so I could move it to the right and provide space for text.
- Photoshop Generative Fill: To extend the shades to clean up a cluttered image.
I used these in addition to the regular suite of tools I've used for years in Final Cut and Photoshop. But knowing how hard those five AI-assisted effects would have been without AI, I can tell you I probably wouldn't have done them… and possibly would not have released the video.
Also: Final Cut Pro on the iPad: A surprisingly touching experience
Yes, I'm concerned about how generative AI will impact employment (especially when a lot of low-end writing work can be replaced by an AI). But these five AI-generated fixes saved me a tremendous amount of time, handled things that I didn't have the skill set to do myself, and yielded a much more fun and engaging video -- a video project I might have just tossed aside because, without these AI tools, I couldn't get it right.
Here's how it all came together:
Have you used any generative AI tools to accomplish fixes and tweaks that you might have otherwise not been able to do (or justify the time to work on)? Let us know in the comments below.
You can follow my day-to-day project updates on social media. Be sure to follow me on Twitter at @DavidGewirtz, on Facebook at Facebook.com/DavidGewirtz, on Instagram at Instagram.com/DavidGewirtz, and on YouTube at YouTube.com/DavidGewirtzTV.