Samsung Galaxy Tab Teardown (Sprint)
TechRepublic's Bill Detwiler cracks open Sprint's version of the Samsung Galaxy Tab 7-inch Android tablet.

1 of 54 Bill Detwiler/ZDNET
The Sprint version of the Samsung Galaxy Tab went on sale in the US on November 14. It's priced at $399 (US) with a 2-year contract and one of two data plans--$29 a month (2GB cap) or $59 a month (5GB cap).
Follow along as I crack open the Galaxy Tab for a look at the hardware inside.
Photo by: Bill Detwiler / TechRepublic
Caption by: Bill Detwiler
Follow along as I crack open the Galaxy Tab for a look at the hardware inside.
Photo by: Bill Detwiler / TechRepublic
Caption by: Bill Detwiler
2 of 54 Bill Detwiler/ZDNET
The Galaxy Tab has a Samsung ARM Cortex 8 1.0 GHz CPU, 512 MB RAM, and a 7-inch (diagonally) TFT active matrix screen that supports a resolution of 1024 x 600 and 169 pixels per inch. The devices ships with Google Android 2.2.
Photo by: Bill Detwiler / TechRepublic
Caption by: Bill Detwiler
Photo by: Bill Detwiler / TechRepublic
Caption by: Bill Detwiler
3 of 54 Bill Detwiler/ZDNET
Photo by: Bill Detwiler / TechRepublic
Caption by: Bill Detwiler
Caption by: Bill Detwiler
4 of 54 Bill Detwiler/ZDNET
Included with Sprint's version of the Galaxy Tab is the power adapter, USB data/charging cable, and a 16 GB microSD card.
Photo by: Bill Detwiler / TechRepublic
Caption by: Bill Detwiler
Photo by: Bill Detwiler / TechRepublic
Caption by: Bill Detwiler
5 of 54 Bill Detwiler/ZDNET
Photo by: Bill Detwiler / TechRepublic
Caption by: Bill Detwiler
Caption by: Bill Detwiler
6 of 54 Bill Detwiler/ZDNET
The Galaxy Tab measures 4.74 inches wide, 7.48 inches high, and 0.5 inches deep. It weighs 13.58 ounces.
On the front of the device are the front-facing 1.3 MP camera, ambient light sensor, and four control buttons.
Photo by: Bill Detwiler / TechRepublic
Caption by: Bill Detwiler
On the front of the device are the front-facing 1.3 MP camera, ambient light sensor, and four control buttons.
Photo by: Bill Detwiler / TechRepublic
Caption by: Bill Detwiler
7 of 54 Bill Detwiler/ZDNET
On the back of the Galaxy Tab are the rear-facing 3.2 MP camera and flash.
Photo by: Bill Detwiler / TechRepublic
Caption by: Bill Detwiler
Photo by: Bill Detwiler / TechRepublic
Caption by: Bill Detwiler
8 of 54 Bill Detwiler/ZDNET
Along the Galaxy Tab's bottom edge are the external speakers and charger/accessory jack.
Photo by: Bill Detwiler / TechRepublic
Caption by: Bill Detwiler
Photo by: Bill Detwiler / TechRepublic
Caption by: Bill Detwiler
9 of 54 Bill Detwiler/ZDNET
Along the Galaxy Tab's left edge is the external microphone.
Photo by: Bill Detwiler / TechRepublic
Caption by: Bill Detwiler
Photo by: Bill Detwiler / TechRepublic
Caption by: Bill Detwiler
10 of 54 Bill Detwiler/ZDNET
Along the Galaxy Tab's right edge are the microSD card slot, volume up/down button, and power button.
Photo by: Bill Detwiler / TechRepublic
Caption by: Bill Detwiler
Photo by: Bill Detwiler / TechRepublic
Caption by: Bill Detwiler
11 of 54 Bill Detwiler/ZDNET
Along the Galaxy Tab's top edge is the 3.5mm headphone jack.
Photo by: Bill Detwiler / TechRepublic
Caption by: Bill Detwiler
Photo by: Bill Detwiler / TechRepublic
Caption by: Bill Detwiler
12 of 54 Bill Detwiler/ZDNET
Two tri-wing screws are hidden behind small plastic circles, which are held on with adhesive tape. You'll need to remove both screws before separating the Tab's plastic shell from the display assembly.
Photo by: Bill Detwiler / TechRepublic
Caption by: Bill Detwiler
Photo by: Bill Detwiler / TechRepublic
Caption by: Bill Detwiler
13 of 54 Bill Detwiler/ZDNET
Once you've removed the case screws, you can pop the plastic case loose from the rest of the Tab. Unlike the iPad, the Galaxy Tab doesn't have any metal clips that break when you open the case. I used a very thin metal blade to pop the case loose and was able to do the job without marring either the display's frame or the case. If you're worried that you may not be able to do the same, could also use a plastic case opening tool.
Photo by: Bill Detwiler / TechRepublic
Caption by: Bill Detwiler
Photo by: Bill Detwiler / TechRepublic
Caption by: Bill Detwiler
14 of 54 Bill Detwiler/ZDNET
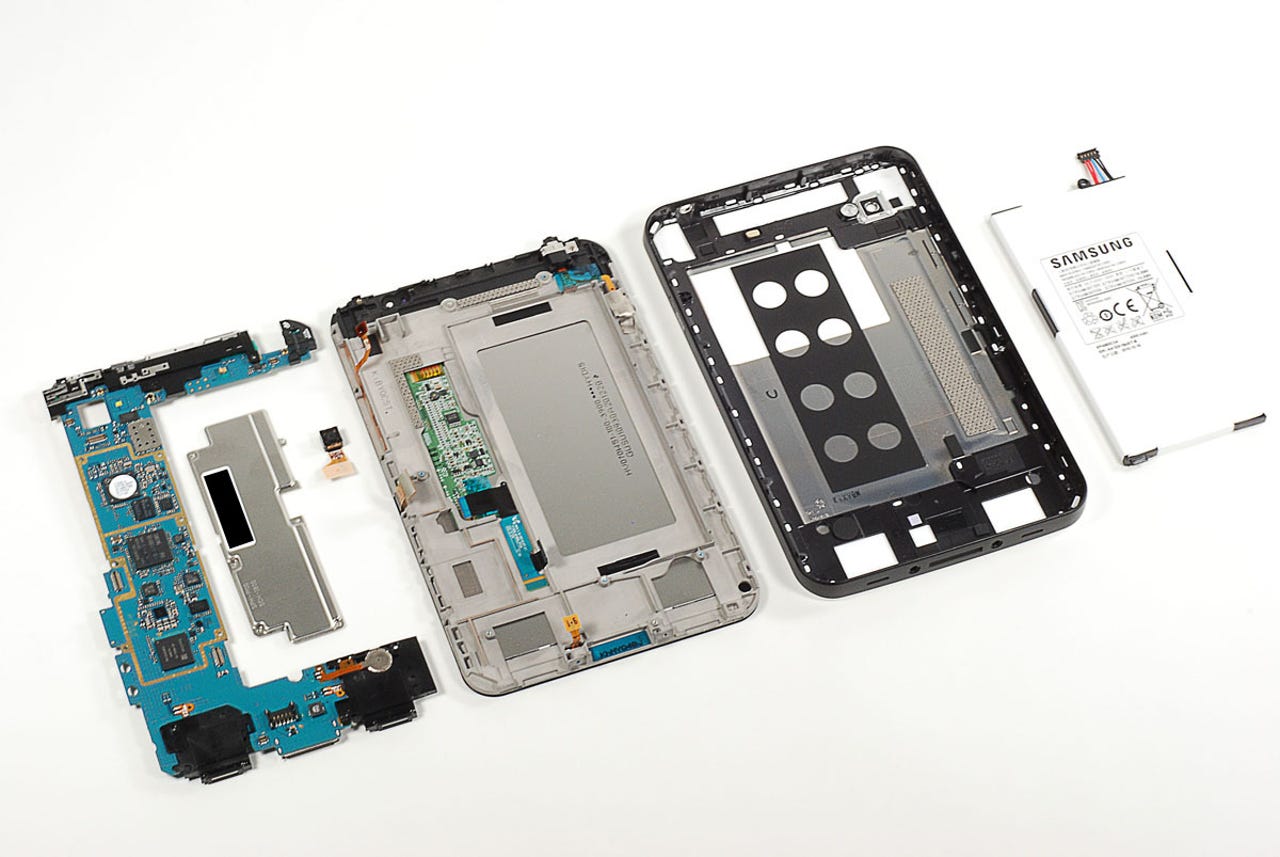
There's not much to see inside the Galaxy Tab's plastic case. All the internal hardware is mounted to the display assembly and frame.
Photo by: Bill Detwiler / TechRepublic
Caption by: Bill Detwiler
Photo by: Bill Detwiler / TechRepublic
Caption by: Bill Detwiler
15 of 54 Bill Detwiler/ZDNET
Flipping the display assembly over, we get our first look at the hardware the makes the Galaxy Tab run. As on the iPad, the Tab's battery takes up much of the device's internal space.
Photo by: Bill Detwiler / TechRepublic
Caption by: Bill Detwiler
Photo by: Bill Detwiler / TechRepublic
Caption by: Bill Detwiler
16 of 54 Bill Detwiler/ZDNET
The battery is held in place with a single Phillips screw.
Photo by: Bill Detwiler / TechRepublic
Caption by: Bill Detwiler
Photo by: Bill Detwiler / TechRepublic
Caption by: Bill Detwiler
17 of 54 Bill Detwiler/ZDNET
The Galaxy Tab uses a 3.7V Li-Ion, 4000 mAh battery.
Photo by: Bill Detwiler / TechRepublic
Caption by: Bill Detwiler
Photo by: Bill Detwiler / TechRepublic
Caption by: Bill Detwiler
18 of 54 Bill Detwiler/ZDNET
Photo by: Bill Detwiler / TechRepublic
Caption by: Bill Detwiler
Caption by: Bill Detwiler
19 of 54 Bill Detwiler/ZDNET
Next, we'll turn our attention to the 3.2 MP rear-facing camera. To remove it, I popped loose its connector and gently lifted it away from the display assembly and frame.
Photo by: Bill Detwiler / TechRepublic
Caption by: Bill Detwiler
Photo by: Bill Detwiler / TechRepublic
Caption by: Bill Detwiler
20 of 54 Bill Detwiler/ZDNET
Photo by: Bill Detwiler / TechRepublic
Caption by: Bill Detwiler
Caption by: Bill Detwiler
21 of 54 Bill Detwiler/ZDNET
Photo by: Bill Detwiler / TechRepublic
Caption by: Bill Detwiler
Caption by: Bill Detwiler
22 of 54 Bill Detwiler/ZDNET
Before lifting the main PCB away from the display assembly and frame, we'll need to disconnect five separate connectors.
Photo by: Bill Detwiler / TechRepublic
Caption by: Bill Detwiler
Photo by: Bill Detwiler / TechRepublic
Caption by: Bill Detwiler
23 of 54 Bill Detwiler/ZDNET
We'll disconnect the headphone/microphone jack first.
Photo by: Bill Detwiler / TechRepublic
Caption by: Bill Detwiler
Photo by: Bill Detwiler / TechRepublic
Caption by: Bill Detwiler
24 of 54 Bill Detwiler/ZDNET
Next, we'll remove the volume control connector (left) and touchscreen connector (right).
Photo by: Bill Detwiler / TechRepublic
Caption by: Bill Detwiler
Photo by: Bill Detwiler / TechRepublic
Caption by: Bill Detwiler
25 of 54 Bill Detwiler/ZDNET
Now detach the connector for the LED for the front control buttons.
Photo by: Bill Detwiler / TechRepublic
Caption by: Bill Detwiler
Photo by: Bill Detwiler / TechRepublic
Caption by: Bill Detwiler
26 of 54 Bill Detwiler/ZDNET
Lastly, detach the connector for the display screen.
Photo by: Bill Detwiler / TechRepublic
Caption by: Bill Detwiler
Photo by: Bill Detwiler / TechRepublic
Caption by: Bill Detwiler
27 of 54 Bill Detwiler/ZDNET
After you've detached all the connectors, you'll need to remove seven Phillips screws that hold the Galaxy Tab's main PCB to the display assembly and frame.
Photo by: Bill Detwiler / TechRepublic
Caption by: Bill Detwiler
Photo by: Bill Detwiler / TechRepublic
Caption by: Bill Detwiler
28 of 54 Bill Detwiler/ZDNET
Once the screws are removed, you can gently lift the main PCB away from the display assembly and frame.
Photo by: Bill Detwiler / TechRepublic
Caption by: Bill Detwiler
Photo by: Bill Detwiler / TechRepublic
Caption by: Bill Detwiler
29 of 54 Bill Detwiler/ZDNET
Photo by: Bill Detwiler / TechRepublic
Caption by: Bill Detwiler
Caption by: Bill Detwiler
30 of 54 Bill Detwiler/ZDNET
The headphone/microphone jack assembly is held in place with a single Phillips screws and two pieces of tape. The translucent blue/green tape was extremely sticky, and I feared removing it would damage the thin ribbon cable underneath. As I want this Galaxy Tab to go back together in perfect working order, I'm going to leave the jack in place.
Photo by: Bill Detwiler / TechRepublic
Caption by: Bill Detwiler
Photo by: Bill Detwiler / TechRepublic
Caption by: Bill Detwiler
31 of 54 Bill Detwiler/ZDNET
On the left side of the main PCB is the front-facing camera assembly. A large EMi shield covers most of the chips in the center. And along the right side, we find the two internal speakers, the power/accessory jack, and what appears to be the system battery.
Photo by: Bill Detwiler / TechRepublic
Caption by: Bill Detwiler
Photo by: Bill Detwiler / TechRepublic
Caption by: Bill Detwiler
32 of 54 Bill Detwiler/ZDNET
Photo by: Bill Detwiler / TechRepublic
Caption by: Bill Detwiler
33 of 54 Bill Detwiler/ZDNET
Except for the front-facing camera, there's not as much to see on the back of the Galaxy Tab's main PCB.
Photo by: Bill Detwiler / TechRepublic
Caption by: Bill Detwiler
Photo by: Bill Detwiler / TechRepublic
Caption by: Bill Detwiler
34 of 54 Bill Detwiler/ZDNET
The Galaxy Tab has a 1.3 MP front-facing camera. Was with the headphone/microphone assembly, I'm going to leave this camera alone. The camera's thin ribbon cable was stuck to the main PCB with adhesive. I was afraid prying the cable loose would damage it.
Photo by: Bill Detwiler / TechRepublic
Caption by: Bill Detwiler
Photo by: Bill Detwiler / TechRepublic
Caption by: Bill Detwiler
35 of 54 Bill Detwiler/ZDNET
Unlike any other mobile device I've dissected, the Galaxy Tab's EMI shield is attached to the main PCB with five Phillips screws.
Photo by: Bill Detwiler / TechRepublic
Caption by: Bill Detwiler
Photo by: Bill Detwiler / TechRepublic
Caption by: Bill Detwiler
36 of 54 Bill Detwiler/ZDNET
With its screws removed, the Galaxy Tab's EMI shield falls off the main PCB.
Photo by: Bill Detwiler / TechRepublic
Caption by: Bill Detwiler
Photo by: Bill Detwiler / TechRepublic
Caption by: Bill Detwiler
37 of 54 Bill Detwiler/ZDNET
There's quite a few chips located under the EMI shield. Let's take a closer look at each of them.
Photo by: Bill Detwiler / TechRepublic
Caption by: Bill Detwiler
Photo by: Bill Detwiler / TechRepublic
Caption by: Bill Detwiler
38 of 54 Bill Detwiler/ZDNET
AVAGO ACFM-7107 PCS/Cellular Band Quadplexer
Photo by: Bill Detwiler / TechRepublic
Caption by: Bill Detwiler
Photo by: Bill Detwiler / TechRepublic
Caption by: Bill Detwiler
39 of 54 Bill Detwiler/ZDNET
2712 OXNGLB
Photo by: Bill Detwiler / TechRepublic
Caption by: Bill Detwiler
Photo by: Bill Detwiler / TechRepublic
Caption by: Bill Detwiler
40 of 54 Bill Detwiler/ZDNET
The Sprint version of the Galaxy Tab has a Qualcomm QSC6085 chip, which provides support for EV-DO Rev. A, EV-DO Rel. 0, and CDMA2000.
Photo by: Bill Detwiler / TechRepublic
Caption by: Bill Detwiler
Photo by: Bill Detwiler / TechRepublic
Caption by: Bill Detwiler
41 of 54 Bill Detwiler/ZDNET
Samsung KFM1G16Q2D OneNAND flash memory
Photo by: Bill Detwiler / TechRepublic
Caption by: Bill Detwiler
Photo by: Bill Detwiler / TechRepublic
Caption by: Bill Detwiler
42 of 54 Bill Detwiler/ZDNET
Wolfson Microelectronics WM8994E (Audio Codec)
Photo by: Bill Detwiler / TechRepublic
Caption by: Bill Detwiler
Photo by: Bill Detwiler / TechRepublic
Caption by: Bill Detwiler
43 of 54 Bill Detwiler/ZDNET
Samsung ARM Cortex 8 1.0 GHz CPU (KB100D0YM A453)
Photo by: Bill Detwiler / TechRepublic
Caption by: Bill Detwiler
Photo by: Bill Detwiler / TechRepublic
Caption by: Bill Detwiler
44 of 54 Bill Detwiler/ZDNET
SD4G 9234BT P3A1422 10K2033
Photo by: Bill Detwiler / TechRepublic
Caption by: Bill Detwiler
Photo by: Bill Detwiler / TechRepublic
Caption by: Bill Detwiler
45 of 54 Bill Detwiler/ZDNET
Samsung CMC6230R N2N321 S1032
Photo by: Bill Detwiler / TechRepublic
Caption by: Bill Detwiler
Photo by: Bill Detwiler / TechRepublic
Caption by: Bill Detwiler
46 of 54 Bill Detwiler/ZDNET
Atmel MXT224 touchscreen controller (right) and Atmel MXT224 touchscreen controller and MAX8998 EWQ 1037 9FAB (left)
Photo by: Bill Detwiler / TechRepublic
Caption by: Bill Detwiler
Photo by: Bill Detwiler / TechRepublic
Caption by: Bill Detwiler
47 of 54 Bill Detwiler/ZDNET
Texas Instruments 06D5X2T LVDS838
Photo by: Bill Detwiler / TechRepublic
Caption by: Bill Detwiler
Photo by: Bill Detwiler / TechRepublic
Caption by: Bill Detwiler
48 of 54 Bill Detwiler/ZDNET
SanDisk SDIN5D2-2G NAND Flash
Photo by: Bill Detwiler / TechRepublic
Caption by: Bill Detwiler
Photo by: Bill Detwiler / TechRepublic
Caption by: Bill Detwiler
49 of 54 Bill Detwiler/ZDNET
1R0 Resistor
Photo by: Bill Detwiler / TechRepublic
Caption by: Bill Detwiler
Photo by: Bill Detwiler / TechRepublic
Caption by: Bill Detwiler
50 of 54 Bill Detwiler/ZDNET
Collection of chips on the back of the main PCB
Photo by: Bill Detwiler / TechRepublic
Caption by: Bill Detwiler
Photo by: Bill Detwiler / TechRepublic
Caption by: Bill Detwiler
51 of 54 Bill Detwiler/ZDNET
Photo by: Bill Detwiler / TechRepublic
Caption by: Bill Detwiler
52 of 54 Bill Detwiler/ZDNET
AGD1 2039 RCF AF
Photo by: Bill Detwiler / TechRepublic
Caption by: Bill Detwiler
Photo by: Bill Detwiler / TechRepublic
Caption by: Bill Detwiler
53 of 54 Bill Detwiler/ZDNET
Broadcom BCM4329 (Bluetooth/FM/WLAN)
Photo by: Bill Detwiler / TechRepublic
Caption by: Bill Detwiler
Photo by: Bill Detwiler / TechRepublic
Caption by: Bill Detwiler
54 of 54 Bill Detwiler/ZDNET
The Samsung Galaxy Tab was rather easy to disassemble. The most difficult step in the process was removing the case. With the right tools and a little patience, those comfortable working on computer and small devices should definitely be able to service the Galaxy Tab.
Photo by: Bill Detwiler / TechRepublic
Caption by: Bill Detwiler
Photo by: Bill Detwiler / TechRepublic
Caption by: Bill Detwiler
Related Galleries
Holiday wallpaper for your phone: Christmas, Hanukkah, New Year's, and winter scenes
![Holiday lights in Central Park background]()
Related Galleries
Holiday wallpaper for your phone: Christmas, Hanukkah, New Year's, and winter scenes
21 Photos
Winter backgrounds for your next virtual meeting
![Wooden lodge in pine forest with heavy snow reflection on Lake O'hara at Yoho national park]()
Related Galleries
Winter backgrounds for your next virtual meeting
21 Photos
Holiday backgrounds for Zoom: Christmas cheer, New Year's Eve, Hanukkah and winter scenes
![3D Rendering Christmas interior]()
Related Galleries
Holiday backgrounds for Zoom: Christmas cheer, New Year's Eve, Hanukkah and winter scenes
21 Photos
Hyundai Ioniq 5 and Kia EV6: Electric vehicle extravaganza
![img-8825]()
Related Galleries
Hyundai Ioniq 5 and Kia EV6: Electric vehicle extravaganza
26 Photos
A weekend with Google's Chrome OS Flex
![img-9792-2]()
Related Galleries
A weekend with Google's Chrome OS Flex
22 Photos
Cybersecurity flaws, customer experiences, smartphone losses, and more: ZDNet's research roundup
![shutterstock-1024665187.jpg]()
Related Galleries
Cybersecurity flaws, customer experiences, smartphone losses, and more: ZDNet's research roundup
8 Photos
Inside a fake $20 '16TB external M.2 SSD'
![Full of promises!]()