Windows 10 setup and configuration secrets for experts

Repair your Windows 10 installation... without losing out
Award-winning technology writer Ed Bott of The Ed Bott Report has mastered the ins and outs of the Windows 10 set-up process so that you can too.
Up first: Repairing your installation.
For this maneuver, Windows 10 installment media is required (and can be obtained using the free Media Creation Tool).
When you're set, download the ISO and double-click to mount it as a virtual drive. (Or, if you chose to create bootable media on a USB drive, open that removable drive in File Explorer.) Double-click Setup to begin reinstalling Windows.
What to keep
When asked what you want to keep, choose the option shown here: Keep personal files and apps. Follow the wizard's prompts to finish setup. After a couple restarts, you'll have a refreshed installation of Windows 10, with your desktop programs, apps, and settings intact.
Cutting in line
Next: How to cut to the front of the line for the next version.
Join the Windows Insider Program at insider.windows.com using the same Microsoft account that you sign in to Windows 10 with. Then go to Settings > Update & security > Windows Insider Program. Click Get Started and then restart.
More on line-cutting
Check the settings and confirm that you're in the Release Preview ring. Once you've completed the process, you'll receive new Release Preview updates automatically using Windows Update.
Back up your third-party hardware drivers
Probably the most frustrating and time-consuming part of installing or reinstalling Windows on a new PC is tracking down the correct drivers for your system and peripherals.
To back up your current collection of drivers, open File Explorer and go to C:\Windows\System32\DriverStore. Copy the FileRepository subfolder to a backup location.
More on backing up
After your clean install is complete, you can reinstall any custom drivers by using the Update Driver option from Device Manager and specifying the backed-up copy of the FileRepository folder as the location where you want Windows to look for new driver files.
Reset your PC completely
This multi-step process requires choices on your part, with one final confirmation that lays out in very clear terms exactly what's about to happen.
You can back out at any time before you click that last button. To start, go to Settings > Update & security > Recovery. Under the Reset this PC heading, click Get Started.
Make your choices for the reset
Choose Keep My Files (best choice if you're planning to reuse the PC yourself) or Remove Everything (if you're turning the device over to someone else).
If you choose to remove all files, the next option allows you to wipe the empty space those files occupied so they can't be recovered using disk utility software.
Then just click the button!
Click the Reset button on the final summary page. Windows will automatically download and install the most recent cumulative update to complete the installation.
Find and decode secret version details
Type about in the search box, or open Settings > System > About.
Look for the Version code
In the list of system details, you'll see a four-digit Version code. The first two digits indicate the year your version of Windows 10 was released; the second two digits are the month. So, version 1607, as pictured, was released in July 2016.
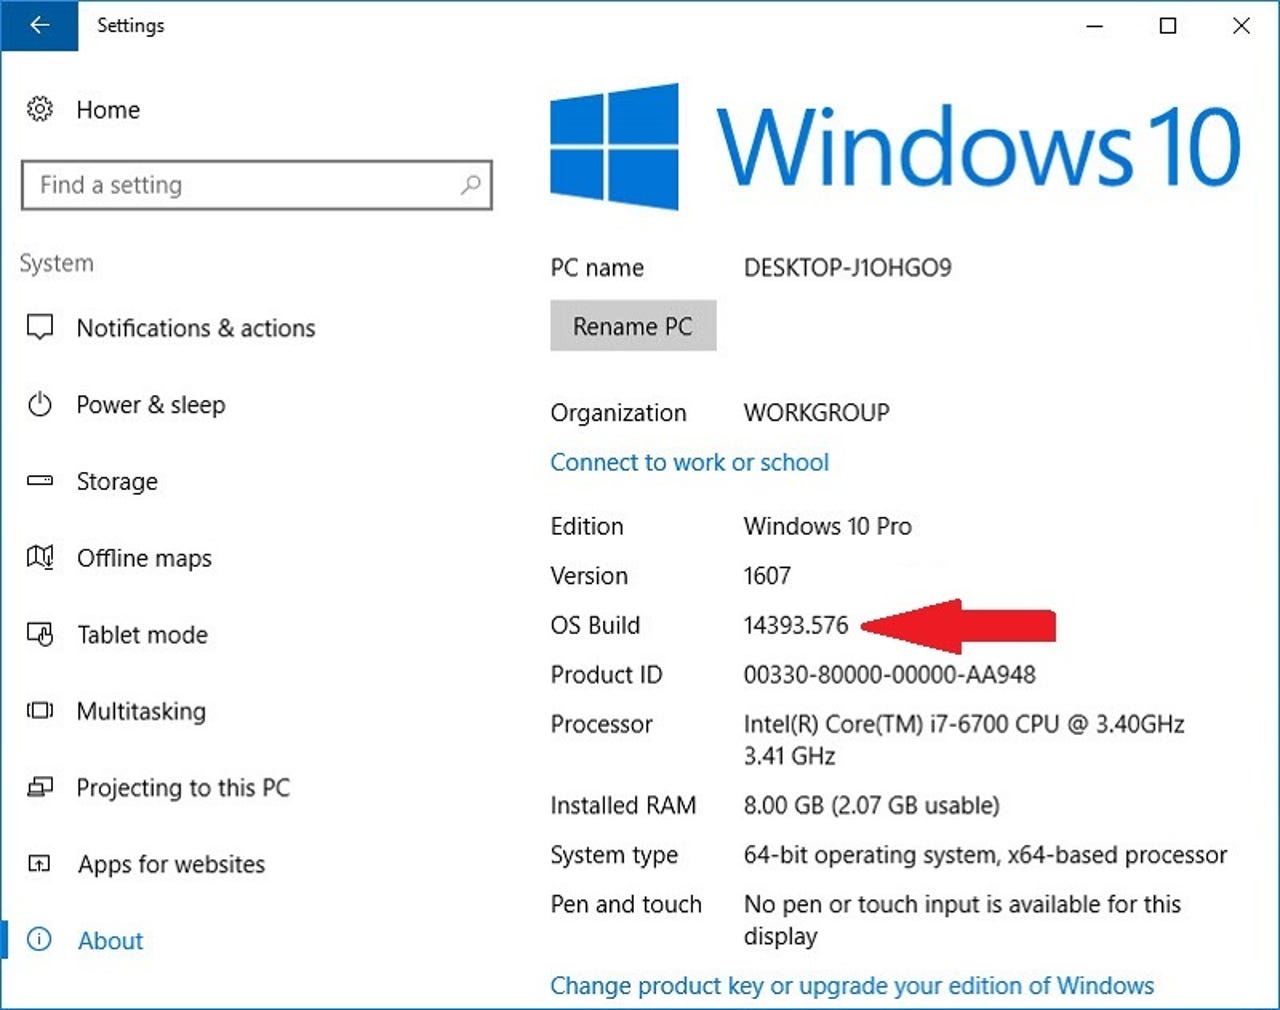
Reading the OS Build code
The OS Build code is read in two parts. On the left side of the dot is a five-digit value that identifies the build number associated with a version release. On the right side is a three-digit value that identifies the most recently installed cumulative update.
How to track updates
Use Microsoft's Windows 10 and Windows Service 2016 update history to track all the updates that have been released.
Keep your laptop from waking up in your travel bag
Simple: Make your PC go into hibernate rather than sleep mode. To do this, open Control Panel (or use the search box on the taskbar) and search for Power Options. From the list of links on the left, click Choose what closing the lid does.
Change to Hibernate
In the When I close the lid section, change the behavior under On Battery to Hibernate and then save your changes. The next time you close the PC's lid, your PC will be guaranteed to keep its cool.
Shut down OneDrive completely
In Windows 10 Pro or Enterprise, open Local Group Policy Editor (Gpedit.msc) and go to Computer Configuration > Administrative Templates > Windows Components > OneDrive.
Double-click the policy Prevent The Usage Of OneDrive For File Storage and set it to Enabled. Restart your PC. The built-in cloud-storage system will be history.
More on shutting down OneDrive completely
On devices running Windows 10 Home, open Registry Editor to navigate to HKLM\Software\Policies\Microsoft\Windows\OneDrive. (If that key doesn't exist, you need to create it).
Add a new DWORD value, DisableFileSyncNGSC, and set it to 1. Restart the PC to make the policy setting effective.
Turn off Cortana completely
A simple registry edit can turn off all of the personal-assistant features, leaving only the ability to search for local apps, files, and settings. On a single device running Windows 10 Pro or Enterprise, use the local Group Policy Editor, gpedit.msc, to open the policy Computer Configuration > Administrative Templates > Windows Components > Search > Allow Cortana and set it to Disabled.
Use Group Policy to apply this setting across multiple machines in an enterprise network.
If you have to do it manually
On a system running Windows 10 Home, a manual registry edit is required. Find the key HKLM\Software\Policies\Microsoft\Windows\Windows Search (you might need to create this key if it doesn't exist), and then create the DWORD value AllowCortana and set it to 0.
Find your PC's original product key
Open a PowerShell window and issue this command:
(Get-WmiObject -query 'select * from SoftwareLicensingService').OA3xOriginalProductKey
If you see no output, that means your system does not include the Windows key in the BIOS, as is often the case with home-built PCs, devices built by a System Builder OEM, or those that were originally sold with a Windows 10 license.
The command for viewing a licensing status
Network administrators who manage licensing using Key Management Services can view all details about a machine's current licensing status with this command:
Get-WMIObject -Class SoftwareLicensingService | Select-Object -Property *
Be sure to include the asterisk at the end of the command.
Find out if your PC can run Hyper-V
On Windows 10, you can only enable the virtualization platform if your CPU supports Second Level Address Translation (SLAT) and Virtual Machine Monitor Mode Extensions.
To find out if your processor is on it, open the System Information utility while Windows 10 is running. Type msinfo32 in the search box and then click System Information from the top of the results list. That opens the app shown here.
Hyper-V recon, continued
Scroll to the bottom of the System Summary results, and look for the four items that begin with Hyper-V. If you see a "Yes" next to each one, you're ready to enable Hyper-V.
If you see a "No" after the Virtualization Enabled In Firmware setting, you have to go into your BIOS (or UEFI firmware) settings and turn on support for virtualization. If you see a "No" next to any of the other items, you won't be able to run Hyper-V.
Switch back to a local account
Did Windows 10 talk you into you setting up a Microsoft account? It happens. It also so happens that you can remove the connection to a Microsoft account at any time. Open Settings > Accounts and click Your info. After confirming that your account is set up to use a Microsoft account, click Sign in with a local account instead.
Finalizing the switch
Enter the password for your Microsoft account to confirm that you're authorized to make the change and then click Next. On the Switch To A Local Account page, enter your new local user name and password, along with a password hint, as shown here. Click Next to sign out from the Microsoft account and sign back in using your new local account.
How to enable the built-in Administrator account (and why you shouldn't)
First the tip, then the warning. To enable this account, open an elevated Command Prompt window and issue two commands. First, type net user administrator /active:yes and press Enter. Then type net user administrator <Password>, where <Password> is the actual password you want to use for this account.
But don't do it
Now the warning: The Administrator account is not needed in the current Windows design and is disabled by default to reduce the attack surface on a Windows PC. So, yes, while you can enable the Administrator account, you shouldn't.
Move your synced OneDrive files to a new location
The option to change the sync folder location appears when you first set up OneDrive. If you want to change the location after you've already completed setup, follow these steps:
- Right-click the OneDrive icon in the taskbar's notification area and click Settings.
- On the Account tab, click Unlink this PC.
- Using File Explorer, move your current OneDrive folder to the new drive.
- In OneDrive Settings, click Add an account. Sign in using the credentials for the account you removed earlier, then click Change location, and and specify the path to the folder where you moved the files.
- Complete setup. Be sure you choose the same folders that are currently in the local sync folder.
Disable annoying notifications
Open the Settings app and go to the Notifications & Actions section: To turn off all app notifications, move the Get notifications from apps and other senders slider to the Off position.
Choosing which to silence
To pick and choose which ones to silence, scroll down to the section headed Get notifications from these senders. Move the slider for an individual app to the Off position to disable notifications from that app or feature.
Customize even more
For more fine-grained control over how an individual app can display notifications, click the app's entry in the Notifications list and customize per your preferences.