Windows 10 tip: How to turn on System Protection and create System Restore points

Windows 10 April 2018 Update: Here's what you can expect
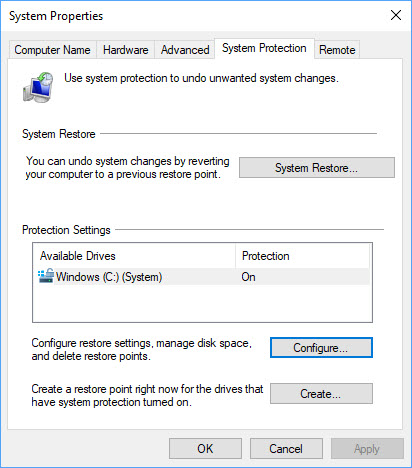
Use this dialog box to enable the option to create System Restore snapshots.
The System Restore feature has been a part of Windows for decades. In Windows 10 it's still useful for recovering quickly when a new app or device driver causes instability.
System Restore works by creating snapshots called restore points, which keep backup copies of your system configuration, including registry settings, driver files, and third-party programs. It works best when you restore your system configuration immediately (or at least very soon) after making a change to system settings.
Primarily as a disk-space-saving measure, Windows 10 disables the System Protection feature and deletes existing restore points as part of setup. If you want to use this feature, you must first turn it back on. Here's how.
First, in the search box, type systempropertiesprotection and press Enter. That opens the System Properties dialog box, with the System Protection tab visible.
In the list of drives available for protection, find the system drive (C:) and check its status. If this setting is Off, the System Restore button and the Create button are both grayed out and unavailable.
Click Configure and then click the Turn on system protection option. From this dialog box, you can also adjust settings for disk space usage and delete any existing restore points. Click Apply and then OK to close the dialog box.
Windows saves some restore points automatically (with each cumulative update installed through Windows Update, for example), but it's never a bad idea to take a system configuration snapshot manually before installing a new app or a downloaded driver or low-level system utility.
On the System Protection tab, click Create to manually create a restore point. Be sure to give it a descriptive name (such as "Before installing new printer driver").
If you detect problems after making a system change, first uninstall the app or driver using Settings > Apps > Apps & Features. Then run System Restore (Rstrui.exe) to restore the previous system configuration.
PREVIOUS AND RELATED CONTENT
Windows 10 tip: Use the hidden repair option to avoid uninstalling an app
Windows 10 tip: Turn off Cortana completely
In the Windows 10 Anniversary Update, version 1607, Microsoft removed Cortana's on-off switch. But it's still there, if you know where to look. Use this tweak to make Windows search strictly local.
Windows 10 tip: Shut down OneDrive completely
In Windows 10, OneDrive is built in. The connections are so tight, in fact, that OneDrive has its own node in File Explorer, with no obvious way to remove it. But the options to disconnect OneDrive are there if you know where to look. Here are the full instructions.
Windows 10 tip: Repair your Windows 10 installation
Performing a clean install or a reset means you have to reinstall apps and desktop programs and start over with settings and preferences. If you suspect Windows has become damaged, there's a less drastic solution: Run Setup to repair Windows. Here's how.