I 3D printed a Tesla Cybertruck because...why not?

Welcome to the Cybertruck 3D print
After watching Elon Musk launch the Cybertruck and fly a little too close to the sun by smashing his unsmashable windows in front of a worldwide audience, I couldn't resist. I had to have one. A small one, made of plastic. But I also had to have one that was demo accurate. Let's get started.
Thingiverse to the rescue
This project was made possible entirely through the creative 3D modeling of Thingiverse user aaskedall, known to his friends and co-workers as Andrew Askedall, creative director of digital products at MakerBot. Oh, the irony. If i'd looked up user aaskedall before running this print and sitting down to write this gallery, I would have run it on the MakerBot, another favorite printer in the Fab Lab. If you want to make your own Cybertruck, here's a link to the model.
Clean the printer
The first thing I did was clean the Ultimaker S5. This print was small enough to print on any printer, but I had this sweet ColorFabb NGEN gray metallic filament, which I thought would be super-appropriate for Musk's brush-steel Cybertruck.
Prep the model in Cura
I brought the model into Cura for slicing. Please note that I chose to print in fast mode (so there will be very visible layer lines) in order to get the job done in a day. I could have printed a much finer model, but that would have taken longer than I had for this project.
Set the (wrong) print settings
Don't do this. I didn't pay any attention to what filament was in my printer (foreshadowing!) and set my temperatures assuming it was normal PLA.
Send to print
Using Cura's direct connection to the printer, I sent it to the printer.
Model loaded on printer
The model is loaded on the printer. It's using PLA print settings (foreshadow: this will be a mistake), and it's expected to take 2 hours and 45 minutes.
Prepare the bed surface
I've been amazingly successful at preparing the Ultimaker's glass surface with a simple glue stick.
The print begins
The print (the first time) begins.
The print comes loose from the bed
I didn't know this for about an hour. The result is... (see the next slide)
Ah. Oops. RTFM.
Yeah, I have a tendency to forget to check the filament specs when initially queuing up a print. This is only the second time a print has failed on the S5, and this time it's also because I didn't set the proper temperatures.
Follow directions
Here are the actual instructions for the filament. Best practice tip: Always check the vendor notes for filament usage instructions.
Here are the correct print settings
NGEN requires a much hotter bed to stick.
Yay! It's sticking!
Finally, once the bed got hot enough, the print properly stuck to the bed.
Cura monitor, partial print
Here's the print beginning to take form, as seen through the camera interface in Cura.
Wheel wells
You can see the wheel wells start to take form.
It's beginning to be recognizable
The vehicle's hood is taking form.
The truck bed
Here, you can see the Cybertruck's bed.
The final shape
You can see the final shape of the vehicle now.
Almost done printing
You can see how pretty the gray metallic filament is in this shot.
The finished body
And here it is, finished, waiting to be removed from the printer.
Preparing the wheels for printing
Before I start to clean up the print and prepare it for final assembly, I wanted to get the wheel print job started. It's ready to print, this time using the proper temperature settings.
Wheels beginning to take form
The wheelset is taking shape.
Trim the flashing
While I was waiting for the wheels to print, I took a sharp knife and trimmed the brim flashing from around the model.
Wheels: The monitor view
Here are the wheels as seen from the built-in camera.
Wheels looking like wheels
You can see how the wheels are forming here.
Wheels complete
The wheels (and by extension, the entire model) is now fully printed. Let's see what it looks like.
Presenting the plastic Cybertruck
Here it is, in all it's 3D-printed glory. But we're not done yet. There are two more steps to go.
Masking off the windows
It's been a very long time since I played with plastic model paints. But I dutifully masked off and painted the windows.
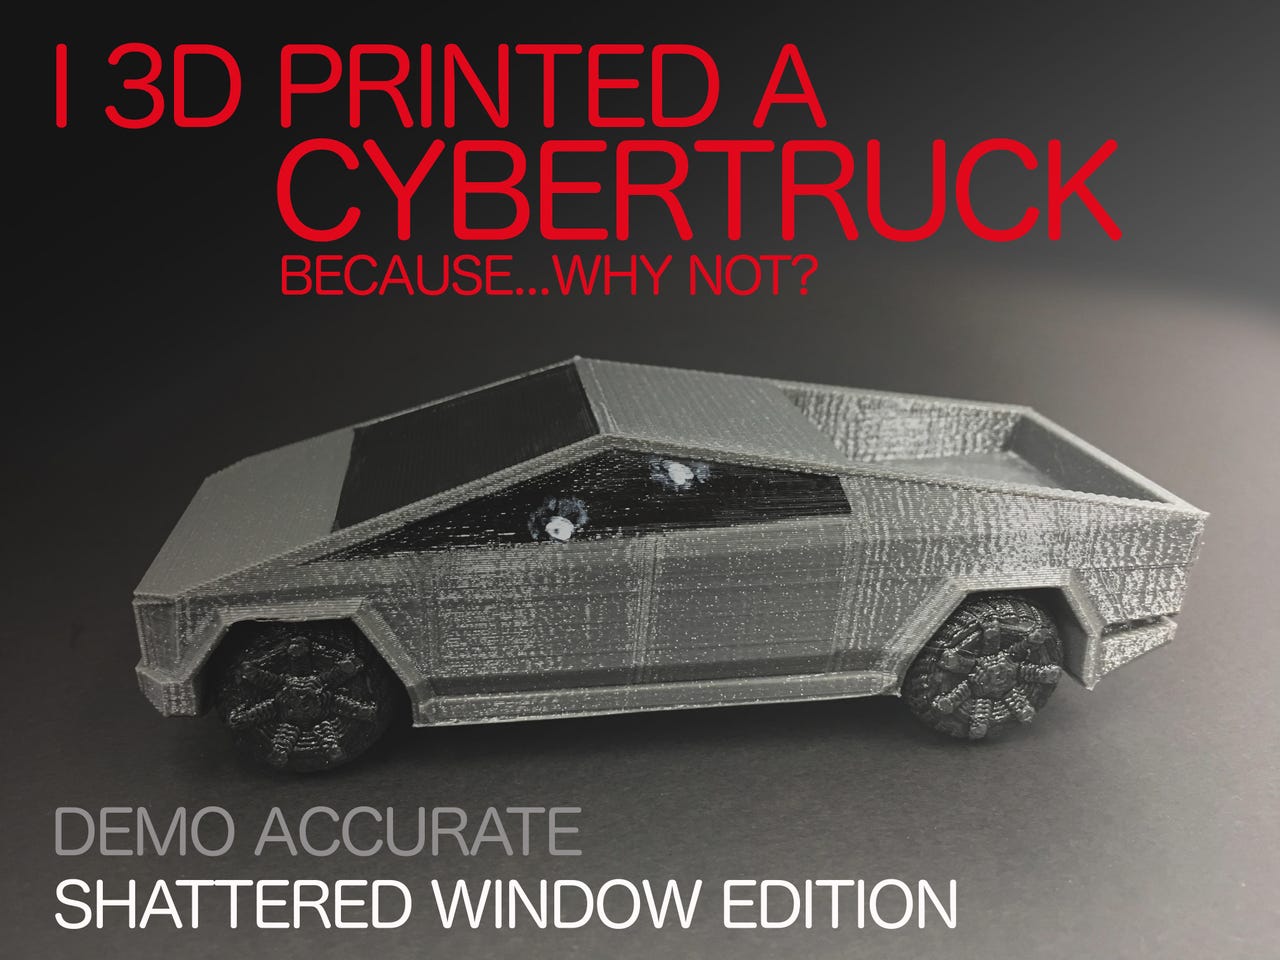
Armored windows, really?
OK, it's not nice to mock. But when Tesla lead designer Franz von Holzhausen attempted to prove how strong the so-called armored windows of the Cybertruck were, well, things didn't go exactly to plan. In the interest of accuracy (and my own twisted sense of humor), I reproduced the window holes in my 3D printed model.
Final admission: For some reason, I think the Cybertruck is cool, in a bad-to-the-bone Humvee kind of way. Who knows, a real one might be in my future.