Optimize your audio gear for pro-quality Google Hangouts

Have you ever noticed bad audio? Even if the video you're watching is high-quality HD, when the audio is crummy, it stands out. Conversely, even if the video isn't of the best quality, if the audio is clear and clean, you're more likely to pay attention and enjoy the show.
Audio quality is incredibly important when it comes to video production, and that includes audio recorded as part of a Hangout, especially if you want to make a professional impression. In this article, we're going to discuss the audio hardware I use in my studio and help you decide how to set up your own studio.
Buiild Your Own Spare Room Studio
Let's do a short recap
I introduced what I then called my Skype Studio project to you as my very first article here on ZDNet's DIY-IT. I decided to build it because I was doing a lot of video appearances as a result of my books, and the quality of those appearances, to be kind, was pretty bad.
When we bought our fixer-upper house, there was a small 9x10 room that we thought would lend itself to being an ideal studio, and the Skype Studio project was born.
That was way back in September of 2011, and whenever I've had some spare time, I've been improving on the original design.
Sound in the studio was a big problem. I not only had to build in soundproofing, I had to record quality audio.
I started by doing everything wrong.
I used an old mixer I had sitting in one of my gear bins since the mid-1990s and hooked it up with an old Radio Shack lavalier lapel mic that was so old, the Radio Shack box had turned yellow.
I dumped that into the Mac mini I was using (I'm still using it, in fact) and then tried to use a free, barely supported software product called SoundFlower to route sound between the mic, Skype, any guests I had on Skype, and the video production product I use, Boinx TV.
Sound quality was mediocre at best. I couldn't just use a set of smartphone earbuds with a mic, because I needed to mix in the audio from Skype as well as the audio from my sound input port, and then route that to another program.
Suddenly, one day, the sound in my studio no longer was a side project interest. It became front and center for my work doing webcasts here for CBS Interactive.
I used to call into the webcasts using a dedicated AT&T land line, which gave me very good quality with the audio bridge. But sometime after I installed that line, land lines became anachronisms and the phone companies spent far less time, attention, and money maintaining them. My previously fine land line suffered from bad, crackly sound.
It was time to bring the sound in the studio up to a professional level. After buying and setting up the gear I'm going to describe to you here, I was able to dial in with Skype and do my webcasts with much higher quality audio.
But what does that have to do with Hangouts?
Over time, Hangouts became more and more popular and I started doing Hangouts in addition to Skype interviews. I wanted the same quality audio to work in Hangouts, and, as it turns out, it does. Because the Skype Studio Project is no longer just about Skype, as of this article, we're officially rechristening the project to the Spare Room Studio. If you want to set up a professional studio in a spare room, whether for Skype, Hangouts, or other projects, this series will get you started.
Let's start off with a demo
In order for you to appreciate what studio-quality sound can do for your recordings, I recorded two 20-second clips of the U.S. Constitution using both a smartphone earbud mic shown below and the pro mic and gear that's in my studio.
First, here's the recording using the smartphone earbuds and mic, connected to my desktop iMac:
Next, here's the recording taken in the studio:
It's quite a difference, right? That's the benefit of studio gear.
Next up: the gear...
By the way, I'm doing more updates on Twitter and Facebook than ever before. Be sure to follow me on Twitter at @DavidGewirtz and on Facebook at Facebook.com/DavidGewirtz.
A look at the gear
There are eight key items that comprise the audio gear in my studio:
- Egg-carton insulation that baffles the sound
- Microphone
- Microphone boom
- Weights for the mic boom
- Mixer
- Interface
- Green M&Ms earbuds
- Headphones
I'm not going to discuss the sound baffling foam in this article because I covered it reasonably well in a previous article. Let's start with the mic instead. I'll get to how all the stuff gets hooked up after I discuss the gear itself.
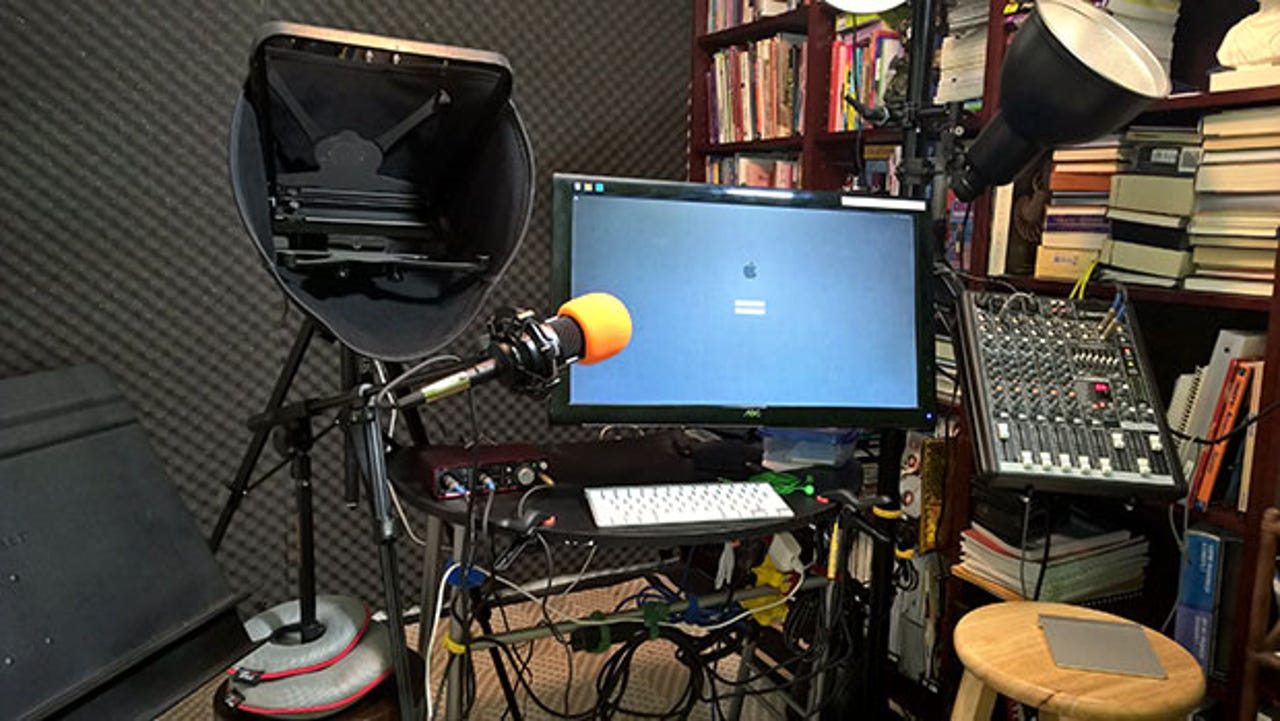
Audio-Technica AT2035 Large Diaphragm Studio Condenser Microphone
It's important to understand that there are many different mics and they all have different purposes. My wife, who sings, has a Shure mic that's ideal for a singer's voice. I don't sing. I just do spoken word. The mic needs to record from just one direction, without any effects. In this context, the studio condenser mic was the way to go.
This one is $149, which was pretty much in the sweet spot of pro quality with relatively low price and outstanding reviews. Also note that I have the mic on a shock mount, so every bump in the room isn't transmitted into the recording.
By the way, you might notice the orange windscreen cover. This type of condenser mic doesn't need a windscreen. However, I found that the mic stuck out into the room and was black, which meant I bumped into it all the time.
The orange cover was a way to make sure I didn't knock into it all the time. You can pick up a set of five different colored covers for about two bucks. It was a good safety investment.
Microphone boom and weights
It's very important to be able to get the mic to the right place near where I'm going to speak. I toyed with hanging it, but the mic then got in the way of the camera. In a small room, some studio tools just don't work. I eventually decided on the $44 Hercules MS120B LO-PRO SHT-Boom H-B Microphone S boom, which was small enough to fit under the camera (if I stuck it up on a small stool).
In the picture above, I blurred out everything around the boom, because I also have a black tripod holding up the teleprompter and camera, and it's hard to see where the mic boom is in comparison to the camera. Note the weights at the bottom of the boom. They are from a local sporting goods store. They're ideal for holding down booms, far better than the sandbags most pros use.
Mackie PROFX8 8-Channel Mixer
I shopped around a long time before I found this mixer. I wanted a mixer with old-school features as well as modern sound-shaping effects and both analog and digital inputs and outputs. This one fit the bill perfectly. It was surprising how hard it was to find the right combination of ins and outs without spending an arm and a leg.
Although I usually only use two channels, I have used additional channels to pipe in special effects (scary Halloween sounds during a Halloween webcast and other bits of audio). It's about $170 or so if you shop around.
Focusrite Scarlett 2i2 2 In/2 Out USB Recording Audio Interface
If you use a mixer, why do you need an interface? Heck, what is an interface? Think of it this way: a mixer mixes sound. An audio interface is a souped-up sound card in a box. Although you can't really see it in the image above, the 2i2 has XLR microphone inputs and a USB output. But the XLR inputs have holes in the middle that also allow standard audio cables as well, making it a versatile, yet small machine. This is how I use the $149 red box.
This is a key component for pulling all the audio elements together and presenting them to the Mac applications as a single audio stream, so the Mac doesn't have to figure out how to route different sounds from different applications. This has become more and more difficult inside the computer because of how OS X has done sandboxing since Mountain Lion. By externalizing all the sound routing, the Mac mini doesn't have to worry its pretty little head about it.
Headphones and earbuds
Depending on what kind of event I'm doing, I'll either use the headphones or earbuds as monitors. They are both pretty inexpensive. The headphones were cans I had sitting around and they are of reasonable quality. The earbuds are green M&M earbuds and I bought them for a very specific purpose: green screen.
When I'm doing audio-only, particularly the webcasts, I use the cans. That's because I can hear the other participants very clearly and I don't really care what they look like on my head.
However, I wanted to have some way of having a monitor so I could hear other participants when I was in a video call, and I didn't want the ear piece to be visible. There are professional ear devices that can do this for hundreds of bucks, but they don't vanish in the green screen chromakey. On the other hand, the Maxell M&M'S Lightweight EarBuds - Green were under ten bucks and perfectly matched the key color on the wall behind me when I'm on camera. Win!
Next: hooking it all up...
By the way, I'm doing more updates on Twitter and Facebook than ever before. Be sure to follow me on Twitter at @DavidGewirtz and on Facebook at Facebook.com/DavidGewirtz.
Hooking it all up
Let's start with a diagram of where everything goes.
Starting with the smiling face in the middle, the Audio-Technica mic goes into the Main XLR port of the Mackie mixer. Also going into the mixer is the Mac's USB sound output (select USB as main sound output on Mac). That gets us both the local sound (me on the mic) and the sounds from any guests online and makes all of that controllable on the mixer. This is very valuable because if I have to boost or reduce a guest's voice or adjust tone, I can do it right on the mixer and it automatically will go back into the main mix.
Featured
Moving down the right side of the diagram, the full mix plus any effects and equalizer adjustments are sent in two directions at once: to the 2i2 interface and to a USB thru switch on the Mackie. This is an important part of the puzzle. The USB thru switch allows me to send my voice and any additional non-guest sounds back to either Skype or Google Hangouts without the guests hearing an echo of their own voices. That isolated output goes into a USB port on the Mac mini.
Also coming out of the mixer is the pure mix, which goes into the 2i2 interface. This is the combined, final-quality mix I want to record. The 2i2 USB output becomes input for Boinx TV (select 2i2 driver as sound input). The 2i2 Monitor output also drives either the green M&M earbuds or the full headphone cans so I can hear both the full mix and guest, allowing me to have a nice dialog without any sound delay.
Final tally
Although this setup provides a substantially improved audio experience, it wasn't that expensive. Not counting the roughly $650 my noisy neighbors cost me in soundproofing, the studio's audio components set me back a little over $500. Given that I use this professionally on a weekly basis, that's not a bad investment for a major improvement to overall production quality.
Let me know what you're doing in your studios and with audio quality in Hangouts. This stuff is fascinating.
By the way, I'm doing more updates on Twitter and Facebook than ever before. Be sure to follow me on Twitter at @DavidGewirtz and on Facebook at Facebook.com/DavidGewirtz.