Windows 10 tip: Use Nearby Sharing to transfer files, photos, and more

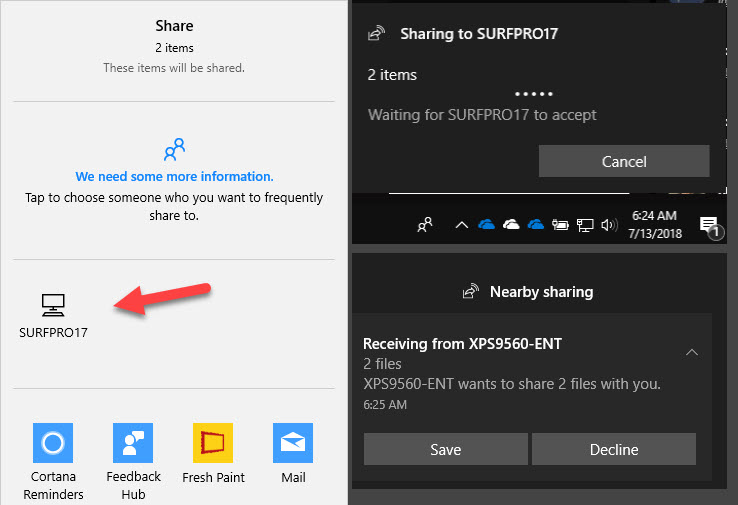
When you use the Share option with a file or photo, PCs that are available for sharing appear in the center of the Share pane.
Unless you've dug deeply into the Windows 10 April 2018 Update, you've probably missed one of its most useful new features.
You could call Nearby Sharing a Windows 10 take on Apple's AirDrop. Windows 10 version 1803 adds a new target to the Share pane, allowing you to share files, photos, web links and more to a computer that's available via Bluetooth or a Wi-Fi network. Both computers must support Bluetooth 4.0 Low Energy (LE).
To set up Nearby Sharing, go to Settings > System > Shared Experiences and slide the Nearby Sharing switch to the On position. Then choose whether you want to be able to share and receive content from any nearby device or only from devices where you're signed in to the same account.
By default, shared files are saved in your user profile, in the Downloads folder. You can change that location from the Shared Experiences Settings page.
If you use the Edge web browser, you can share a link to any web page. Maybe someday Chrome and Firefox will incorporate the Windows 10 Sharing APIs so they can do the same.
You can also share a photo by opening it in the Windows 10 Photos app and then clicking Share.
But the most common scenario of all is to move files between two Windows 10 PCs (version 1803 or later) using nothing more than File Explorer.
Open a File Explorer window, select the file (or files) you want to transfer, right-click, and then click Share. That opens the Share panel (shown above), where the center pane includes an icon for any nearby PC that's available for sharing.
Click that icon, and then wait for the recipient to approve the transfer. In both cases, you'll see a notification in the lower right corner of the display. (If you don't see the invitation to receive a file, click the Notifications button and look for that invitation in the Notifications pane.)
If you don't recognize a file transfer request, you can decline (and then revisit the settings for this feature to limit sharing).
PREVIOUS AND RELATED CONTENT
Windows 10 tip: Squeeze hours of extra life from your laptop battery
By default, Windows 10 shifts to Battery Saver mode automatically when your battery capacity dips below a preset level. But why wait? Turn this feature on manually to get the most out of your system when you're away from a power outlet.
Windows 10 tip: Hunt down battery-draining apps
Buried deep in the Settings app on a Windows 10 laptop or tablet is a list of which apps and desktop programs have been burning through your battery lately. You'll also find special Battery Saver settings that can extend your remaining battery life dramatically.
Windows 10 tip: Check the performance of your laptop battery
A powerful but obscure command-line tool lets you see at a glance how your portable PC's battery is performing and how much battery life you can expect from each charge.
Windows 10 tip: How to enable Hyper-V and create virtual machines
Windows 10 tip: Repair your Windows 10 installation
Performing a clean install or a reset means you have to reinstall apps and desktop programs and start over with settings and preferences. If you suspect Windows has become damaged, there's a less drastic solution: Run Setup to repair Windows. Here's how.