How to perform a clean install of Windows 10: Here's a step-by-step checklist

Before you start
To minimize the chance that you'll run into problems, I recommend gathering the following bits of essential information before you run Windows Setup.
-- Credentials for network access (SSID name and Wi-Fi password)
-- Usernames and passwords for email accounts and online services
- Installer files (or download links) and product keys for third-party software
-- The latest custom hardware drivers for your PC
-- A backup of your data files, stored locally or in the cloud
Now is also a good time to check for and install any available BIOS/firmware upgrades. In my experience, this can prevent a large number of compatibility-related glitches in the Windows setup process.
Step 1: Choose your installation method
A clean install is the ultimate troubleshooting technique, virtually guaranteed to eliminate performance or compatibility problems caused by third-party software, temporary files, configuration errors, and garden-variety malware. Done right, the result is a PC that starts from a known good state, with either the default Windows 10 configuration or a previously tested configuration that includes specific third-party software and drivers.
There are four ways to do a clean install (not counting the option of buying a brand-new PC), as I explain in How to do a clean install of Windows 10: Which option is best for you?
In this post, I assume you've chosen the option to install a completely fresh copy Windows 10 by booting from a USB flash drive or resetting Windows without keeping any programs or settings. But many of the steps work with other methods as well.
If you're unsure about any details of the installation process, check out my FAQ: Windows 10 updates: How to install, reinstall, upgrade, and activate,
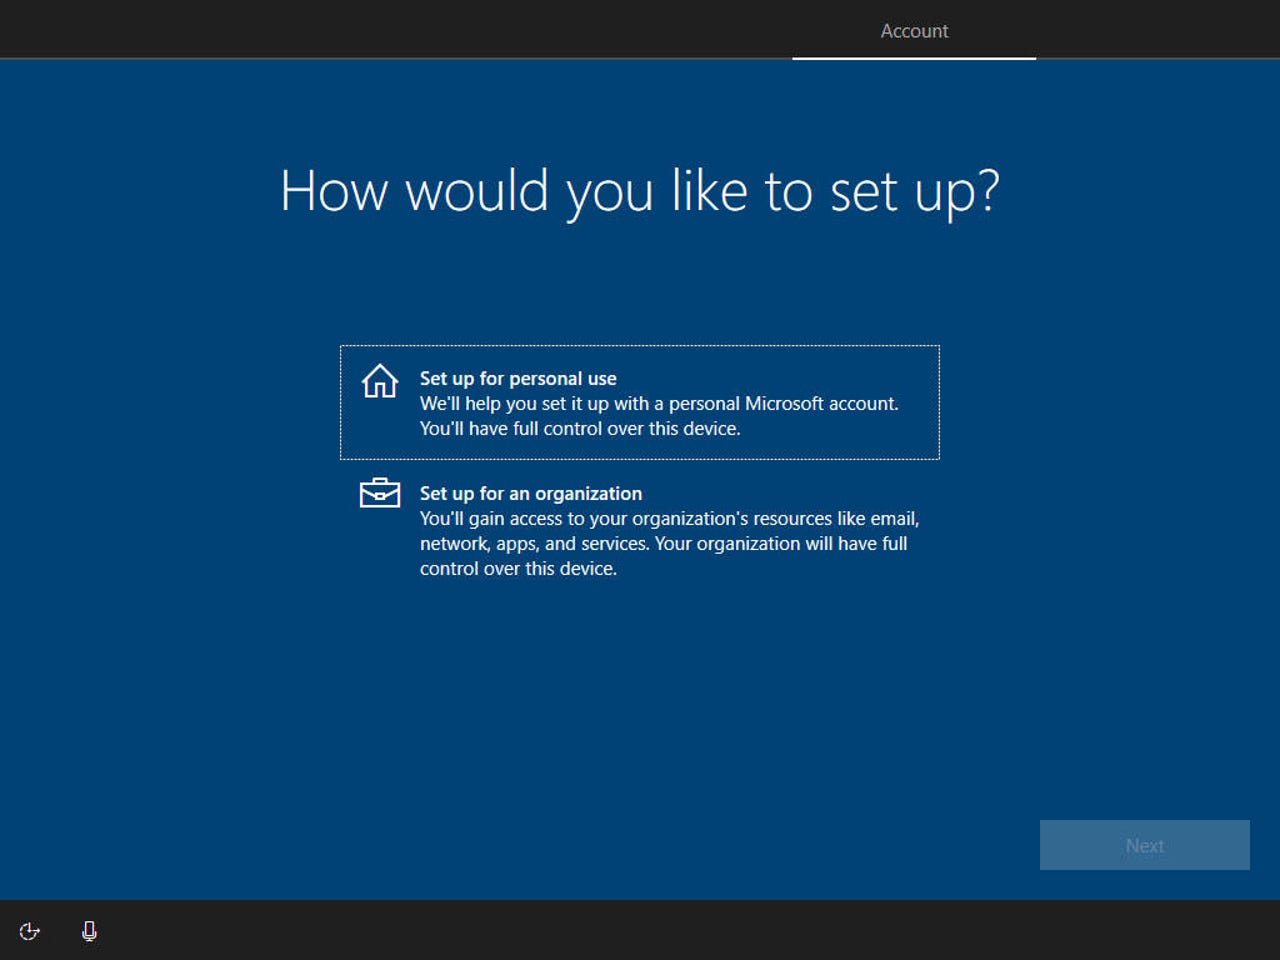
Step 2: Choose the right account type
If you're setting up a PC for use in a home or small office, Microsoft will push you aggressively to sign in for the first time using a Microsoft account. If you'd prefer not to authenticate using Microsoft's servers, you can also set up a local account and connect to cloud-based services one at a time.
Businesses, especially larger ones with an existing Windows domain, also have the option to set up a traditional Active Directory account or sign in using an Azure Active Directory account associated with an Office 365 Business or Enterprise subscription.
For an overview of the different account type, see Windows 10 setup: Which user account type should you choose?
There's no right or wrong answer to that question. My recommendation, though, is that you set up using a Microsoft account at first. Doing so allows your product activation status to be associated with that account, a feature you can use to recover if you encounter activation problems in the future. After you confirm that activation is successful, you can switch to a different account type.
Step 3: Adjust privacy options and other settings
During the short life of Windows 10, Microsoft has taken its lumps for aggressively collecting diagnostic data (aka telemetry) that it uses as part of the Windows development and distribution process.
Microsoft uses telemetry data from Windows 10 to identify security and reliability issues, to analyze and fix software problems, to help improve the quality of Windows and related services, and to make design decisions for future releases. (To read more about what data Microsoft collects and how it's used, see Windows 10 telemetry secrets: Where, when, and why Microsoft collects your data.)
You can't turn off diagnostic tracking completely, but you can minimize the amount of data collected. To do so, go to Settings > Privacy > Diagnostics & Feedback and change the selection from the default Full to Basic.
While you're on that page, you can also adjust other privacy settings, including how and when Windows uses your location and your typed or spoken input. For detailed recommendations, see my Windows 10 privacy guide: How to take control.
Step 4: Check network and security settings
Without a working connection to the Internet, you won't be able to do much of anything. In fact, most of the remaining steps on this checklist require an Internet connection.
For most PCs sold in the past decade, the built-in Windows 10 network drivers work just fine. The quickest way to check network status is to go to Settings > Network & Internet > Status. If you see a display that says you're connected to the Internet, you're good to go.
I keep a USB-based Ethernet adapter (Amazon has a huge selection, including some solid performers in the $10-20 range) handy for those rare occasions when I have trouble getting a solid Wi-Fi connection, but you shouldn't need it under normal circumstances.
For small networks, click Change Connection Properties from the Status page and change the network profile to Private, which makes your PC discoverable for sharing purposes.
Step 5: Check edition and activation status
If you're performing a clean install on a PC that was previously activated with Windows 10, Microsoft's activation servers should recognize the hardware "fingerprint" and activate the new installation automatically. (For details, see "Microsoft quietly rewrites its activation rules for Windows 10.")
To check the activation status of a Windows 10 PC, open Settings > Update & Security > Activation. That display shows the current edition (Home or Pro) and the activation status.
What happens if that display shows the wrong edition? That can occur on a PC that you originally purchased with a preinstalled OEM copy of Windows 10 Home and then upgraded to Windows 10 Pro. In that case, both activations are on Microsoft's servers, and you can restore the correct one by entering the default Pro product key to force the upgrade. Full instructions are here: How to upgrade from Windows 10 Home to Pro for free. (See the "Clean reinstall, with edition upgrade" section at the end of the post.)
Step 6: Enable BitLocker encryption for your system drive
The basic rule of data security is pretty simple: Encrypt every drive that contains personal data. Without encryption, anyone who steals that device can mount the drive using an operating system of their choosing and siphon the data away with ease. With encryption, getting to your data requires an encryption key that is effectively uncrackable.
On a Windows 10 PC, full-strength BitLocker encryption requires a Trusted Platform Module (TPM) chip and a business edition of Windows (Pro or Enterprise). On modern portable PCs running Windows 10 Home, you can enable device encryption if you're signed in with a Microsoft account.
To turn on BitLocker encryption, open File Explorer, click This PC, right-click the icon for your system drive (usually drive C), and then click Turn on BitLocker. If your system doesn't meet the specifications, you'll get an error message. If everything's clear, you can follow the wizard's prompts to save your recovery key (do not skip this step!) and begin the encryption process.
If you have additional data drives, fixed or removable, you can enable BitLocker encryption for them as well, but only on devices running Windows 10 Pro or Enterprise. For more detailed instructions, see my Windows 10 Expert's Guide: Everything you need to know about BitLocker.
Step 7: Configure Windows Update and get the latest updates
After you complete a Windows 10 clean install, the first thing you should do is go to Settings > Update & Security > Windows Update and click Check For Updates. Install any available updates, including updated hardware drivers. (If a servicing stack update is available, you might need to restart and then check for updates again.)
While those updates are downloading, you can tweak a few other Windows Update options.
Start by clicking Change Active Hours, and adjust the range during which Windows won't unexpectedly restart your system to install updates. If you routinely work late-night sessions, make sure the end time is after your normal quitting time.
Next. click Advanced Options and adjust settings there to match your preferences. If you have Windows 10 Pro or Enterprise installed, you can defer the regular monthly quality updates by up to 30 days from their normal delivery date, and you can postpone feature updates by up to a year. For advice on how to configure these settings for work PCs, see Windows 10 update: The complete guide for businesses of every size.
Step 8: Change your PC’s name
The Windows 10 Setup program automatically assigns a random name to your PC, such as DESKTOP-4U27S15. If you use any network sharing features with your PC, it's worth changing this name to make the PC easier to identify in a listing.
You'll find the computer name on the System > About page in Settings, under the Device Specifications heading. There, you'll also find a Rename This PC button, which opens a dialog box showing the current name and offering a box where you can enter the new name.
Your new computer name can be up to 15 characters long and must not be the same as another PC on the network. You can use letters, numbers, and the hyphen character, but you can't use any other symbols, punctuation, spaces, or special characters such as emoji. You also can't create a computer name using all numbers.
After you enter the new name, you need to restart the PC to make the change effective. Until you do so, Windows will continue to use the old name until you restart and will list both the old and new names on the About page in Settings.
Step 9: Set your preferred browser and install extensions
Windows 10 includes a new default browser, Microsoft Edge. As of mid-2019, Microsoft's developers are in the process of rebuilding Edge from the open-source Chromium codebase. Until that work is complete, most people will use Microsoft's built-in browser to download their preferred alternative, typically Chrome or Firefox.
Even if you're eager to try out the new Edge (which is currently available in a beta version), it's a good idea to have a backup browser. Take this opportunity to download your favorite, and then sign in to sync bookmarks, tabs, and extensions.
To set the new browser as default, go to Settings > Apps > Default Apps. Scroll to the bottom of the page and click Set Defaults By App. Choose your preferred browser and then click Set This Program As Default.
This is also a good time to set up extensions, including a password manager, which I consider a critical addition to Windows. For more on the whys and hows of this crucial software category, see Forgot password? Five reasons why you need a password manager.
Step 10: Install Office 365 and add email accounts
I consider Microsoft Office to be an essential add-on to Windows 10. Even if you're blasé about the desktop apps, an Office 365 subscription is worth it for the upgraded OneDrive cloud storage alone. The least expensive subscription, Office 365 Personal, costs less than $70 a year. For a household, the $100-a-year Office 365 Home package allows you to share the desktop apps and provide 1 TB of OneDrive storage with up to five family members. (If your business has an Office 365 subscription, it offers an expanded selection of apps, plus OneDrive for Business storage.)
You don't need to hunt down installation media or product keys. Just sign in at Office.com and choose the Install Office option.
If you use a standalone email client, you need to add account information to it. After installing Office 365, you have access to Microsoft Outlook, and running Outlook for the first time prompts you to enter your email accounts.
I also recommend adding your email accounts to the built-in Mail and Calendar client in Windows 10, even if you plan to always use a browser for a web-based account such as Gmail. Add your Gmail account and set the option to sync just your calendar and contacts.
With those settings, you can see your calendar in agenda format any time by clicking the date in the taskbar. (For more on how this works, check out my Windows 10 tip: "See all your calendars at a glance in agenda view.")
Step 11: Set up OneDrive and other cloud services
In Windows 10, OneDrive is integrated into File Explorer, with its own node in the navigation pane. You get 5 GB of cloud storage with a free Microsoft account and 1 TB with an Office 365 account. Thanks to the Files On-Demand feature, you can browse, edit, and manage all of your OneDrive files as if they were stored locally
To set up OneDrive, click its File Explorer icon and sign in using either your personal Microsoft account of the work account associated with your Office 365 Business or Enterprise account.
You might need to install a OneDrive sync client update to enable the Files On-Demand feature. When that update's installed, you can configure which files and folders you want to keep synced to your local PC and which should stay in the cloud until they're needed.
A relatively new OneDrive feature makes it possible to back up your Desktop, Documents, and Pictures to your personal OneDrive account. To configure this feature, open OneDrive Settings, click the Backup tab, and then click Manage Backups. Click to select or clear any folder (if you want to sync only the Documents folder, for example) and then click Start Protection. Your existing files are moved to the new location, merged with any files that are already there, and then synced on the local device.
If you prefer Dropbox, Box, or Google Drive, download the sync client for that service, sign in with your account, and begin syncing. If you have no plans to use OneDrive, you can remove it from File Explorer and shut down its prompts by following the instructions in this Windows 10 tip: " Shut down OneDrive completely."
Step 12: Set up printers, input devices, and other hardware
Windows 10 does a respectable job of finding and installing generic drivers for just about every component in a modern PC. Still, it's worth checking to see if your system has any obscure devices that require custom drivers to unlock their full set of features.
First things first, though. Before installing a new driver or making any other system changes, make sure System Restore is enabled. Press Windows key+R to open the Run box, enter the command SystemPropertiesProtection, and press Enter. If the entry to the right of your system drive says On, you're set. If it says Off, click Configure and then click Turn On System Protection.
It's worth checking the manufacturer's page for the PC you're upgrading to see if there are any custom drivers or utilities that need to be installed. The same holds true for peripherals. For a Microsoft keyboard or mouse, for example, you might need to install the Microsoft Mouse and Keyboard Center software shown here
For most directly connected printers, all you need to do is plug the printer into a USB port, open Settings > Devices > Printers & Scanners, and confirm that the printer is listed. Click the printer name, click Manage, and then click Print A Test Page.
If you have an all-in-one printer or scanner that requires special control software, this is a good time to download the latest version and confirm that all the hardware is working properly.
Step 13: Clear away the crapware
When you install Windows 10 Pro on a new PC and sign in with a local account or a Microsoft account, you get more than you bargained for. Specifically, you get some unexpected (and probably unwanted) third-party apps splattered onto your Start menu, including Candy Crush Soda Saga, Bubble Witch 3 Saga, and March of Empires. They don't take up much room, but they're worth clearing away if you're not going to use them.
The easiest way to avoid this crapware is to sign in with an Active Directory domain or Azure AD account. If that's not an option, open Start and right-click the tile for any app you want to remove. The menu option varies depending on whether the app is actually installed or is just a shortcut.
See also: Avoid Windows 10 crapware: How to get rid of Candy Crush and all the rest
You can also remove some (but not all) of the Microsoft apps preinstalled with Windows 10. For a full list, see: Windows 10 apps: Which are worth keeping? Which ones should you dump?
Step 14: Configure backup options and create an image backup
After going through all the work of crafting a clean install, it would be a shame to have to do it all over again after a data disaster such as a system drive failure. The much less painful alternative is to restore that drive from an image-based backup. You'll need an external hard disk—at least as large as the amount of space in use on the system drive and ideally the same size as your system drive.
The capability to back up and restore a system image is in the Windows 7 Backup and Restore program, which is included with Windows 10, albeit well hidden.
To start the program, go to System > Settings > Backup and click Go To Backup And Restore (Windows 7). (As an alternative, you can run the command Sdclt.exe from any command prompt or the Run box.) Click Create A System Image from the column on the left, choose your external hard disk as the location where you want to save the backup, and then click Next. On the following page, all partitions on the system drive should be selected. Click Next and then click Start Backup.
For detailed instructions on how to use this old but still useful utility, see my Windows 10 tip: Create a full image backup using this hidden tool.
After that task is done, consider using File History for ongoing backups. File History saves copies of data files at regular intervals (every hour, by default) giving you the option to roll back to an earlier version of an individual file or restore all data from a system after you reinstall Windows.
For details on how to set up File History, see my Windows 10 tip Turn on File History for automatic backups.
Step 15: Restore your data files
If you connected to a cloud storage service earlier, your data files are already syncing to your new installation. If those files are backed up to local storage instead, now's the time to restore them to their rightful place.
For backups you saved on an external drive using File History, go to Settings > Update & Security > Backup. Under the Back Up Using File History heading, click More Options, and then scroll to the bottom of the page and click Restore Files From A Current Backup, as shown here. The most current backup should be selected already, but you can use the left arrow to choose a backup from an earlier date.
Click the big green button to begin restoring all files to their original locations, or right-click that button and then click Restore To if you'd prefer to restore everything to an alternate destination.
Step 16: Reinstall your other apps
The final step is to install any other apps that you use regularly, whether they're from the Windows Store or available as downloads. I have a handful of essential apps and utilities I use on every new PC; For the sake of convenience, I keep the installer files for those programs in OneDrive, along with a text file containing product keys and any other important details. (You can do the same with any cloud-based storage service.)
Open that folder, download and run the installers, and you're done.