'ZDNET Recommends': What exactly does it mean?
ZDNET's recommendations are based on many hours of testing, research, and comparison shopping. We gather data from the best available sources, including vendor and retailer listings as well as other relevant and independent reviews sites. And we pore over customer reviews to find out what matters to real people who already own and use the products and services we’re assessing.
When you click through from our site to a retailer and buy a product or service, we may earn affiliate commissions. This helps support our work, but does not affect what we cover or how, and it does not affect the price you pay. Neither ZDNET nor the author are compensated for these independent reviews. Indeed, we follow strict guidelines that ensure our editorial content is never influenced by advertisers.
ZDNET's editorial team writes on behalf of you, our reader. Our goal is to deliver the most accurate information and the most knowledgeable advice possible in order to help you make smarter buying decisions on tech gear and a wide array of products and services. Our editors thoroughly review and fact-check every article to ensure that our content meets the highest standards. If we have made an error or published misleading information, we will correct or clarify the article. If you see inaccuracies in our content, please report the mistake via this form.
Luminar AI, hands on: Quick and easy AI-powered photo editing

Modern photographic software uses a lot of machine-learning tools. Adobe's Lightroom, for example, offers various options for analysing images and then getting the best out of them. It's an attractive approach, simplifying what could be a complex set of steps, tweaking every setting to get an image that's just right.
Skylum's Luminar AI is a newer alternative to the usual suspects, offering a powerful set of editing tools with a mix of manual and AI features, as well as AI-curated templates that can quickly apply selected transforms to a picture. It's not only a standalone (macOS and Windows) tool: Luminar AI can also be installed as a plug-in to both Photoshop and Lightroom, giving you the best of both worlds.
I've been exploring the latest build of Luminar AI, using it with a mix of older photographs and more recent images.
Like most photographic tools, Luminar AI uses a lightbox metaphor, helping you view catalogued image folders as a set of filmstrips.
Getting started
Installation is easy enough, with a fairly hefty download. The app has a clean, open look to it, with a dark background that allows you to focus on your images. I'd recommend using it full-screen on as large a display as possible to get the most from your pictures. Once installed, the app offers a relatively simple workflow that guides you through four steps: working with a catalog, applying templates, using the edit tools, and exporting your processed images. It will work with most image formats, including raw images.
Building a catalog is a matter of locating image folders and then scanning for pictures. Images are displayed in a thumbnail grid. When you select an image, you're presented with a set of curated templates in the editing pane. Luminar AI's image analysis tools select appropriate groups of templates for an image, from which you can chose one to apply. Templates wrap a set of editing actions, designed to give a specific set of effects. Once you've applied a template you can export the edited image, or delve into Luminar AI's editing tools to make your own changes. You can also skip applying templates and go straight to the editor.
Templates bundle up a series of image-editing actions, and are selected automatically by image analysis.
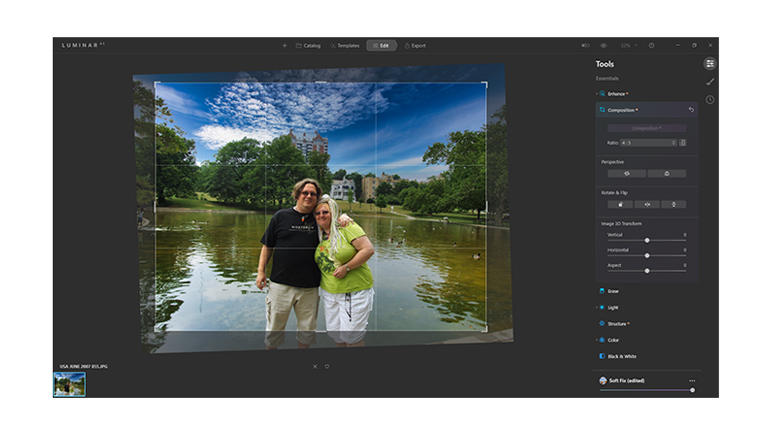
The edit tools mix AI and conventional editing. Here I've swapped out a stormy grey sky for blue (automatically adding reflections in the water) and adjusted the picture's composition.
Editing photographs
The SkyAI tools let you quickly swap out a sky for one from a library of different sets of clouds and sunlight.
If you've used any other photo-processing application, you'll find the edit tools familiar. They're accessed from a tool pane on the right of the screen, grouped into sections. Essentials are your standard editing tools, while Creative groups tools that can be used to enhance landscapes and other photos. A separate section offers Portrait tools for enhancing and tidying up faces and bodies, while the Professional tools offer fine adjustments along with camera-specific edits to adjust for any lens distortions or sensor issues.
One of the more interesting features in the Creative group is SkyAI. This uses image recognition to automatically mask out objects and apply one of a library of different sky backgrounds. It's surprisingly effective, taking out existing sky backgrounds and dropping in something much more attractive. In one case I started with a picture of a helicopter against a flat grey sky, applied new lighting effects to the helicopter and then used SkyAI to put it against a vivid sunset.
Top ZDNET Reviews
The result was much better than anything I've been able to achieve with Photoshop, and I didn't have to spend ages applying masks or layers. Instead, all I had to do was chose an option, click a button, and wait a minute or so for the program to finish. Unfortunately, SkyAI doesn't adjust for perspective, so the cloudscape behind the helicopter seemed a little off. It was improved by using a higher-altitude set of clouds, but you do need to be careful what sky source you choose.
As an experiment I loaded up a 2007 photograph of Mary and myself taken by a friend in a park in Cincinnati, as a thunderstorm approached. How I edited it is a good example of how to use Luminar AI to improve a poor photograph.
The lighting was poor, and the friend who was holding the camera wasn't used to it, so the picture wasn't particularly well-framed. I first applied a template to clean up the image, before using the AI-powered face tools to improve lighting. Then I used the Sky feature to swap out the dark grey storm clouds, replacing them with a blue sky and some fluffy clouds. We were standing by a small lake, so it was pleasant to see those same cloud reflected in the lake without affecting the ripples -- or the ducks. Finally, I used the Composition tool to reframe the picture and change the angle of the horizon.
Both tests worked well and resulted in pleasing pictures, taking casual photographs and making significant improvements. If you're using the SkyAI tool, you're best working with a conventional snapshot or a landscape, as it works best with a standard perspective.
Templates and workflow integration
The bunded templates are a useful set of starters, as they wrap up several transforms in a single action. I took one set of wildlife-focused templates and applied them to a recent zoom photograph of a feral parrot. Using the template and some of the AI-based Structure tools I was able to produce a more detailed image that that showed the fine detail of the bird's feathers as well as reflections in its eye. Considering that the picture was taken using a zoom lens at 15 metres or so, this was a significant improvement.
Zoom into a processed image and you can see the structure and detail that Luminar AI adds to a picture: shown here are the feathers and eye reflections in a parakeet on the far side of a garden.
I also tried out Luminar AI's integration with Adobe's Lightroom. You can install it as a plugin for both Lightroom and Photoshop, and can jump straight from an edit session in one to Luminar AI, working with a copy of your image, taking advantage of its tools, before opening the edited version for additional edits in the original application. This isn't like working with an integrated plugin: rather, it's making two tools part of an image editing workflow.
I was surprised to find that Luminar didn't pick up the Nvidia GPU on either of my test machines. Instead, it defaulted to using the integrated Intel graphics. It's a pity that it didn't detect the more capable hardware, instead using a lot of CPU and memory to process images. Testing on another workstation with an Nvidia Quadro showed that it was hardly using the GPU at all. That wasn't too painful on machines that had either a Core i7 or a Xeon-E CPU with 32GB of RAM, but it's something you'll need to think about when looking for a photo-editing machine. The Luminar team has said it will be moving to use more processing to GPU, which would make sense for AI-based image processing. We'll look forward to seeing the results.
Microsoft's upcoming support for OpenCL to Direct Compute mappings may speed this process up, as it will remove the need for GPU-specific drivers. It's a change that should allow companies like Skylum to use one set of common APIs for Windows and macOS versions.
SEE: Cheat sheet: Windows 10 PowerToys (free PDF) (TechRepublic)
One thing to note: Luminar AI does not play well with OneDrive cloud files-on-demand. Installing it on a machine that already had a pointer to my photo import folders set up on another machine with the same Microsoft account caused it to crash every time it was started, until I made sure the Luminar AI catalogue files were downloaded on the second machine. In the end, though, it was easier to create a new catalogue for the new machine once I was able to start the program.
Overall, I'm impressed with Luminar AI. It's a useful addition my image editing suite, with plenty of quick edit options that would take a lot of effort in another tool. The library of templates simplifies getting started, and its machine learning-powered features are surprisingly powerful. It'll be interesting to see how Skylum evolves Luminar AI in future releases, but for now it's well worth a look. Beginners will find it a quick and powerful alternative to the simple editing tools bundled with most computers, while more experienced users will be able to improve older images and start the editing journey for their latest pictures.
A Luminar AI licence for two computers costs £79, while Luminar X membership, which delivers a monthly bundle of creative assets, courses, templates and sky textures, costs £45 a year.
RECENT AND RELATED CONTENT
Google Photos is getting these new video and photo editing features
PictoScanner, hands on: Simple and affordable smartphone-based film scanning
Adobe previews content attribution tool in Photoshop to fight deep fakes
CorelDRAW Graphics Suite 2020 review: Faster, with more AI and added collaboration
Adobe: Photoshop is a lot faster on Macs with Apple silicon
Read more reviews
- The best cheap phones in 2021: Flagship features on any budget
- The best laptops for graphic design in 2021: Top creator notebooks
- OnePlus 9 Pro, Xiaomi Redmi Note 10 Pro, HP ZBook Create G7, and more: ZDNet's reviews roundup
- Ambassador Translator review: Over-ear comfort and accurate translation
- Oukitel WP10 rugged phone review: Huge screen, durable with a long battery life